> ## Documentation Index
> Fetch the complete documentation index at: https://docs.famulor.io/llms.txt
> Use this file to discover all available pages before exploring further.
# Connect Shopify
> Connect your Shopify store to Automations with your own Dev Dashboard app — no App Store review, no sign-in window
Shopify has no shared sign-in app for third-party platforms: an app that many stores install must first pass Shopify's App Store review. Famulor therefore connects **your** store through **your own** Shopify app. You create it in the Shopify Dev Dashboard in a few minutes, install it on your store, and paste its Client ID and secret into Famulor. Famulor exchanges them for an Admin API token and refreshes it automatically.
What you get: every Shopify **trigger and action** in the [App Catalog](/automations/app-catalog) — orders, products, customers, inventory, fulfillments, discounts and more — plus the Shopify tools your assistants can call from a conversation via an automation.
This is different from the **Shopify (Storefront MCP)** connection, which only reads the public catalog, carts and policies of a store and needs no app. Use this guide when an automation should read or change store data through the Admin API.
## Before you start
* You are the **owner or a staff member with app-development permission** of the Shopify store.
* Your Famulor workspace has the Automation platform on its plan and **Beta Features** enabled (Settings → Workspace → Beta Features).
* Keep the store's permanent name at hand — the `acme` in `acme.myshopify.com` (Shopify admin → Settings → Domains). Your custom domain will not work.
The whole setup takes about ten minutes. Client ID and secret stay at the app connector; Famulor never stores them in your workspace.
## Step 1 — Open the Dev Dashboard
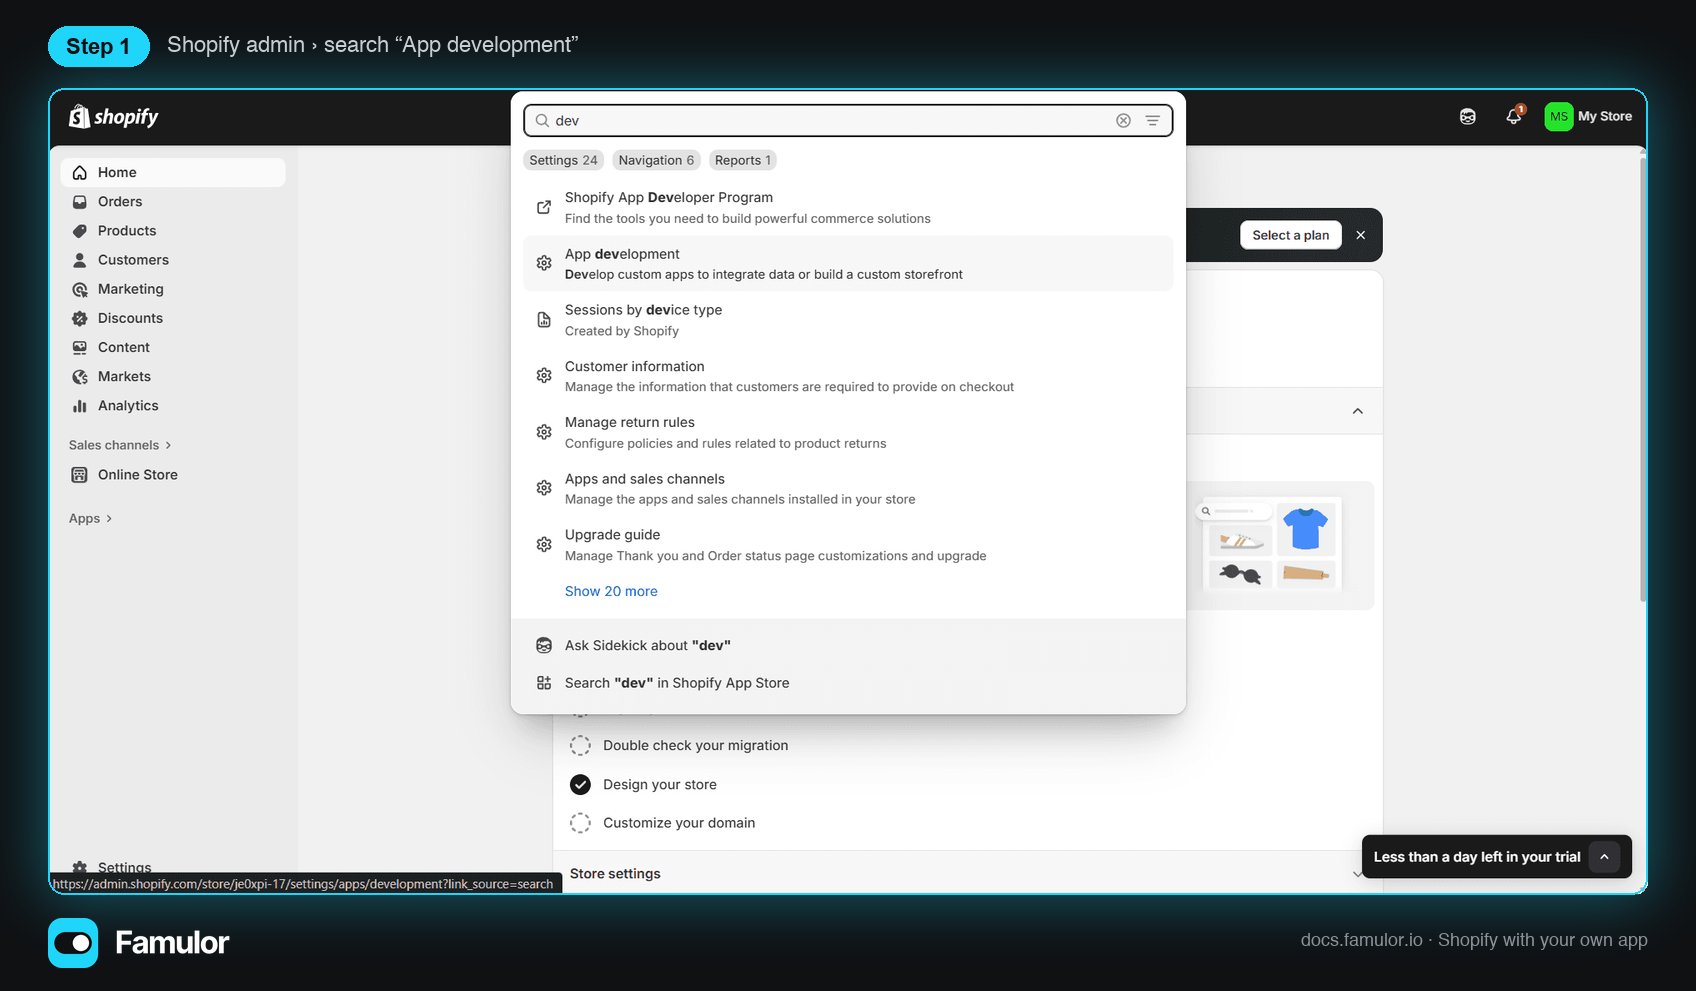
In your Shopify admin, type **App development** into the search bar and open the settings entry, or go to **Settings → Apps and sales channels → Develop apps**.
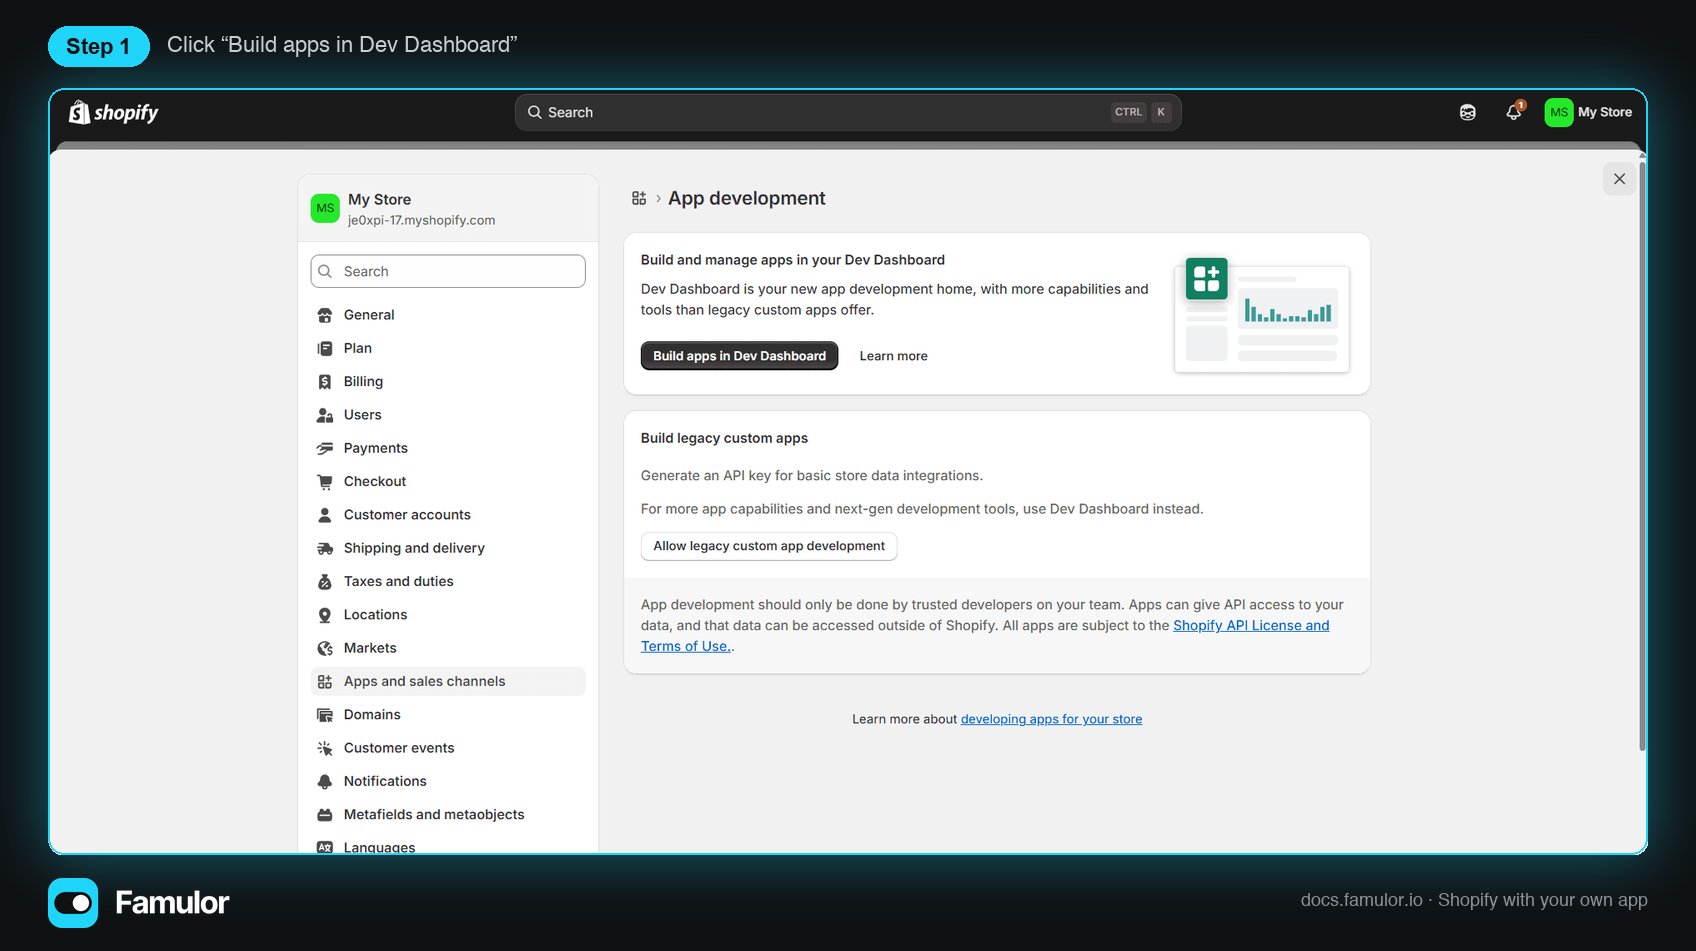
 Click **Build apps in Dev Dashboard**. Ignore the legacy custom-app option — Shopify is retiring it, and Famulor's connection uses the new app model.
 ## Step 2 — Create the app
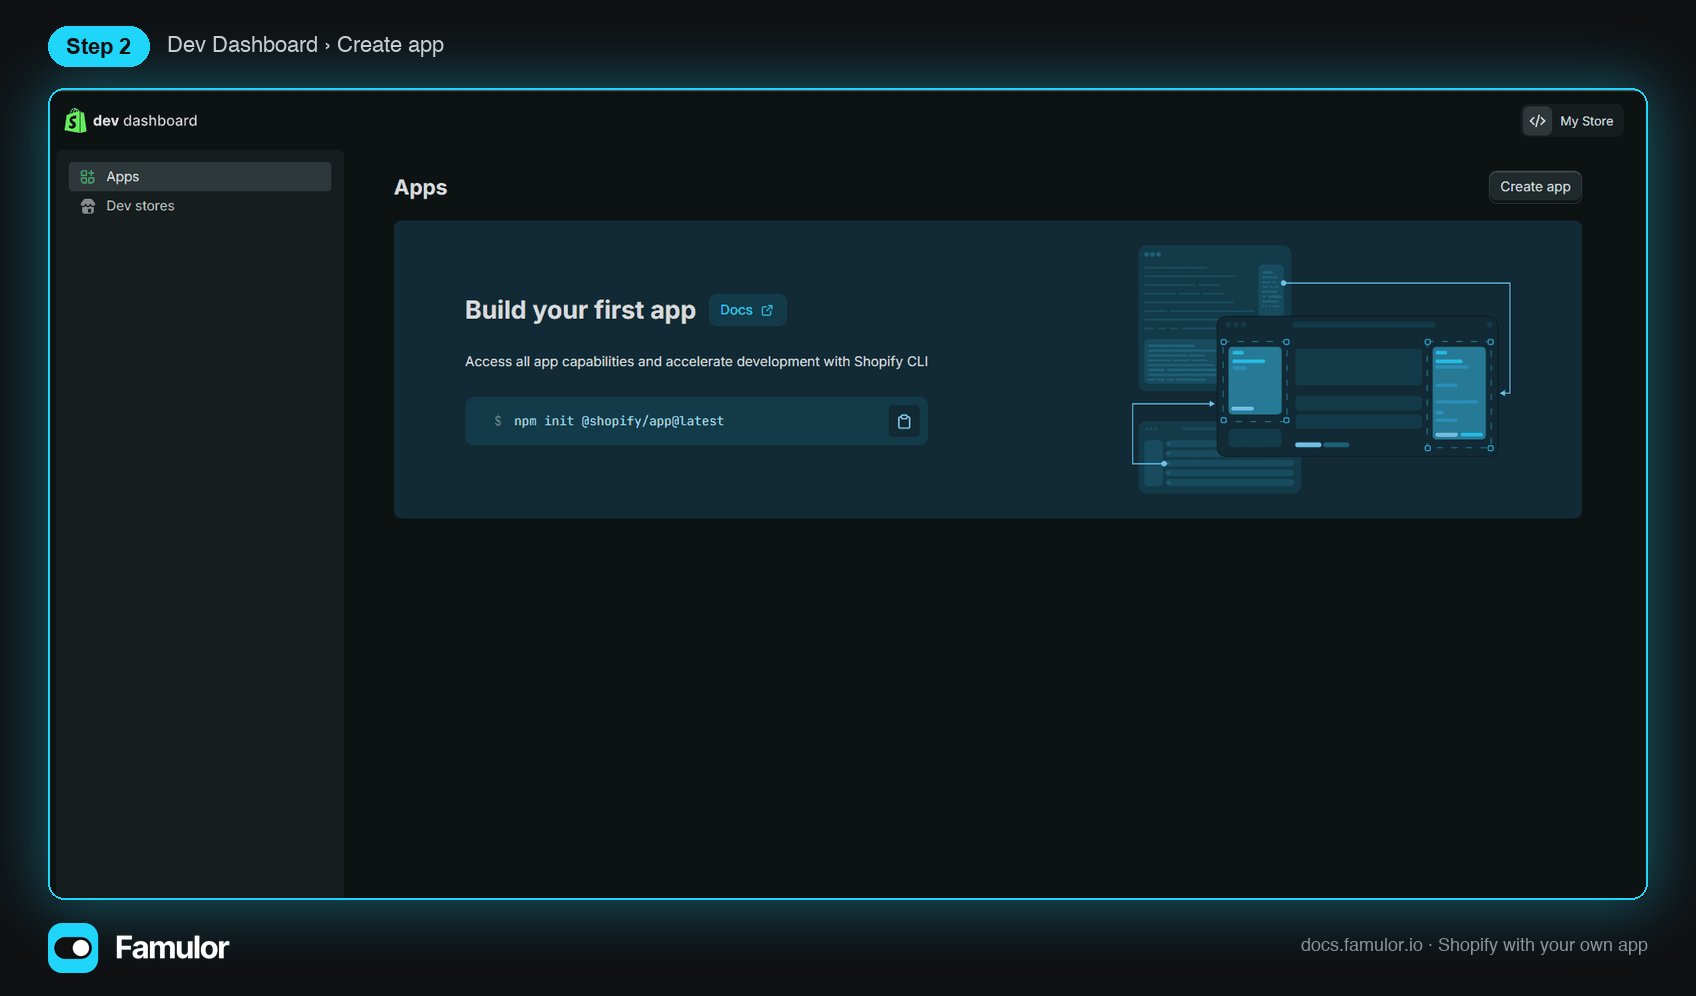
In the Dev Dashboard click **Create app** (top right).
## Step 2 — Create the app
In the Dev Dashboard click **Create app** (top right).
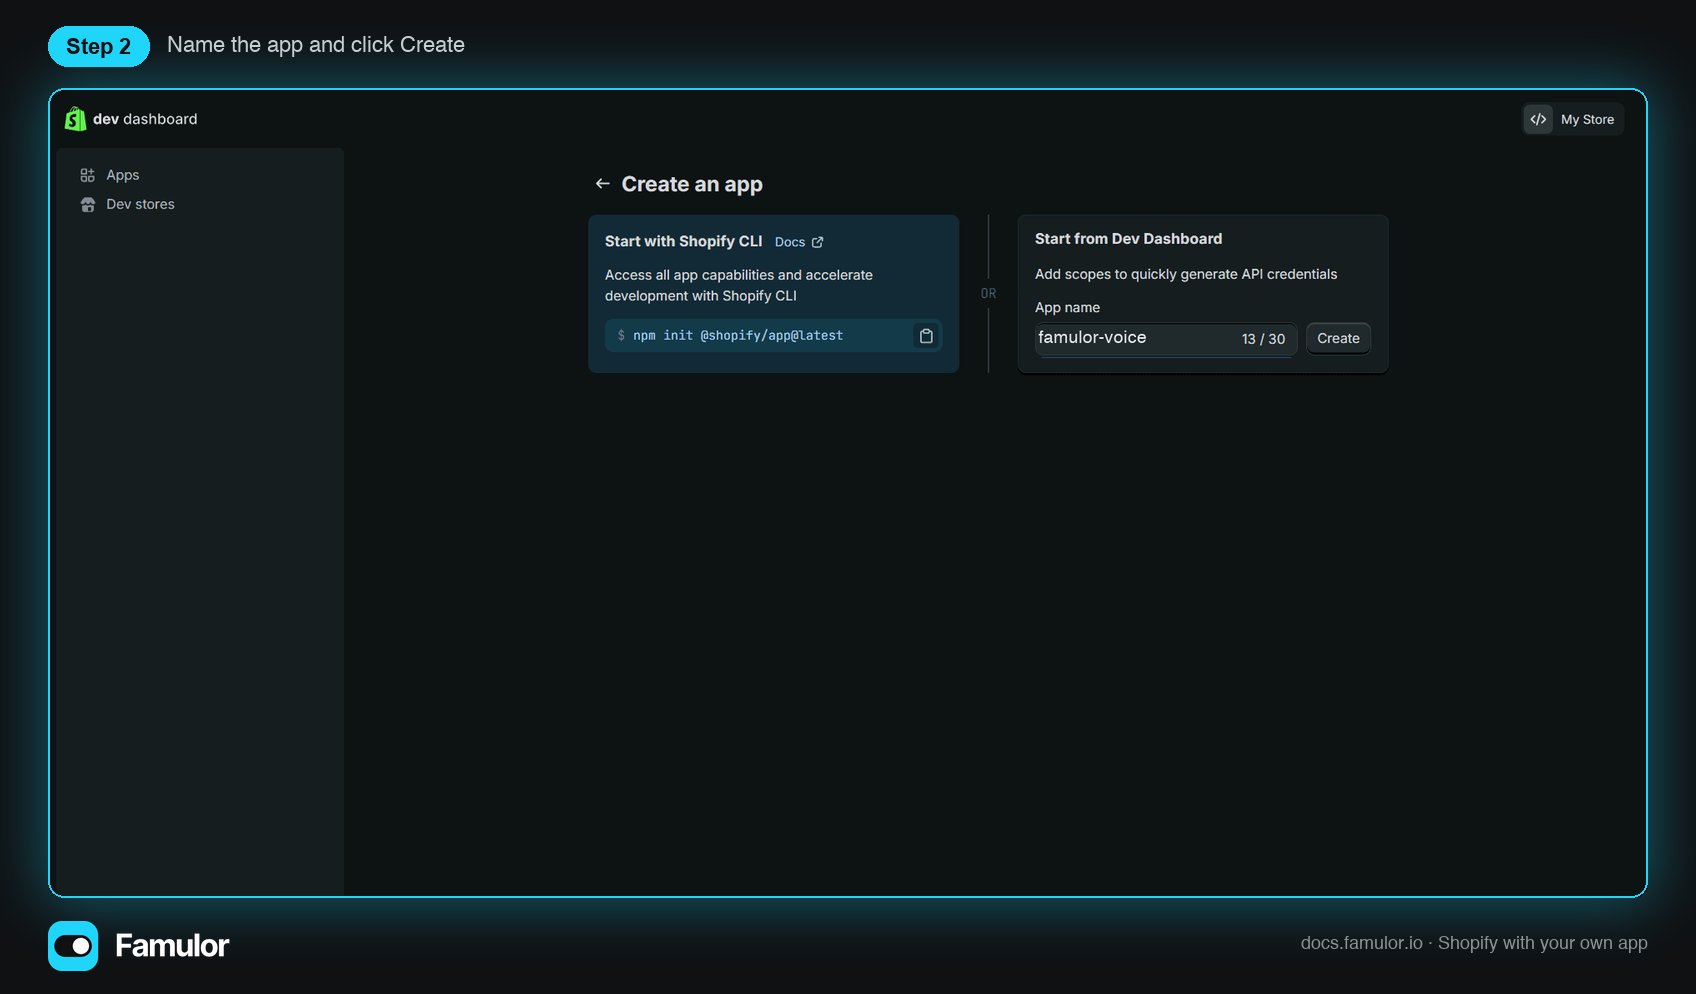
 Choose **Start from Dev Dashboard**, give the app a name you will recognize later (for example `famulor-voice`) and click **Create**. You do not need Shopify CLI.
 ## Step 3 — Configure a version with the scopes Famulor needs
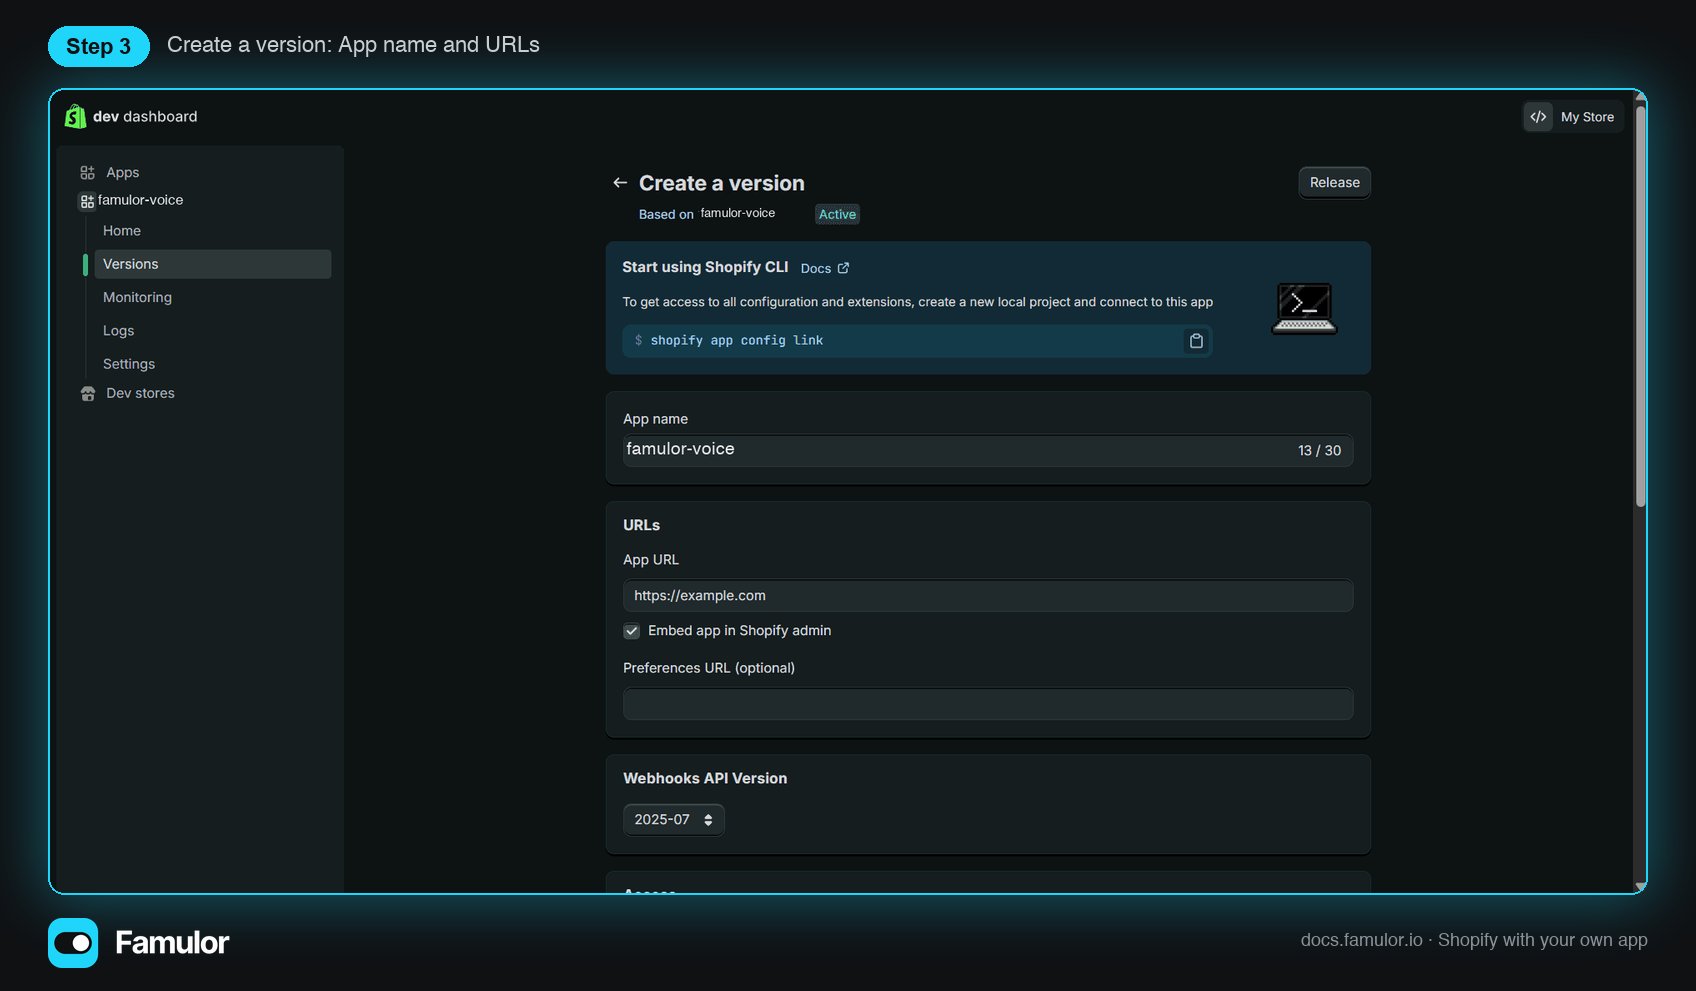
Open **Versions** and click **Create a version**. Keep **App URL** at a placeholder such as `https://example.com` — Famulor does not host an embedded app — and leave the redirect URLs empty. This connection type does not use them.
## Step 3 — Configure a version with the scopes Famulor needs
Open **Versions** and click **Create a version**. Keep **App URL** at a placeholder such as `https://example.com` — Famulor does not host an embedded app — and leave the redirect URLs empty. This connection type does not use them.
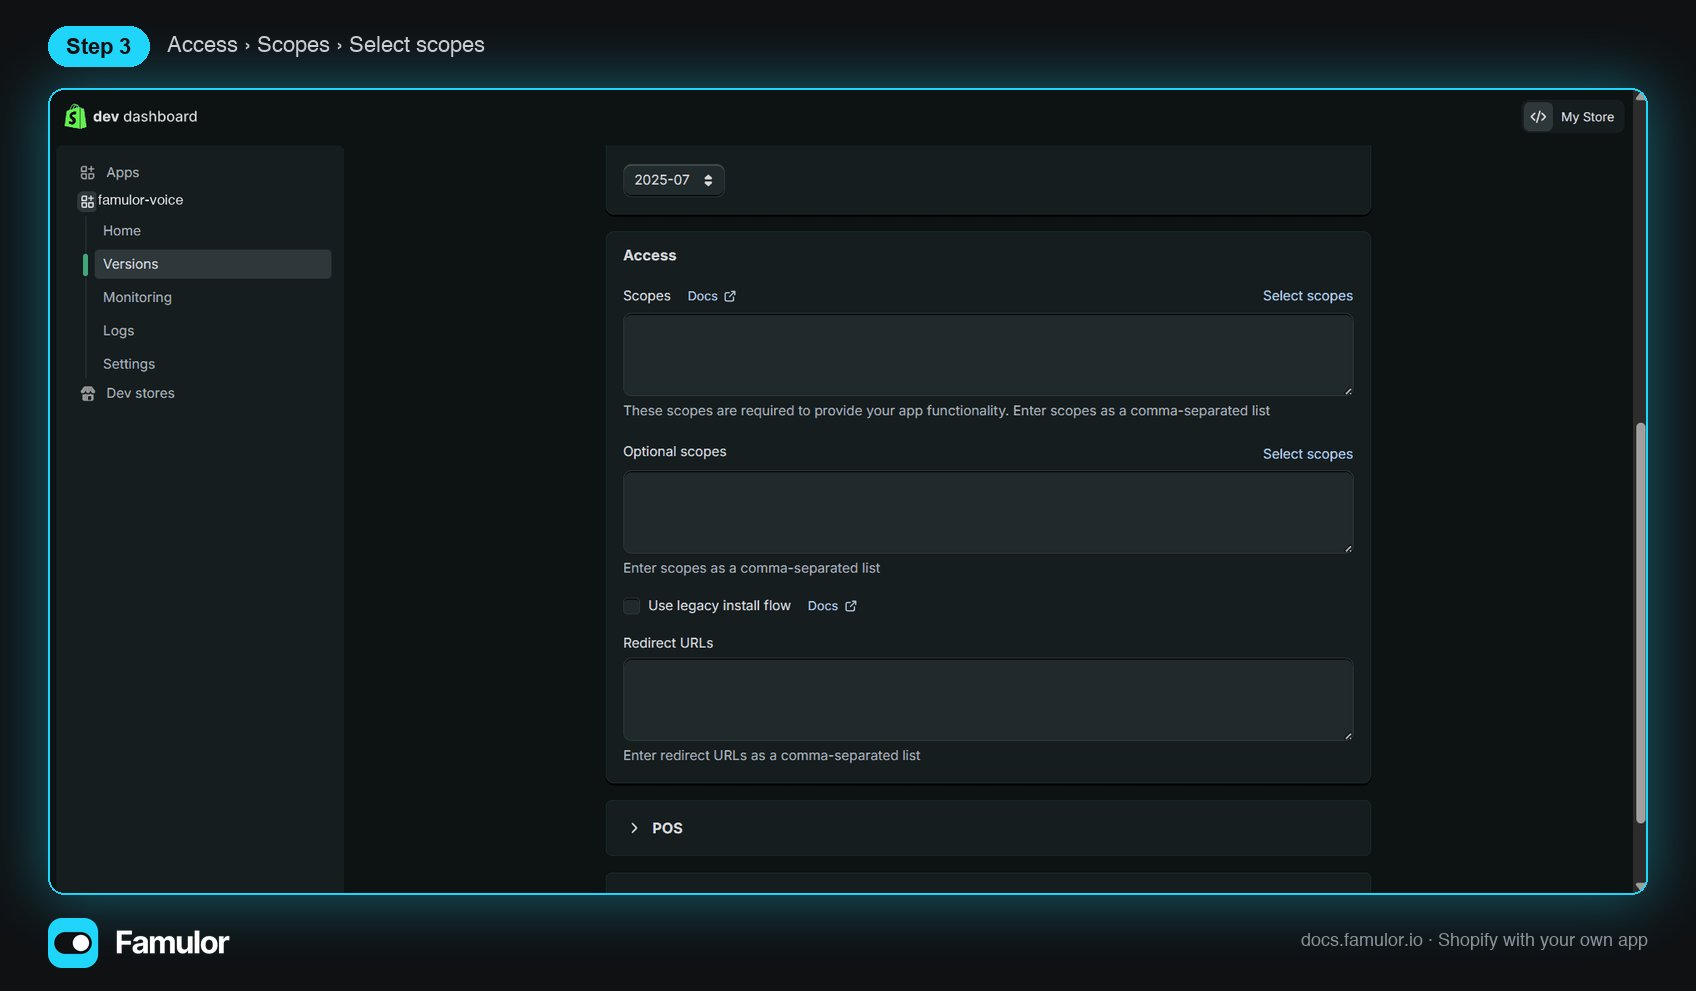
 Scroll to **Access → Scopes** and click **Select scopes**.
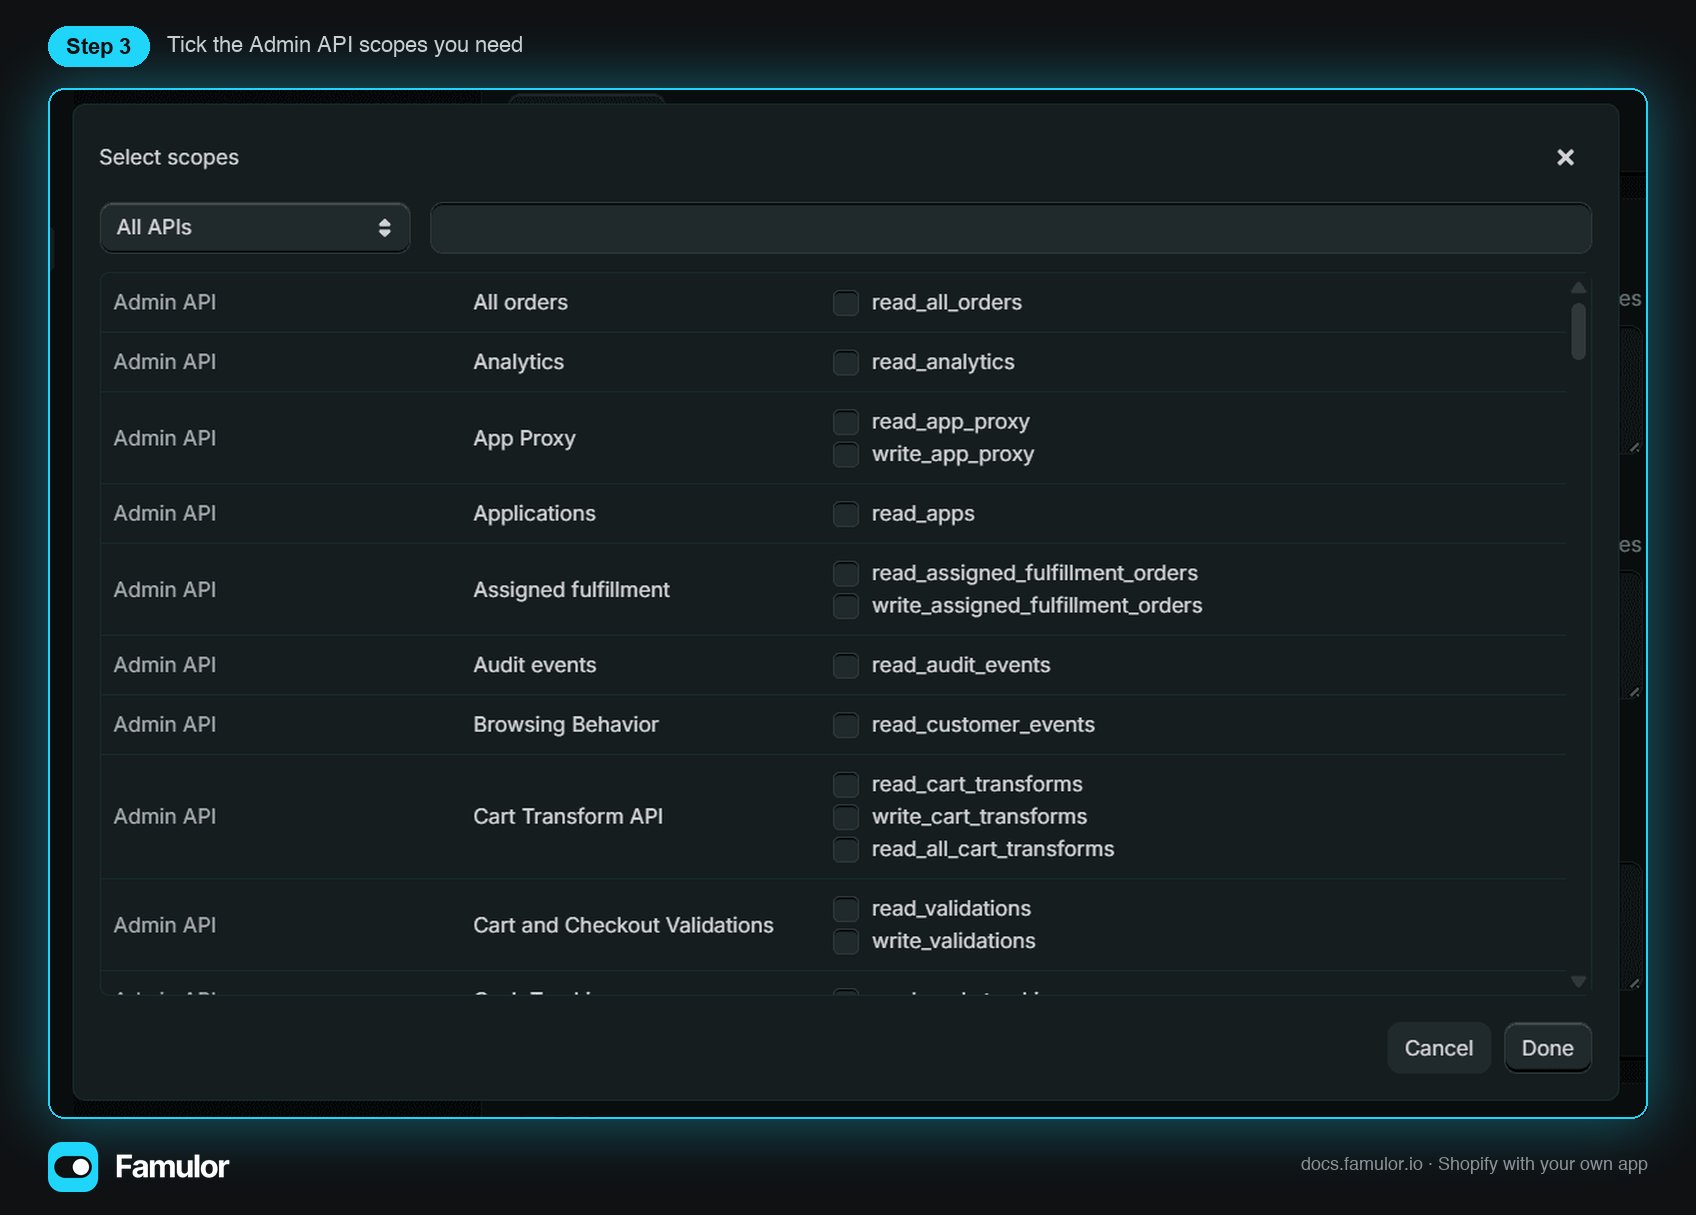
 Tick the Admin API scopes for the data your automations should touch. A safe default set:
| Area | Scopes |
| -------------------- | ----------------------------------------------------------------------------------------------------------------------- |
| Orders | `read_orders`, `write_orders` (add `read_all_orders` if you need orders older than 60 days) |
| Products & inventory | `read_products`, `write_products`, `read_inventory`, `write_inventory` |
| Customers | `read_customers`, `write_customers` |
| Fulfillment | `read_fulfillments`, `write_fulfillments`, `read_assigned_fulfillment_orders`, `write_assigned_fulfillment_orders` |
| Discounts & drafts | `read_discounts`, `write_discounts`, `read_draft_orders`, `write_draft_orders`, `read_price_rules`, `write_price_rules` |
| Store setup | `read_locations`, `read_shipping`, `write_shipping`, `read_content`, `write_content` |
Only `read_*` scopes for the areas you use is fine too. If an automation later fails with a permission error, add the scope here, release a new version and reconnect in Famulor.
Tick the Admin API scopes for the data your automations should touch. A safe default set:
| Area | Scopes |
| -------------------- | ----------------------------------------------------------------------------------------------------------------------- |
| Orders | `read_orders`, `write_orders` (add `read_all_orders` if you need orders older than 60 days) |
| Products & inventory | `read_products`, `write_products`, `read_inventory`, `write_inventory` |
| Customers | `read_customers`, `write_customers` |
| Fulfillment | `read_fulfillments`, `write_fulfillments`, `read_assigned_fulfillment_orders`, `write_assigned_fulfillment_orders` |
| Discounts & drafts | `read_discounts`, `write_discounts`, `read_draft_orders`, `write_draft_orders`, `read_price_rules`, `write_price_rules` |
| Store setup | `read_locations`, `read_shipping`, `write_shipping`, `read_content`, `write_content` |
Only `read_*` scopes for the areas you use is fine too. If an automation later fails with a permission error, add the scope here, release a new version and reconnect in Famulor.
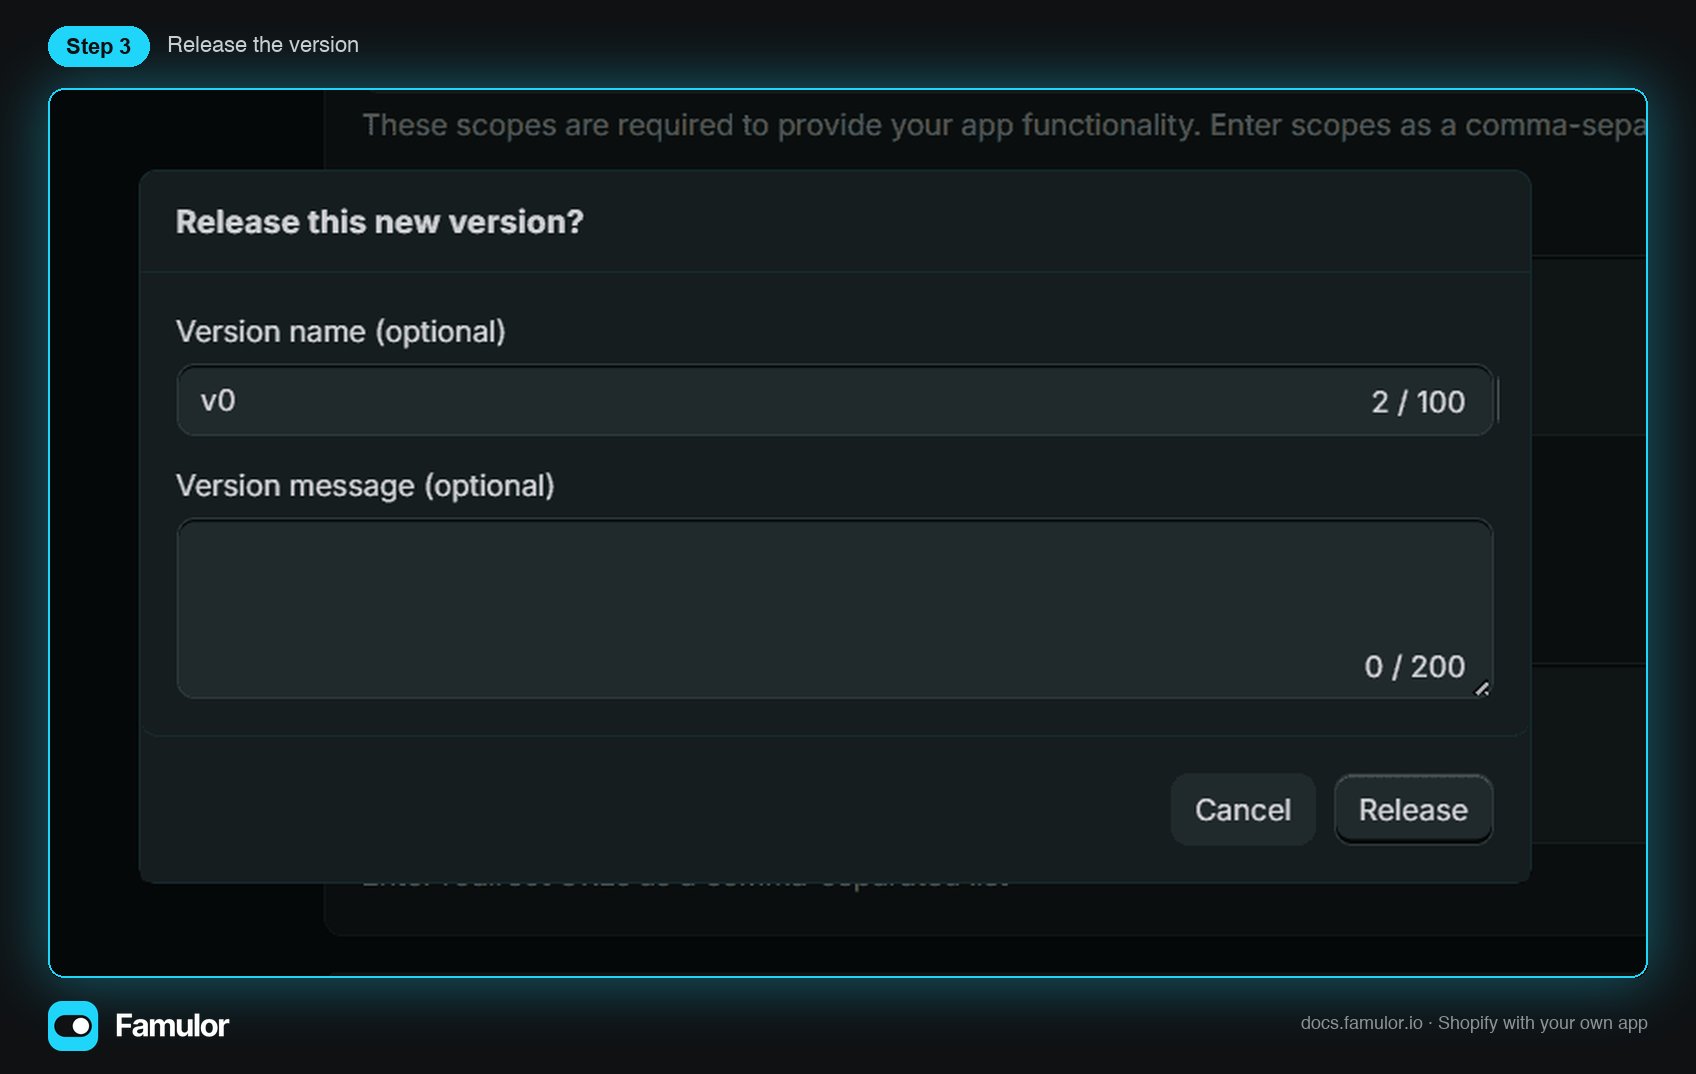
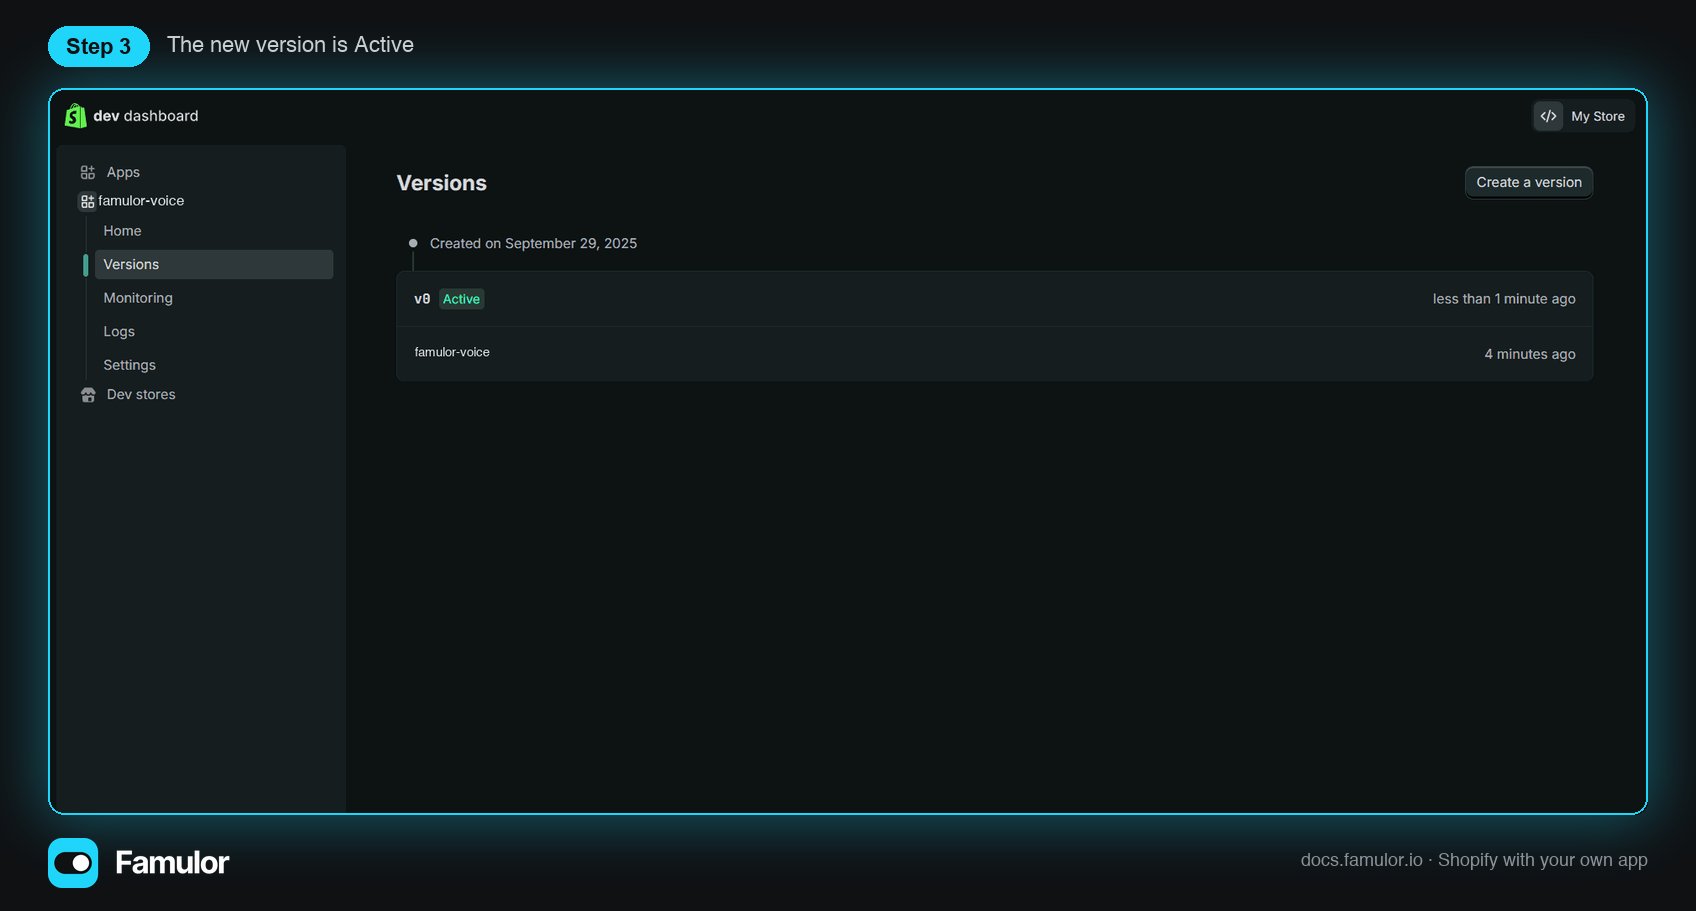
 Click **Release** at the bottom. In the dialog you can name the version (for example `v1`) — then confirm **Release**.
 The new version is now marked **Active**.
 ## Step 4 — Set distribution and install the app on your store
Famulor exchanges the app's credentials for an Admin API token with Shopify's client-credentials grant. Shopify only allows that once the app is **installed on the store**, and both app and store must belong to the same Shopify organization — which is the case when you create the app from your own store.
1. In the app's left menu open **Distribution** (on some accounts it is under **Home → Distribution**).
2. Choose **Custom distribution** and confirm. Custom distribution is the right choice for an app that only your own store(s) use; it needs no App Store review.
3. Enter your store's `.myshopify.com` domain, click **Generate link** and open the install link.
4. In your Shopify admin, review the requested scopes and click **Install**.
Distribution can be set only once per app. Pick **Custom** — a public app would require Shopify's App Store review before any store could install it.
## Step 5 — Copy the Client ID and secret
In the app's **Settings** you find **Credentials**. Copy the **Client ID** and reveal and copy the **Secret**.
## Step 4 — Set distribution and install the app on your store
Famulor exchanges the app's credentials for an Admin API token with Shopify's client-credentials grant. Shopify only allows that once the app is **installed on the store**, and both app and store must belong to the same Shopify organization — which is the case when you create the app from your own store.
1. In the app's left menu open **Distribution** (on some accounts it is under **Home → Distribution**).
2. Choose **Custom distribution** and confirm. Custom distribution is the right choice for an app that only your own store(s) use; it needs no App Store review.
3. Enter your store's `.myshopify.com` domain, click **Generate link** and open the install link.
4. In your Shopify admin, review the requested scopes and click **Install**.
Distribution can be set only once per app. Pick **Custom** — a public app would require Shopify's App Store review before any store could install it.
## Step 5 — Copy the Client ID and secret
In the app's **Settings** you find **Credentials**. Copy the **Client ID** and reveal and copy the **Secret**.
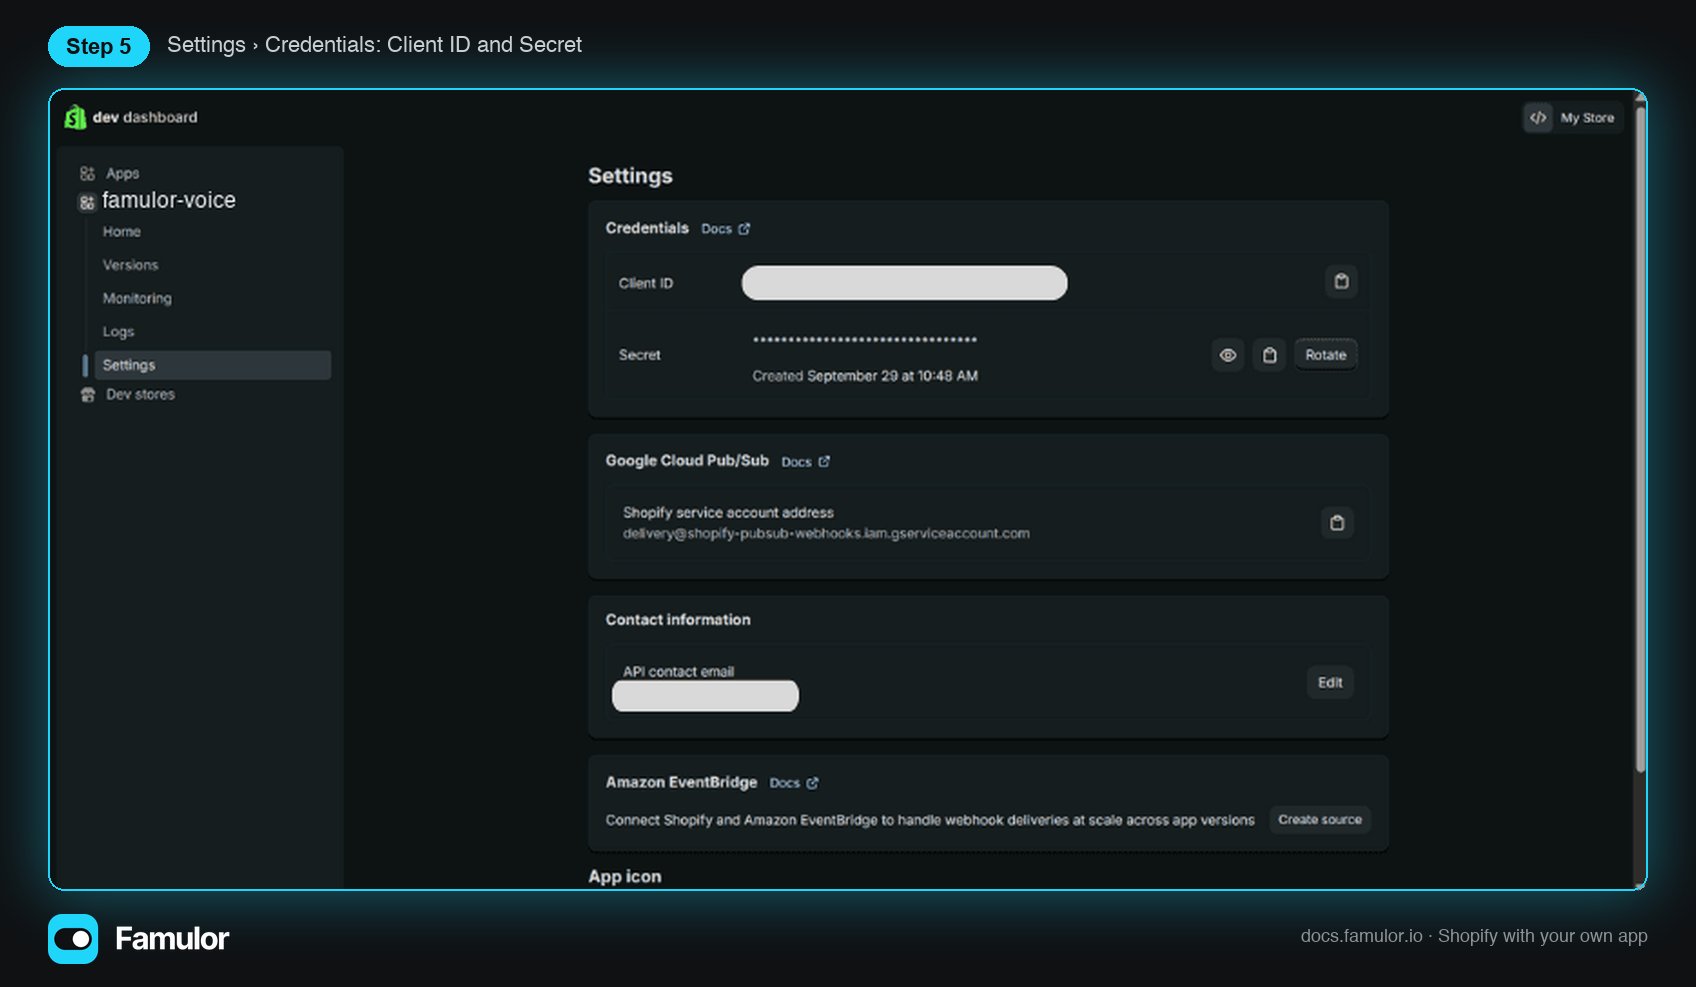 Treat the secret like a password. If you ever rotate it in Shopify, reconnect in Famulor with the new value.
## Step 6 — Connect in Famulor
1. In Famulor open **Automations → Connections** and click **Add connection**.
2. Choose **Browse apps (Beta)**, search for **Shopify** and select it.
3. Enter the **store name** (`acme` or `acme.myshopify.com` — Famulor trims it), the **Client ID** and the **Client secret**.
4. Click **Connect Shopify**.
Treat the secret like a password. If you ever rotate it in Shopify, reconnect in Famulor with the new value.
## Step 6 — Connect in Famulor
1. In Famulor open **Automations → Connections** and click **Add connection**.
2. Choose **Browse apps (Beta)**, search for **Shopify** and select it.
3. Enter the **store name** (`acme` or `acme.myshopify.com` — Famulor trims it), the **Client ID** and the **Client secret**.
4. Click **Connect Shopify**.
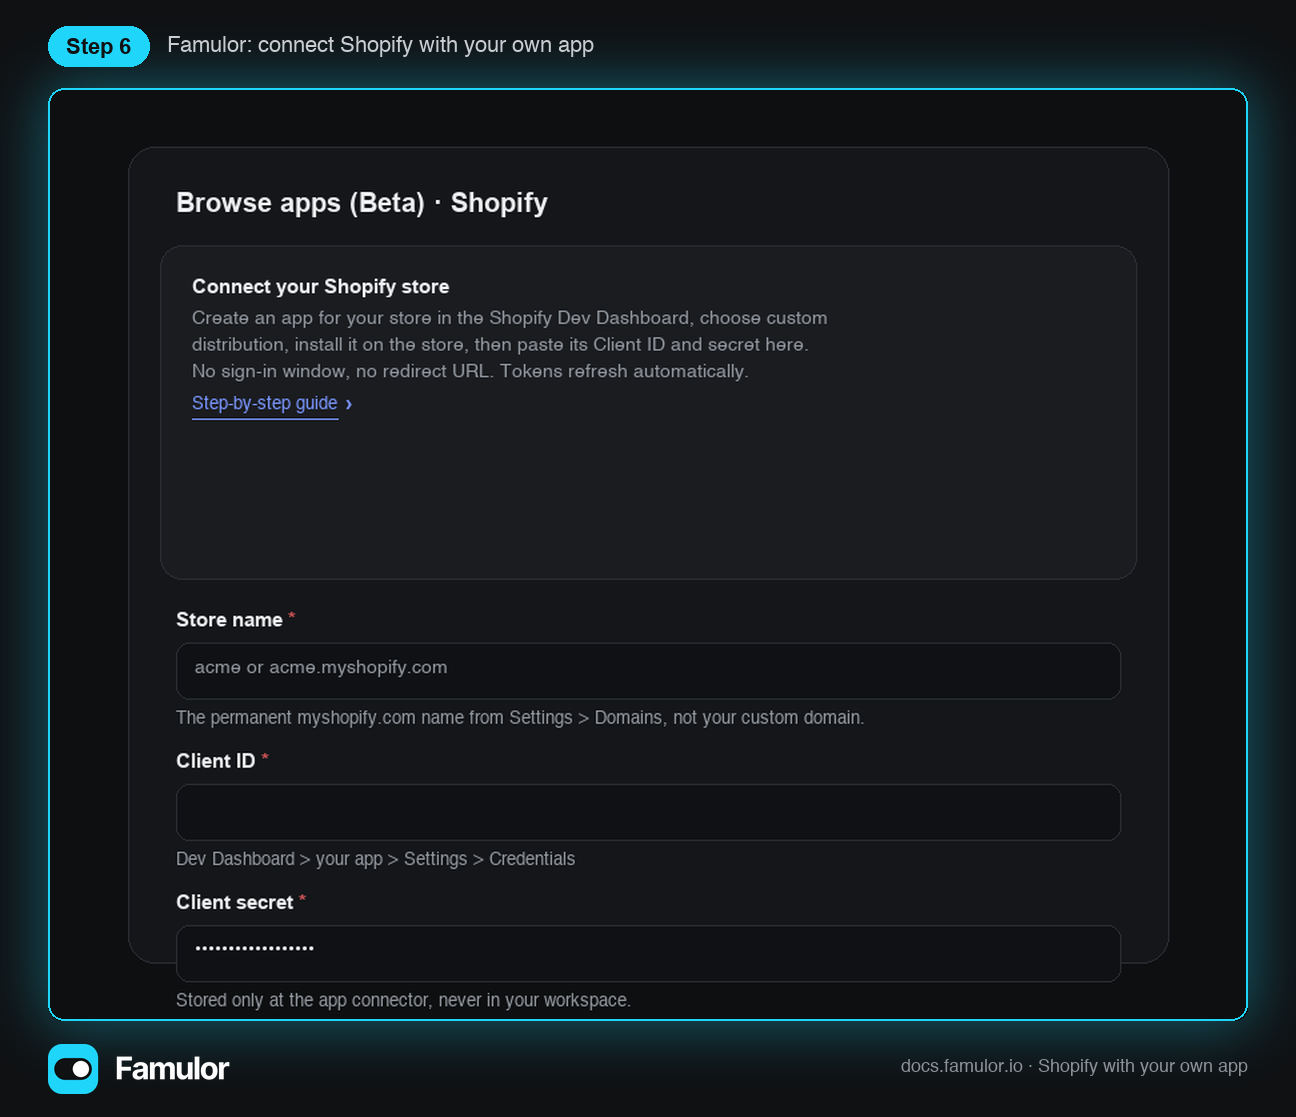 Famulor validates the credentials with Shopify immediately. On success the connection appears as **ok** in the Connections list and Shopify is available in the App Catalog for every automation in the workspace.
## Troubleshooting
| Message | What it means | Fix |
| ------------------------------------------------ | ------------------------------------------------------------------------- | ---------------------------------------------------------------------------------------------------------- |
| *Shopify does not know this Client ID* | The ID does not belong to any app, or has a typo. | Copy it again from Dev Dashboard → your app → Settings → Credentials. |
| *Shopify rejected the client secret* | Wrong or rotated secret. | Reveal the current secret in Settings → Credentials, or rotate it and use the new one. |
| *The app is not installed on this store yet* | Step 4 was skipped, or the install link was opened for a different store. | Set Custom distribution, generate the link for this store and install. |
| *This store name does not exist* | A custom domain or a typo was entered. | Use the permanent name from Settings → Domains (`acme` for `acme.myshopify.com`). |
| An automation step fails with a permission error | The app version lacks a scope. | Add the scope in Step 3, release a new version, then **Replace credentials** on the connection in Famulor. |
## Reconnecting and removing
* **Replace credentials:** open the connection under Automations → Connections and choose **Edit**. Enter the new Client ID and secret; Famulor replaces the stored app credentials in one step.
* **Remove:** deleting the connection also removes the app credentials from the app connector. Automations that used the connection show *Connect needed* until you connect Shopify again.
* To revoke access on the Shopify side, uninstall the app from your store or rotate the secret in the Dev Dashboard.
## Related
* [App Catalog](/automations/app-catalog) — the Shopify triggers and actions you can use
* [Automation node reference](/automations/nodes)
* [Automations overview](/automations/overview)
Famulor validates the credentials with Shopify immediately. On success the connection appears as **ok** in the Connections list and Shopify is available in the App Catalog for every automation in the workspace.
## Troubleshooting
| Message | What it means | Fix |
| ------------------------------------------------ | ------------------------------------------------------------------------- | ---------------------------------------------------------------------------------------------------------- |
| *Shopify does not know this Client ID* | The ID does not belong to any app, or has a typo. | Copy it again from Dev Dashboard → your app → Settings → Credentials. |
| *Shopify rejected the client secret* | Wrong or rotated secret. | Reveal the current secret in Settings → Credentials, or rotate it and use the new one. |
| *The app is not installed on this store yet* | Step 4 was skipped, or the install link was opened for a different store. | Set Custom distribution, generate the link for this store and install. |
| *This store name does not exist* | A custom domain or a typo was entered. | Use the permanent name from Settings → Domains (`acme` for `acme.myshopify.com`). |
| An automation step fails with a permission error | The app version lacks a scope. | Add the scope in Step 3, release a new version, then **Replace credentials** on the connection in Famulor. |
## Reconnecting and removing
* **Replace credentials:** open the connection under Automations → Connections and choose **Edit**. Enter the new Client ID and secret; Famulor replaces the stored app credentials in one step.
* **Remove:** deleting the connection also removes the app credentials from the app connector. Automations that used the connection show *Connect needed* until you connect Shopify again.
* To revoke access on the Shopify side, uninstall the app from your store or rotate the secret in the Dev Dashboard.
## Related
* [App Catalog](/automations/app-catalog) — the Shopify triggers and actions you can use
* [Automation node reference](/automations/nodes)
* [Automations overview](/automations/overview)