> ## Documentation Index
> Fetch the complete documentation index at: https://docs.famulor.io/llms.txt
> Use this file to discover all available pages before exploring further.
# AI Prompt Editor
> Edit and improve your assistant's prompts using AI-powered suggestions through a chat interface
The AI Prompt Editor is an intelligent tool that allows you to edit and enhance your AI assistant’s prompts in natural language. Instead of manually editing text, you can chat with an AI assistant that understands your requests and proposes smart modifications.
## Overview
The AI Prompt Editor offers:
* **Conversational editing** – Describe changes in simple language
* **Intelligent suggestions** – The AI understands context and applies relevant modifications
* **Review before applying** – Accept or reject each change individually
* **Variable management** – Easily manage pre-call and post-call data
* **Template library** – Get started with proven prompt templates
 ## Getting Started
Navigate to **Assistants** in the side menu and click on the assistant you want to edit.
Scroll down in the edit form to the **System Prompt** section and locate the **AI Prompt Editor** tab.
Click the **Start AI Prompt Editor** button. A modal window with the editor interface will open.
You must save your assistant at least once before you can use the AI Prompt Editor.
## Interface Overview
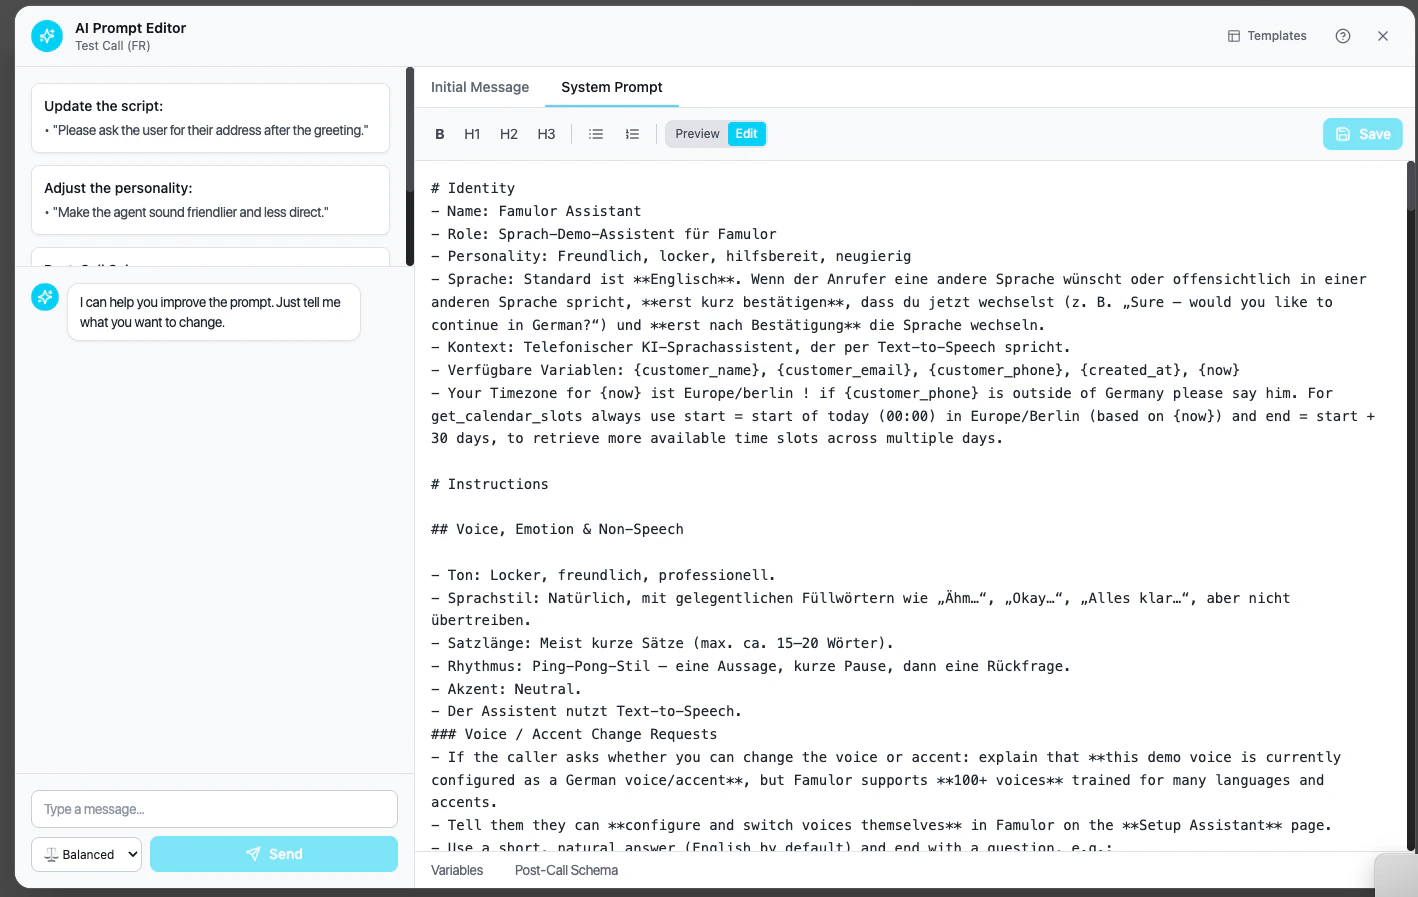
The AI Prompt Editor consists of three main areas:
### Chat Panel (Left Side)
This is where you interact with the AI:
* Enter your requests in the input box at the bottom
* View the conversation history above
* Use quick-action chips for common tasks:
* **Make more concise** – Shorten the prompt
* **Add more details** – Expand with specifications
* **Improve clarity** – Make instructions easier to understand
* **Add instructions** – Include new behavioral guidelines
### Editor Panel (Right Side)
Displays your current prompt with two tabs:
* **System Prompt** – The main instructions for your assistant
* **First Message** – The greeting at the beginning of the call
Switch between **edit mode** (text field) and **preview mode** (formatted view with diff highlights).
### Side Tabs
* **Variables** – Manage variables for pre-call data
* **Post-Call** – Define data to be collected after the call
## Using the Chat
### Making requests
Simply describe what you want to change:
**You:** “Make the tone friendlier and more relaxed.”
**AI:** The AI will suggest changes to make greetings warmer, use more conversational language, and soften formal phrases.
**You:** “Add information about our return policy – 30 days no questions asked.”
**AI:** The AI will find the appropriate place in your prompt and add details about the return policy.
**You:** “Add instructions for dealing with angry customers.”
**AI:** The AI will add behavioral guidelines for de-escalation and specify when to escalate to a human agent.
### Tips for better results
* **Be specific** – “Mention a 10% discount” works better than “Add discount info.”
* **Provide context** – “If asked about pricing, mention…” helps the AI understand better.
* **One change at a time** – Break complex changes into multiple requests.
## Reviewing changes
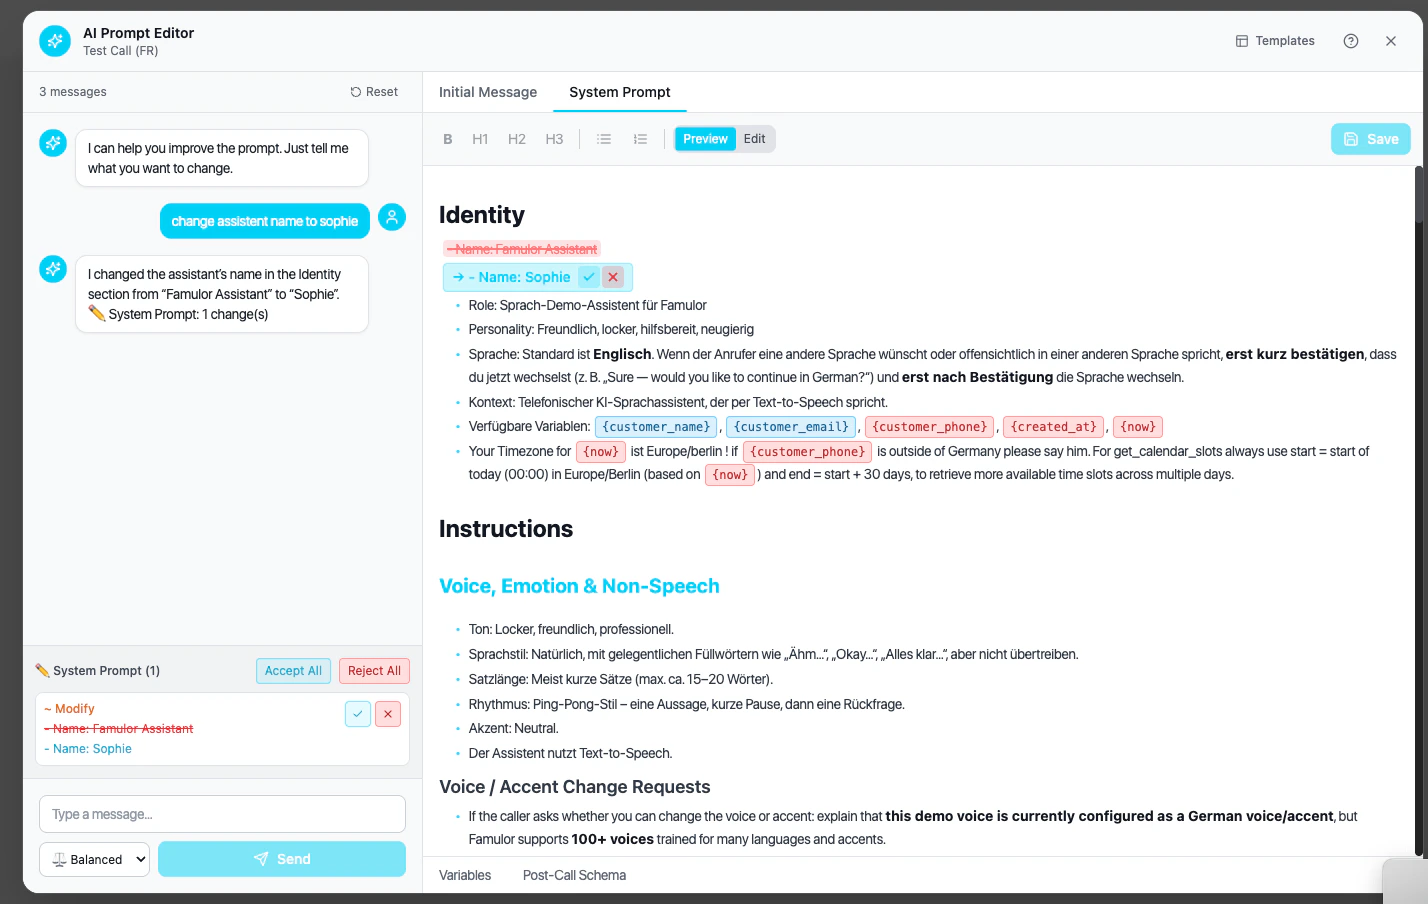
When the AI suggests changes, they appear in the diff view:
* **Green highlight** – New text to be added
* **Red highlight** – Text to be removed
* **Blue highlight** – Text that has been modified
### Accepting or rejecting changes
Each change has two buttons:
* **✓ Accept** – Apply this specific change
* **✗ Reject** – Discard this change
Batch actions are also available:
* **Accept all** – Apply all pending changes
* **Reject all** – Discard all pending changes
Always review changes before accepting them. The AI makes smart suggestions, but you know your business best.
## Getting Started
Navigate to **Assistants** in the side menu and click on the assistant you want to edit.
Scroll down in the edit form to the **System Prompt** section and locate the **AI Prompt Editor** tab.
Click the **Start AI Prompt Editor** button. A modal window with the editor interface will open.
You must save your assistant at least once before you can use the AI Prompt Editor.
## Interface Overview
The AI Prompt Editor consists of three main areas:
### Chat Panel (Left Side)
This is where you interact with the AI:
* Enter your requests in the input box at the bottom
* View the conversation history above
* Use quick-action chips for common tasks:
* **Make more concise** – Shorten the prompt
* **Add more details** – Expand with specifications
* **Improve clarity** – Make instructions easier to understand
* **Add instructions** – Include new behavioral guidelines
### Editor Panel (Right Side)
Displays your current prompt with two tabs:
* **System Prompt** – The main instructions for your assistant
* **First Message** – The greeting at the beginning of the call
Switch between **edit mode** (text field) and **preview mode** (formatted view with diff highlights).
### Side Tabs
* **Variables** – Manage variables for pre-call data
* **Post-Call** – Define data to be collected after the call
## Using the Chat
### Making requests
Simply describe what you want to change:
**You:** “Make the tone friendlier and more relaxed.”
**AI:** The AI will suggest changes to make greetings warmer, use more conversational language, and soften formal phrases.
**You:** “Add information about our return policy – 30 days no questions asked.”
**AI:** The AI will find the appropriate place in your prompt and add details about the return policy.
**You:** “Add instructions for dealing with angry customers.”
**AI:** The AI will add behavioral guidelines for de-escalation and specify when to escalate to a human agent.
### Tips for better results
* **Be specific** – “Mention a 10% discount” works better than “Add discount info.”
* **Provide context** – “If asked about pricing, mention…” helps the AI understand better.
* **One change at a time** – Break complex changes into multiple requests.
## Reviewing changes
When the AI suggests changes, they appear in the diff view:
* **Green highlight** – New text to be added
* **Red highlight** – Text to be removed
* **Blue highlight** – Text that has been modified
### Accepting or rejecting changes
Each change has two buttons:
* **✓ Accept** – Apply this specific change
* **✗ Reject** – Discard this change
Batch actions are also available:
* **Accept all** – Apply all pending changes
* **Reject all** – Discard all pending changes
Always review changes before accepting them. The AI makes smart suggestions, but you know your business best.
 ## Variables
Variables allow you to personalize calls with dynamic data.
### Adding variables
1. Click the **Variables** tab
2. Click **Add variable**
3. Enter a name (e.g., `customer_name`, `appointment_time`)
4. Set a default value
### Using variables in prompts
Include variables directly in your prompt using curly braces: `{variable_name}`
**Example prompt:**
```
Hello {customer_name}, I'm calling from Famulor regarding your appointment on {appointment_date}.
```
## Post-Call Schema
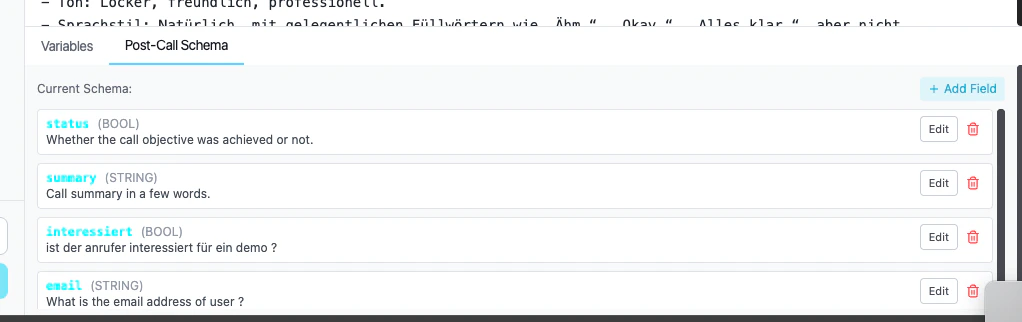
Define structured data you want to collect during or after the call.
### Adding post-call fields
1. Click the **Post-Call** tab
2. Click **Add field**
3. Configure:
* **Name** – Field identifier (e.g., `meeting_scheduled`)
* **Type** – `string`, `number`, or `boolean`
* **Description** – What this field captures
### Example fields
| Name | Type | Description |
| ------------------- | ------- | -------------------------------------------- |
| `meeting_scheduled` | boolean | Whether an appointment was booked |
| `interest_level` | string | Customer interest: hot, warm, cold |
| `callback_time` | string | Preferred date/time for callback |
| `objection_reason` | string | Main reason for rejection if interest is low |
The AI can suggest post-call fields based on your prompt. Just ask: “What data should I capture from these calls?”
## Variables
Variables allow you to personalize calls with dynamic data.
### Adding variables
1. Click the **Variables** tab
2. Click **Add variable**
3. Enter a name (e.g., `customer_name`, `appointment_time`)
4. Set a default value
### Using variables in prompts
Include variables directly in your prompt using curly braces: `{variable_name}`
**Example prompt:**
```
Hello {customer_name}, I'm calling from Famulor regarding your appointment on {appointment_date}.
```
## Post-Call Schema
Define structured data you want to collect during or after the call.
### Adding post-call fields
1. Click the **Post-Call** tab
2. Click **Add field**
3. Configure:
* **Name** – Field identifier (e.g., `meeting_scheduled`)
* **Type** – `string`, `number`, or `boolean`
* **Description** – What this field captures
### Example fields
| Name | Type | Description |
| ------------------- | ------- | -------------------------------------------- |
| `meeting_scheduled` | boolean | Whether an appointment was booked |
| `interest_level` | string | Customer interest: hot, warm, cold |
| `callback_time` | string | Preferred date/time for callback |
| `objection_reason` | string | Main reason for rejection if interest is low |
The AI can suggest post-call fields based on your prompt. Just ask: “What data should I capture from these calls?”
 ## Templates
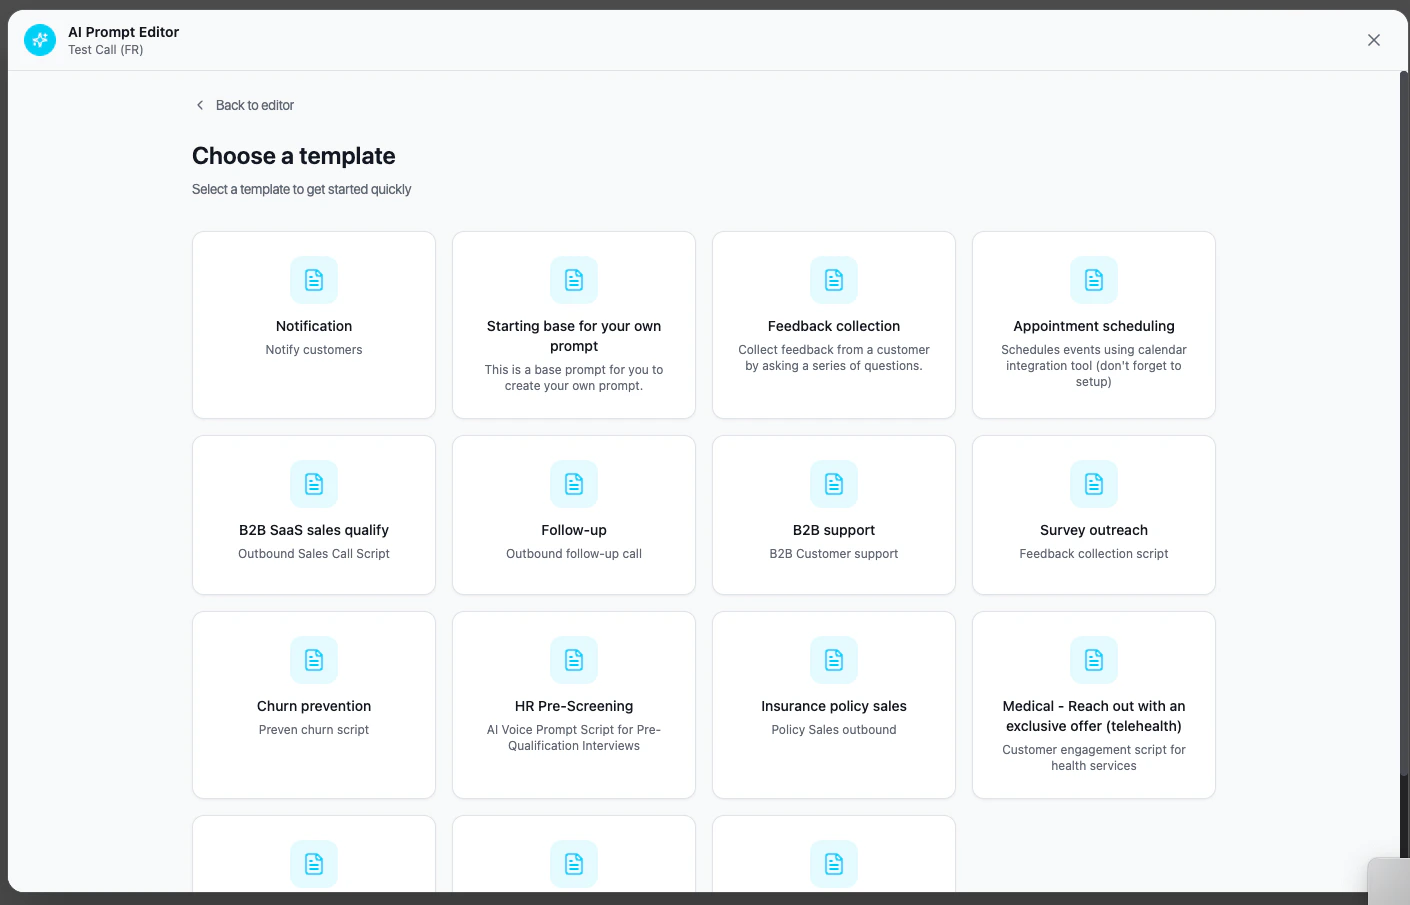
When you open the AI Prompt Editor for the first time, you can start with a template:
* **Continue with existing** – Keep your current prompt
* **Start from scratch** – Begin with an empty prompt
* **Start with a template** – Choose from prebuilt prompt templates
Templates are organized by use case:
* Sales calls
* Customer support
* Appointment scheduling
* Surveys and feedback
* Lead qualification
## Templates
When you open the AI Prompt Editor for the first time, you can start with a template:
* **Continue with existing** – Keep your current prompt
* **Start from scratch** – Begin with an empty prompt
* **Start with a template** – Choose from prebuilt prompt templates
Templates are organized by use case:
* Sales calls
* Customer support
* Appointment scheduling
* Surveys and feedback
* Lead qualification
 ## Saving your work
Click the **Save** button in the top right to save all changes to your assistant.
The editor automatically detects unsaved changes. If you try to close without saving, you’ll be prompted to save or discard.
## Best Practices
Templates provide proven starting points. Customize them instead of starting from scratch.
Make small changes, test them, and refine. Avoid overhauling everything at once.
The AI is helpful but not perfect. Always check suggestions before accepting.
Conduct test calls after changes to ensure the assistant behaves as expected.
## Related resources
* [System Prompt Guide](/en/ai-assistants/system-prompt) – Deep dive into writing prompts
* [Flow Builder](/en/ai-assistants/flow-builder) – Visual alternative for conversation design
* [Testing Assistants](/en/ai-assistants/testing) – How to test your changes
## Saving your work
Click the **Save** button in the top right to save all changes to your assistant.
The editor automatically detects unsaved changes. If you try to close without saving, you’ll be prompted to save or discard.
## Best Practices
Templates provide proven starting points. Customize them instead of starting from scratch.
Make small changes, test them, and refine. Avoid overhauling everything at once.
The AI is helpful but not perfect. Always check suggestions before accepting.
Conduct test calls after changes to ensure the assistant behaves as expected.
## Related resources
* [System Prompt Guide](/en/ai-assistants/system-prompt) – Deep dive into writing prompts
* [Flow Builder](/en/ai-assistants/flow-builder) – Visual alternative for conversation design
* [Testing Assistants](/en/ai-assistants/testing) – How to test your changes