> ## Documentation Index
> Fetch the complete documentation index at: https://docs.famulor.io/llms.txt
> Use this file to discover all available pages before exploring further.
# MCP Client
> Connect Famulor MCP to ChatGPT, Claude, Cursor, and other MCP-compatible clients
# MCP Client Setup
Connect the hosted Famulor MCP server to your AI client in a few steps. Instead of clicking through the dashboard, you just describe what you want — and your AI assistant does it on your account:
* *"Create an inbound receptionist that books appointments."*
* *"Show me why my last campaign call failed."*
* *"Add three leads to my follow-up campaign and start it."*
After setup, sign in with your [Famulor API key](https://app.famulor.de/api-keys) in the browser when prompted — no API key goes into config files.
Capabilities, auth, and self-hosting
Required for OAuth sign-in
Full connector guide with screenshots
## What you can do
Inbound and outbound: system prompt, voice, language, model and call behaviour. Attach
knowledge bases (your documents) and mid-call tools (live API lookups during a call).
Create campaigns, add and manage leads, and start, pause or resume them.
List calls, read full transcripts and post-call evaluations, then update the assistant or its
tools — a complete build → review → improve loop.
Knowledge bases & documents, phone numbers & SIP trunks, WhatsApp senders & templates,
conversations, folders, labels, API keys and your blacklist.
Read and write are separate tools. Actions that **spend balance** (placing a call, sending
SMS/WhatsApp, buying a number) or **delete data** always ask for confirmation first. Integration
secrets (e.g. auth tokens on your mid-call tools) are **masked** in responses.
## Server URL
**Canonical endpoint:** `https://app.famulor.de/mcp`
Use `https://app.famulor.de/mcp` in your client's connector dialog.
## Before you start
* A **Famulor account** at [app.famulor.de](https://app.famulor.de).
* An **active plan** for the features you use (some actions consume call minutes or chat credits).
## Quick start
1. Add the server in your client (see [ChatGPT](#chatgpt), [Claude](#claude), or [other clients](#other-clients) below).
2. When prompted, complete OAuth sign-in in the browser and paste your Famulor API key.
3. Ask in natural language, e.g. *"Show my last 10 calls"* or *"List my assistants"*.
Authentication uses standard MCP OAuth 2.1 (PKCE). Your API key is never stored in a database — only inside an encrypted access token on your device. Tokens expire after 30 days; your client will prompt you to sign in again.
## ChatGPT
Famulor is available as a **custom app** in ChatGPT (web). You need a ChatGPT plan that supports apps/connectors and **Developer mode** enabled.
### Add the Famulor app
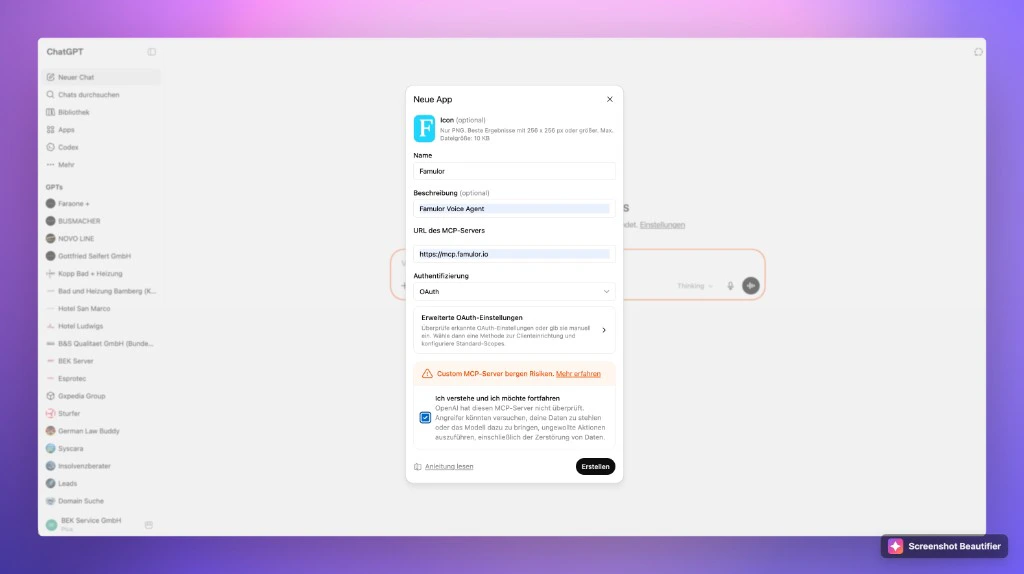
1. Open **ChatGPT** → **Settings** → **Apps** (or **Connectors**).
2. Click **Create app** / **New app**.
3. Fill in:
| Field | Value |
| ------------------ | -------------------------------- |
| **Name** | `Famulor` |
| **Description** | `Famulor Voice Agent` (optional) |
| **MCP server URL** | `https://app.famulor.de/mcp` |
| **Authentication** | **OAuth** |
4. Confirm the security notice and click **Create**.
5. Complete OAuth sign-in and paste your [API key](https://app.famulor.de/api-keys) when asked.
 ### Use Famulor in a chat
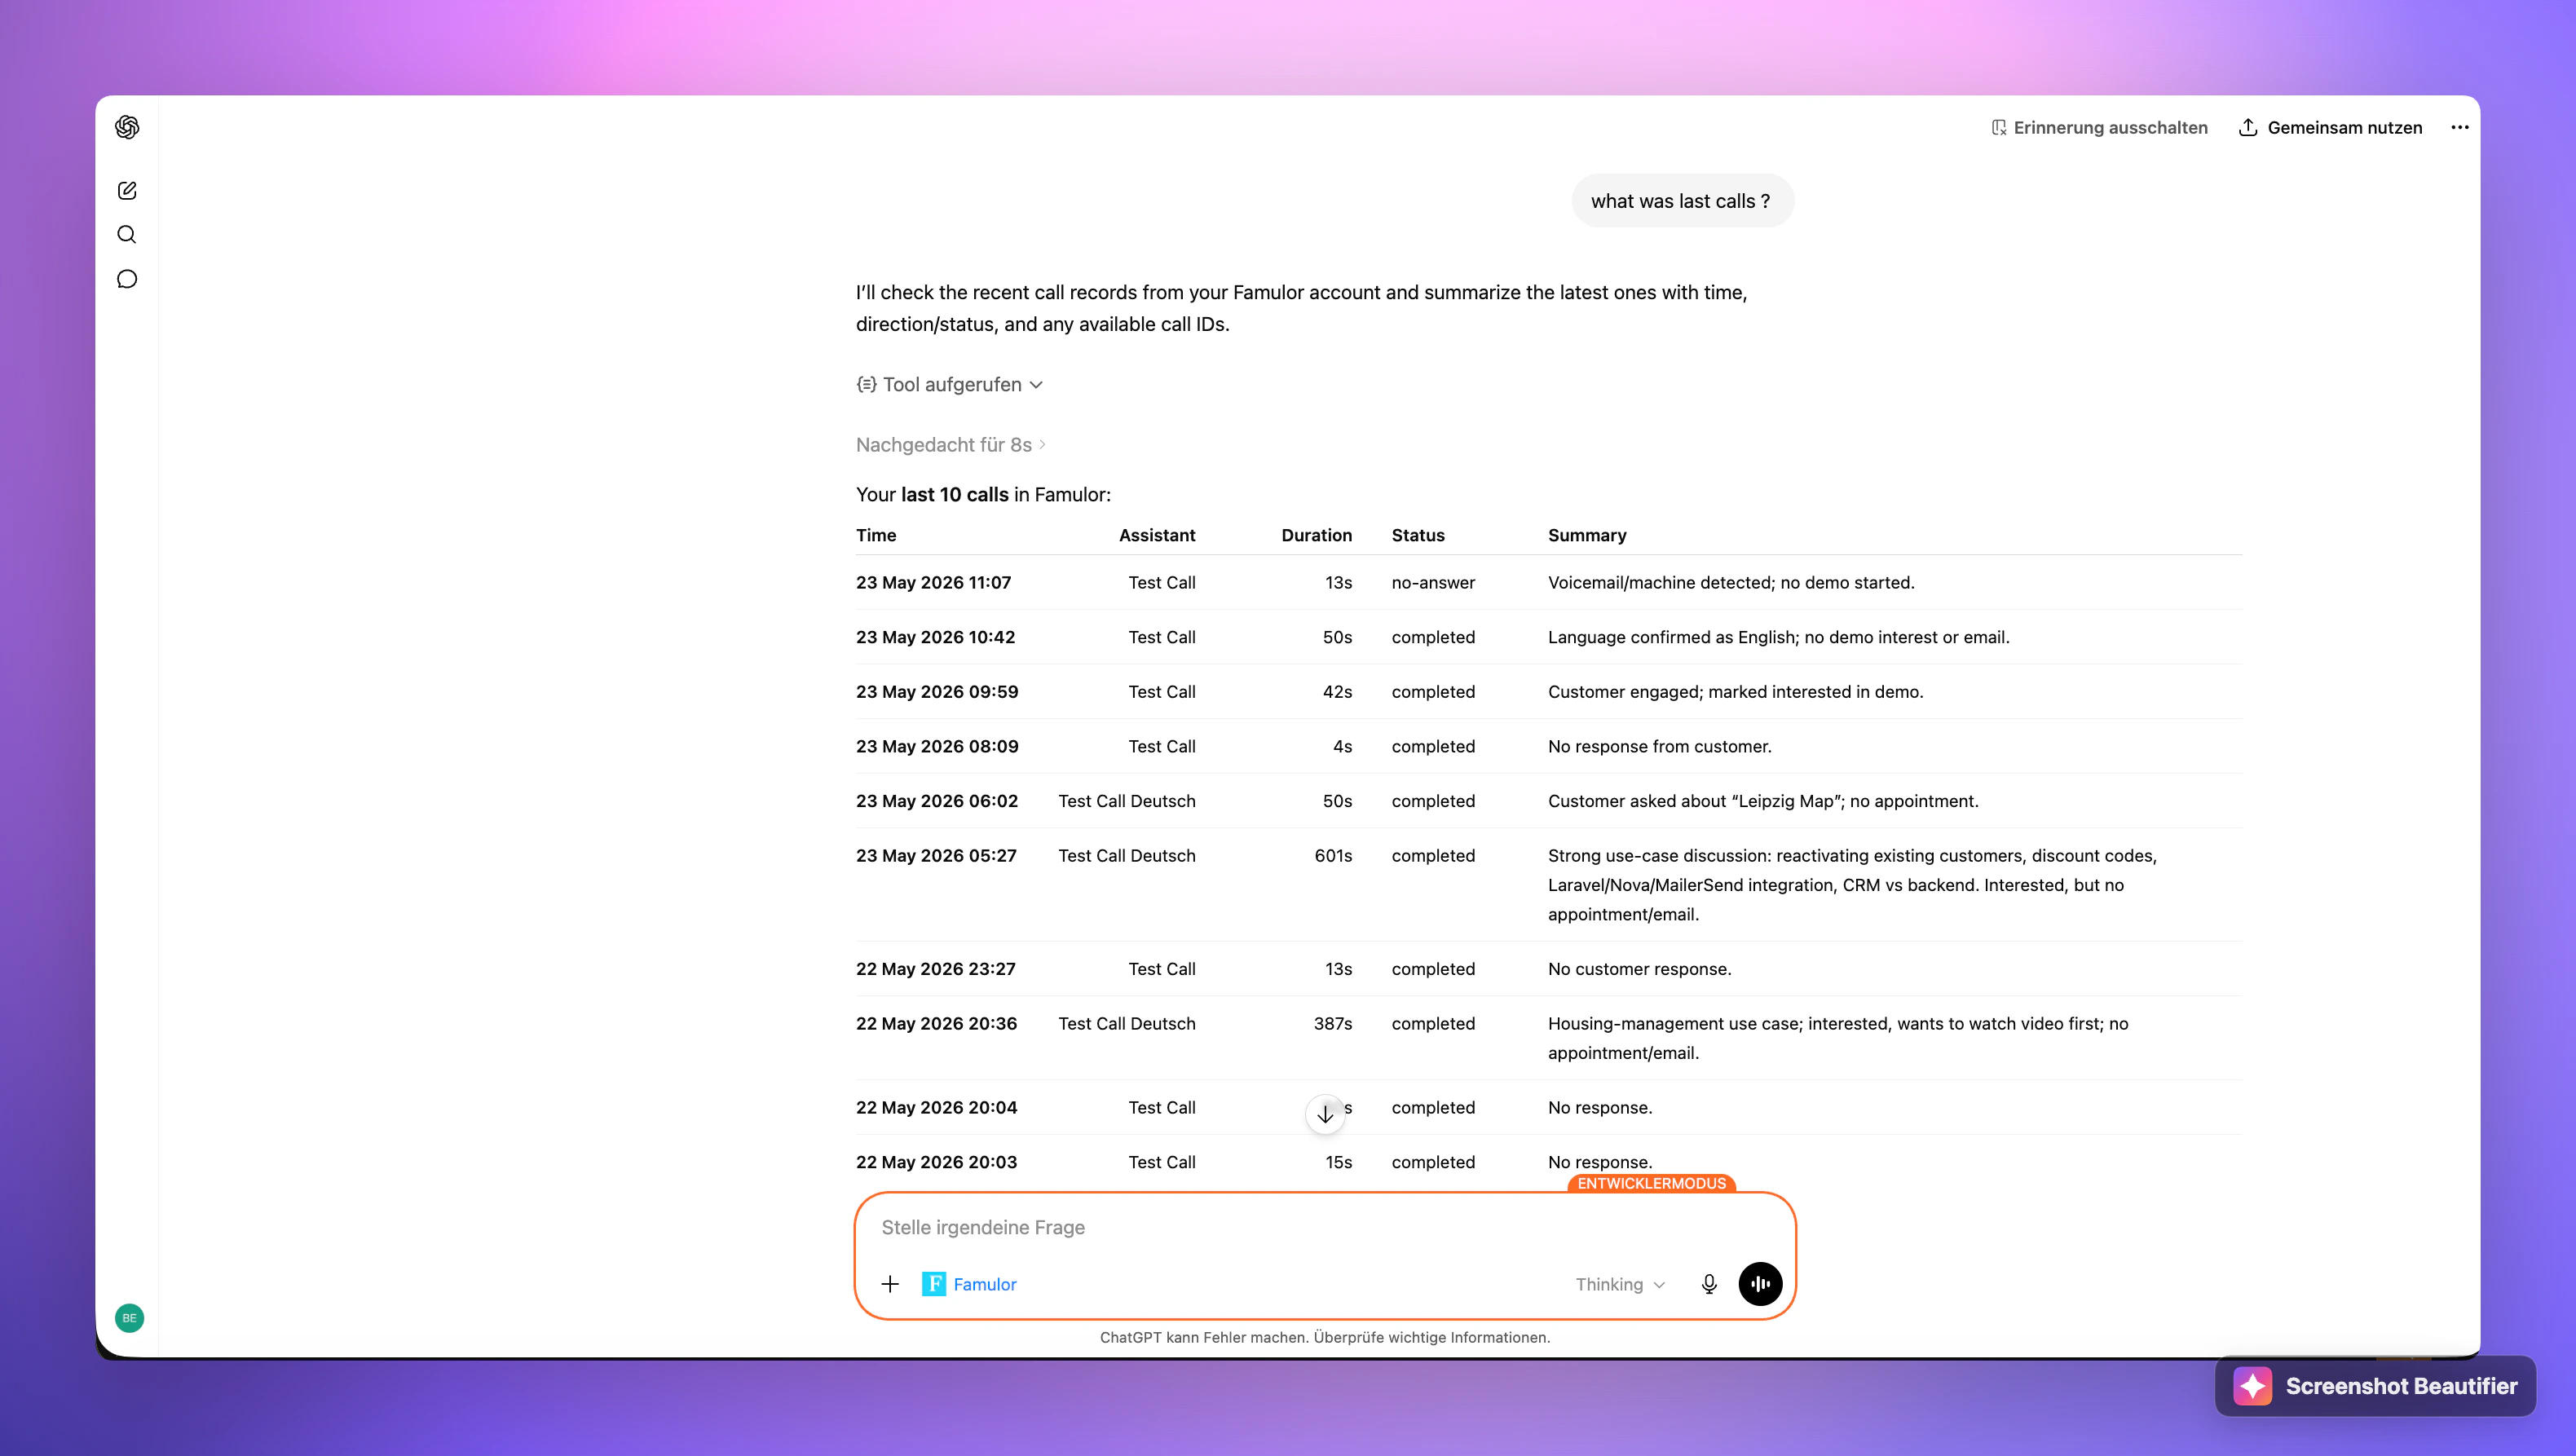
1. Start a new chat and enable **Developer mode** if required.
2. Select **Famulor** from the tools/apps menu in the composer.
3. Ask questions about your account — e.g. *"What were my last calls?"*
### Use Famulor in a chat
1. Start a new chat and enable **Developer mode** if required.
2. Select **Famulor** from the tools/apps menu in the composer.
3. Ask questions about your account — e.g. *"What were my last calls?"*
 ### Step-by-step with screenshots
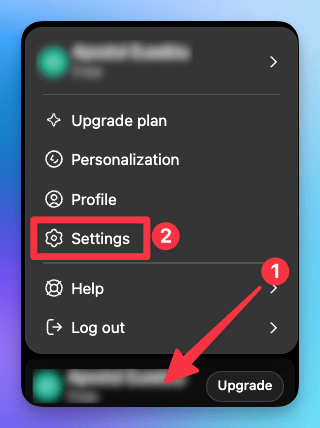
In ChatGPT, click your name at the bottom-left, then **Settings**.
### Step-by-step with screenshots
In ChatGPT, click your name at the bottom-left, then **Settings**.
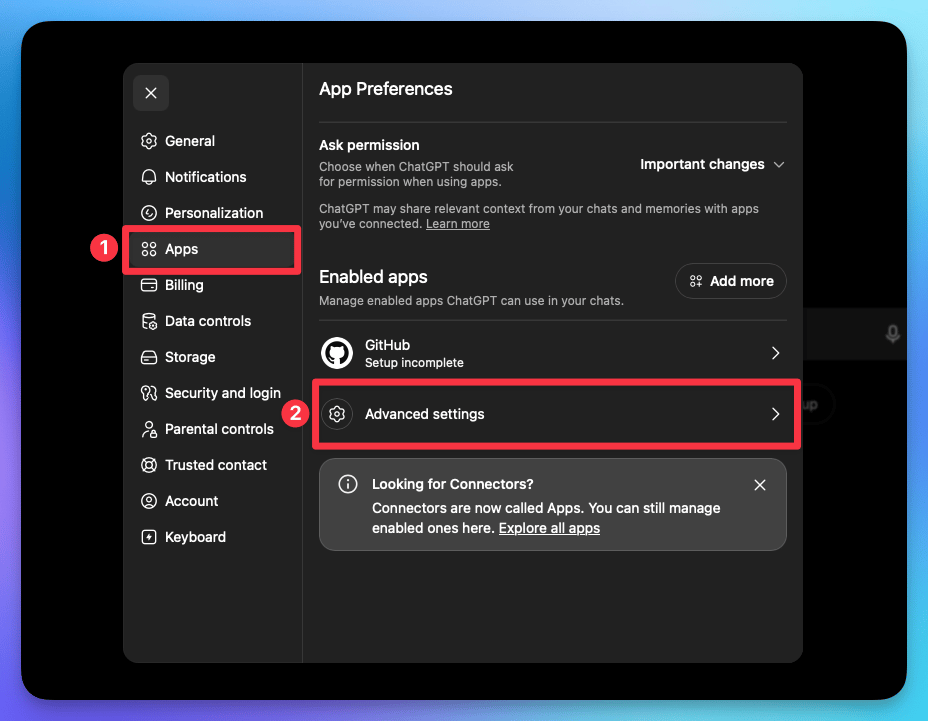
 Open the **Apps** tab (connectors now live under "Apps"), then open **Advanced settings**.
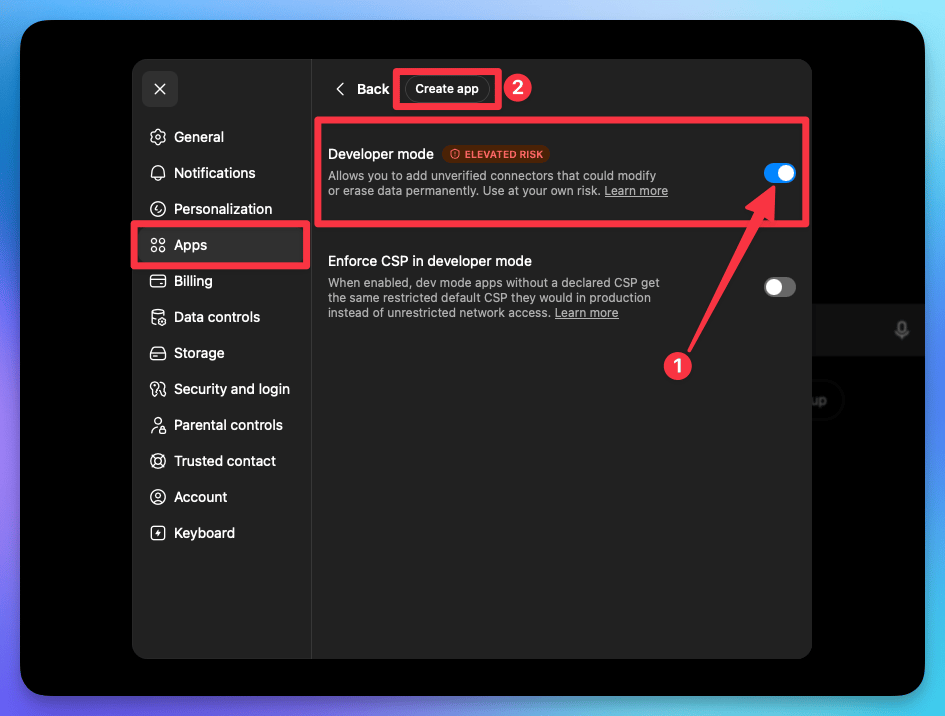
 Switch on **Developer mode** (this lets you add a custom connector), then click **Create app**
at the top.
Switch on **Developer mode** (this lets you add a custom connector), then click **Create app**
at the top.
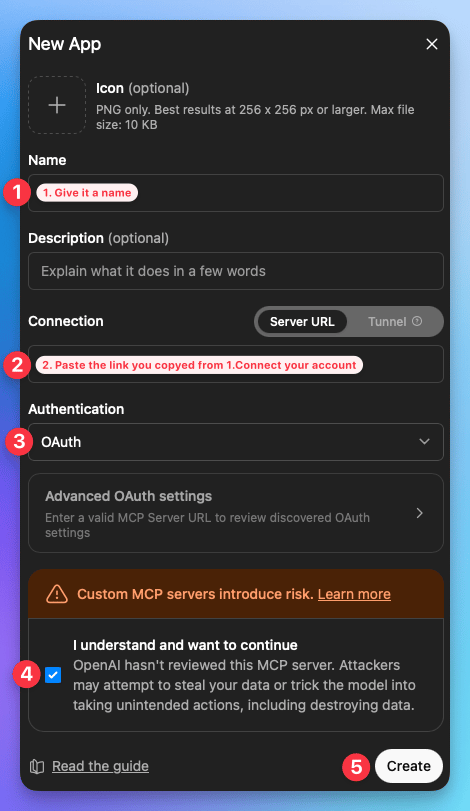
 Give it a name, paste `https://app.famulor.de/mcp` into the **Server URL** field, set
**Authentication** to **OAuth**, tick *"I understand and want to continue"*, then **Create**.
Give it a name, paste `https://app.famulor.de/mcp` into the **Server URL** field, set
**Authentication** to **OAuth**, tick *"I understand and want to continue"*, then **Create**.
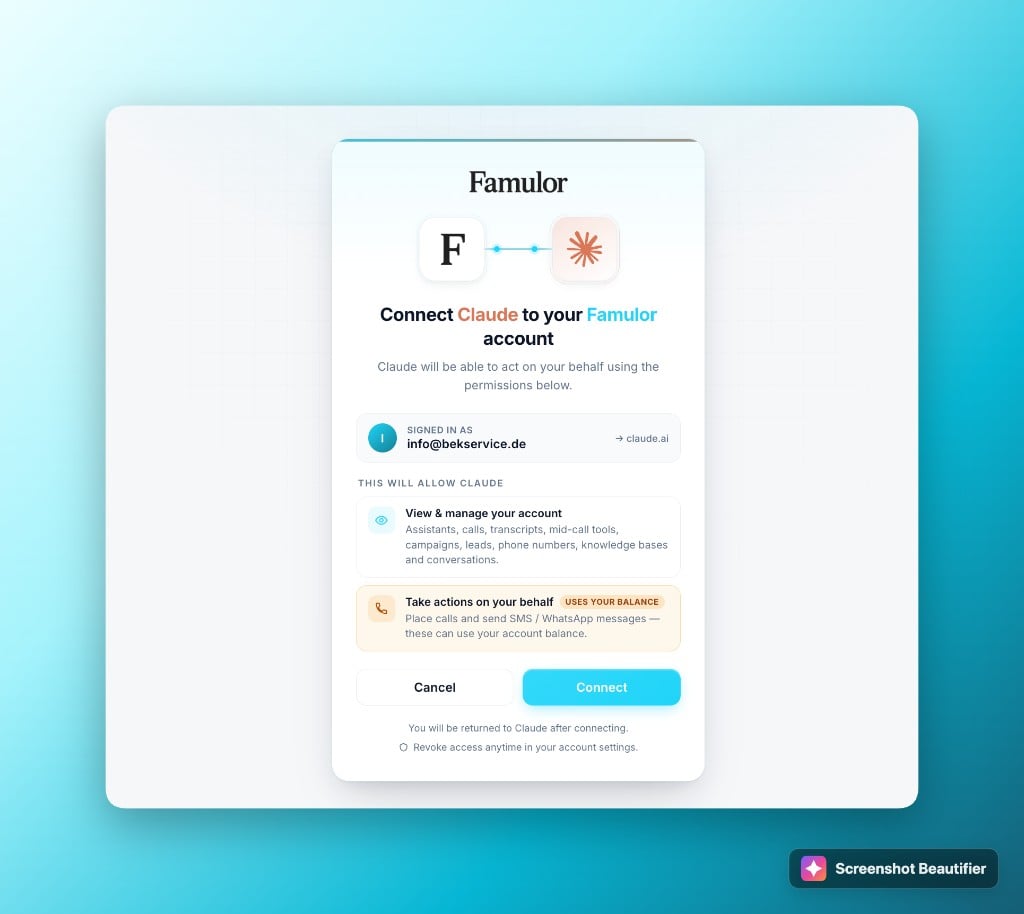
 Your browser opens Famulor's OAuth consent screen. Review the permissions, paste your
[API key](https://app.famulor.de/api-keys) when asked, then click **Connect**.
Your browser opens Famulor's OAuth consent screen. Review the permissions, paste your
[API key](https://app.famulor.de/api-keys) when asked, then click **Connect**.
 ## Claude
Famulor works in **Claude Desktop** (custom connector) and **Claude Code** (CLI). Both use OAuth — sign in with your [API key](https://app.famulor.de/api-keys) when prompted.
### Claude Desktop
1. Open **Claude** → **Settings** → **Connectors**.
2. Click **Add custom connector**.
3. Fill in:
| Field | Value |
| -------- | ---------------------------- |
| **Name** | `Famulor` |
| **URL** | `https://app.famulor.de/mcp` |
4. Click **Add**, then complete OAuth sign-in in the browser.
## Claude
Famulor works in **Claude Desktop** (custom connector) and **Claude Code** (CLI). Both use OAuth — sign in with your [API key](https://app.famulor.de/api-keys) when prompted.
### Claude Desktop
1. Open **Claude** → **Settings** → **Connectors**.
2. Click **Add custom connector**.
3. Fill in:
| Field | Value |
| -------- | ---------------------------- |
| **Name** | `Famulor` |
| **URL** | `https://app.famulor.de/mcp` |
4. Click **Add**, then complete OAuth sign-in in the browser.
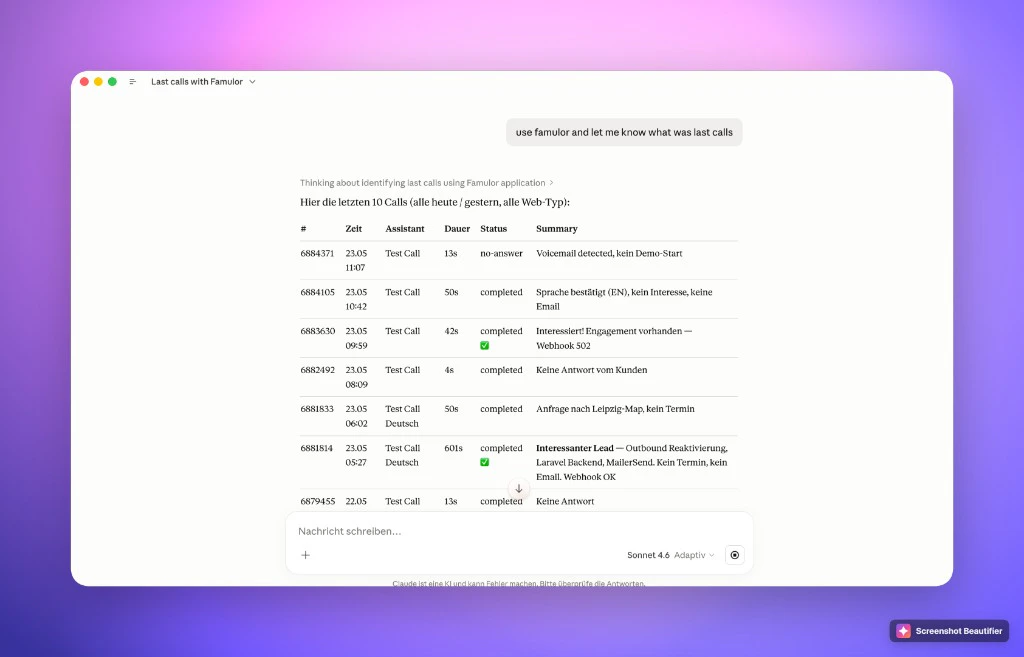
 ### Use Famulor in Claude
1. Start a new chat and enable the **Famulor** connector for the conversation.
2. Ask in natural language — e.g. *"Use Famulor and show me my last calls"*.
### Use Famulor in Claude
1. Start a new chat and enable the **Famulor** connector for the conversation.
2. Ask in natural language — e.g. *"Use Famulor and show me my last calls"*.
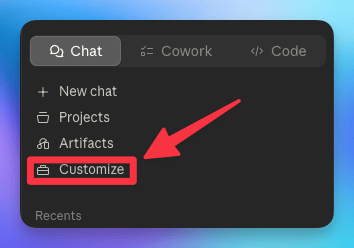
 ### Step-by-step with screenshots
In Claude, open the left sidebar and click **Customize**.
### Step-by-step with screenshots
In Claude, open the left sidebar and click **Customize**.
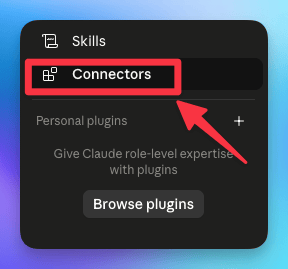
 In the Customize panel, click **Connectors**.
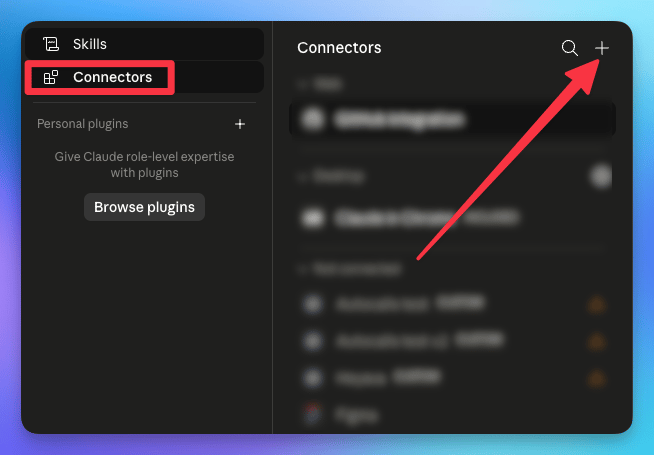
 Click the **+** button in the top-right of the Connectors panel, then choose **Add custom
connector**.
Click the **+** button in the top-right of the Connectors panel, then choose **Add custom
connector**.
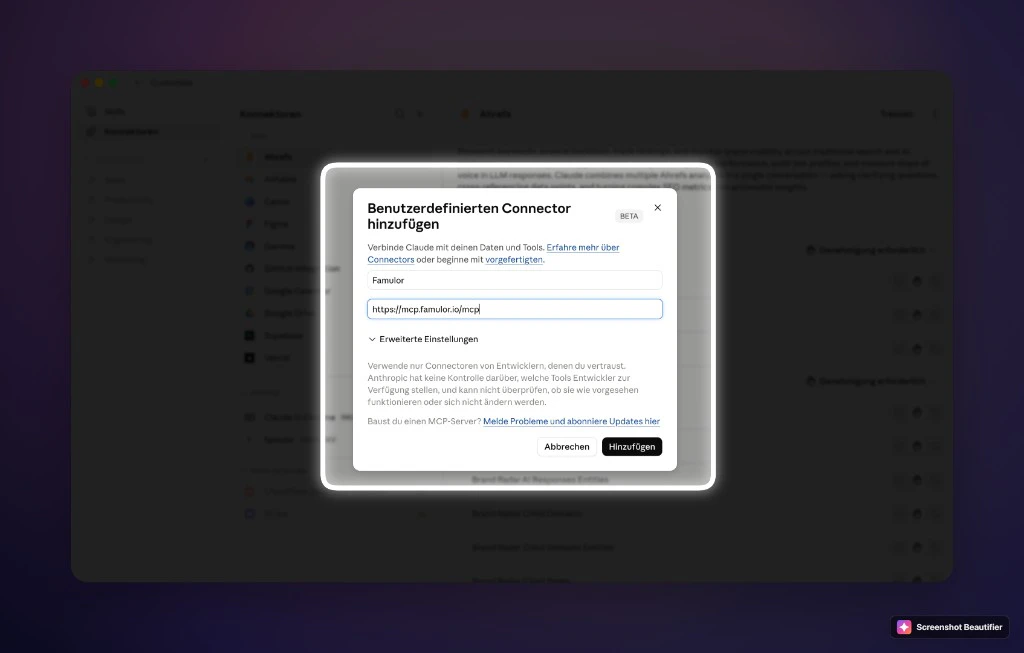
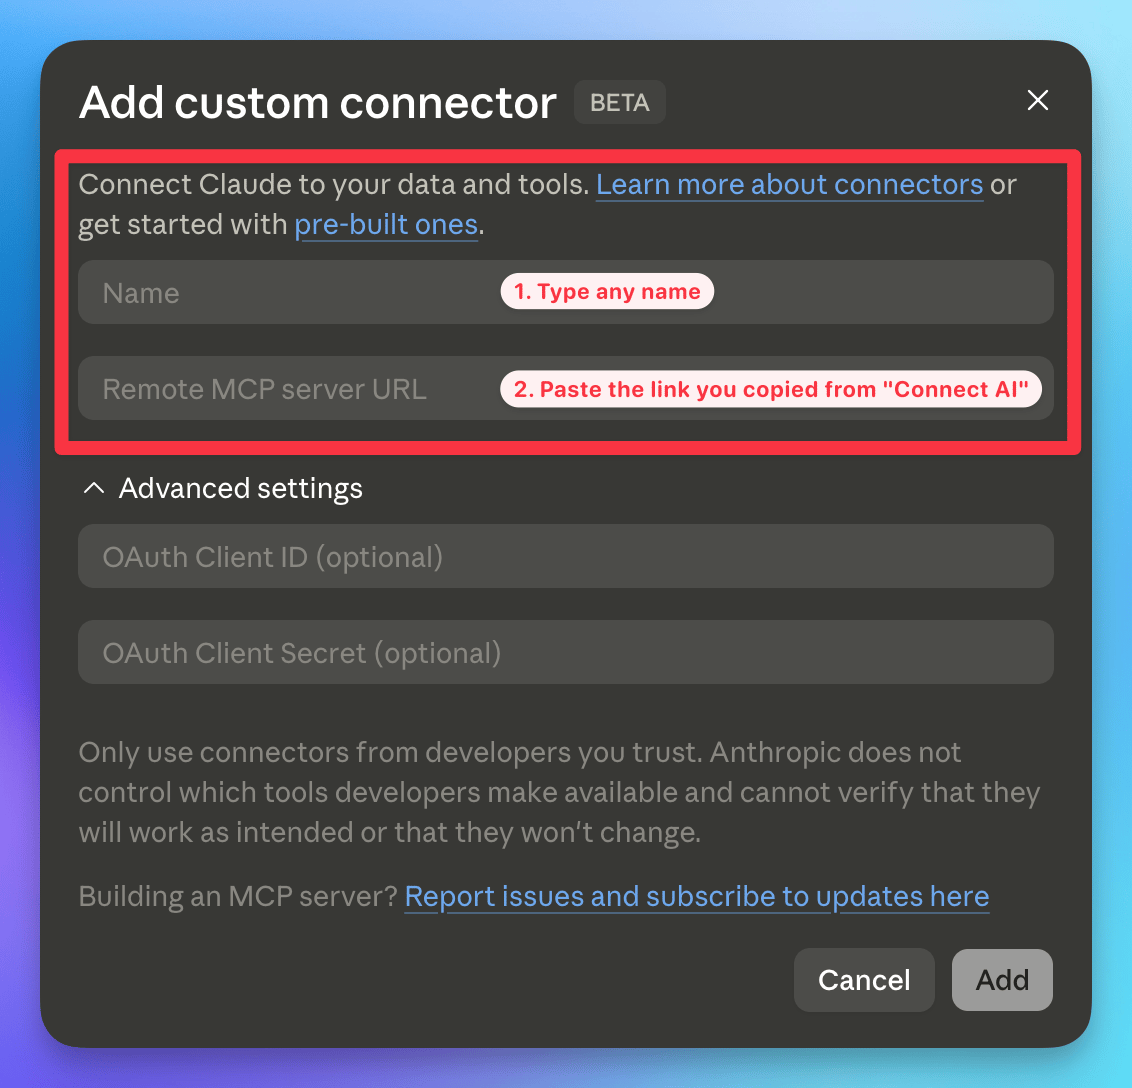
 Type any name (e.g. *Famulor*), paste `https://app.famulor.de/mcp` into **Remote MCP server URL**,
leave the OAuth fields empty, then click **Add**.
Type any name (e.g. *Famulor*), paste `https://app.famulor.de/mcp` into **Remote MCP server URL**,
leave the OAuth fields empty, then click **Add**.
 After you click **Add**, your browser opens Famulor's OAuth consent screen. Review the
permissions, paste your [API key](https://app.famulor.de/api-keys) when asked, then click **Connect**.
Once the connector is listed in the Claude and ChatGPT directories, you'll also be able to add it in
one click by searching for **Famulor** under Settings → Connectors — no manual URL needed.
## CLI clients — Claude Code, Codex, Gemini CLI
Add the hosted server to a CLI agent, then sign in with your [API key](https://app.famulor.de/api-keys) when prompted:
```bash theme={null}
# Claude Code
claude mcp add --transport http famulor https://app.famulor.de/mcp
# OpenAI Codex
codex mcp add famulor --url https://app.famulor.de/mcp && codex mcp login famulor
# Gemini CLI
gemini mcp add --transport http famulor https://app.famulor.de/mcp
```
Prefer a full onboarding agent over raw tools? Install the **Famulor Skill** (works with Claude Code, Cursor, Codex, OpenClaw, Hermes and more): `npx skills add bekservice/Famulor-Skill` — see [Famulor Skill](/en/mcp/famulor-skill).
## Other clients
**One-click install:** [Add to Cursor](cursor://anysphere.cursor-deeplink/mcp/install?name=famulor\&config=eyJ0eXBlIjoiaHR0cCIsInVybCI6Imh0dHBzOi8vYXBwLmZhbXVsb3IuZGUvbWNwIn0%3D) · [Add to VS Code](https://vscode.dev/redirect/mcp/install?name=famulor\&config=%7B%22type%22%3A%22http%22%2C%22url%22%3A%22https%3A%2F%2Fapp.famulor.de%2Fmcp%22%7D)
**Global:** Cursor **Settings → Tools & MCP → New MCP Server** (opens `~/.cursor/mcp.json`)
**Project:** create `.cursor/mcp.json` in your project root.
```json theme={null}
{
"mcpServers": {
"famulor": {
"type": "http",
"url": "https://app.famulor.de/mcp"
}
}
}
```
Refresh MCP in settings after saving. Sign in with your [API key](https://app.famulor.de/api-keys) when prompted.
### Windsurf
`~/.codeium/windsurf/mcp_config.json`
```json theme={null}
{
"mcpServers": {
"famulor": {
"serverUrl": "https://app.famulor.de/mcp"
}
}
}
```
### VS Code
`.vscode/mcp.json`
```json theme={null}
{
"servers": {
"famulor": {
"type": "http",
"url": "https://app.famulor.de/mcp"
}
}
}
```
### Cline
**Cline extension → MCP Servers → Configure**
```json theme={null}
{
"mcpServers": {
"famulor": {
"url": "https://app.famulor.de/mcp"
}
}
}
```
### Continue
`~/.continue/config.yaml`
```yaml theme={null}
mcpServers:
- name: famulor
type: streamable-http
url: "https://app.famulor.de/mcp"
```
### Zed
`~/.config/zed/settings.json`
```json theme={null}
{
"context_servers": {
"famulor": {
"command": "npx",
"args": ["-y", "mcp-remote@latest", "https://app.famulor.de/mcp"]
}
}
}
```
## Try it
Start a new chat in Claude or ChatGPT and ask, for example:
"Create an inbound receptionist for my dental clinic that books appointments and answers FAQs."
"Read my last 5 calls and tell me what my assistant got wrong."
"Create a mid-call tool that looks up an order by number from our API."
"Set up an outbound campaign for this week's leads and start it."
More prompt ideas:
* *"Create a German sales assistant using GPT-4.1-mini and the Susi voice"*
* *"Start campaign #42 and add these 50 leads"*
* *"Show me all calls today where the goal wasn't reached"*
* *"What were my last calls?"*
## Security & privacy
* **OAuth 2.0** with a branded consent screen — no API key is ever stored in config files.
* **Scoped to your account** — the connector can only see and change your own data.
* **Secrets masked** — auth tokens stored on your tools are never returned in plain text.
* **No chat-history harvesting** — the connector acts only on your Famulor resources.
* Privacy policy: [famulor.io/privacy](https://www.famulor.io/privacy).
## Self-hosting
To run your own instance instead of the hosted server, see [MCP Server — Self-hosting](/en/mcp/server#self-hosting).
## FAQ
This page covers **ChatGPT**, **Claude**, CLI agents, and other MCP clients such as Cursor or
VS Code. For a full connector walkthrough with screenshots, see
[Claude & ChatGPT Connector](/en/automation/mcp-connector).
Yes — you paste your [Famulor API key](https://app.famulor.de/api-keys) during the OAuth consent
flow. It is **not** stored in config files — only inside an encrypted access token on your device.
Yes. Every tool is scoped to your own authenticated account, write and destructive actions ask for
confirmation, and any integration secrets you've stored are masked in responses.
Only when you explicitly ask it to place a call or send an SMS/WhatsApp — and it confirms first.
Building and editing assistants, reading calls, and managing your account don't place calls.
This block comes from **OpenAI's own safety layer inside ChatGPT**, not from Famulor. When ChatGPT is
about to trigger a tool that places a real outbound phone call, OpenAI's policy on AI agents
initiating phone calls stops it before the request ever reaches us. We can't override OpenAI's
decision from our side, and it mainly affects the **ChatGPT browser**.
Things that work:
* **ChatGPT desktop app** or an **OpenAI agent** — the same call goes through there.
* **Claude** — the call works there too, including placing a reminder call through the assistant.
* **Schedule an outbound campaign** — for reminder calls ("call John at 16:00"), set up a
[scheduled outbound campaign](/en/outbound-calls/campaigns) (assistant + contact + time) from the dashboard or via the [API](/en/api-reference/introduction) /
[Automate](/en/automation-platform/introduction). It never goes through ChatGPT's safety layer, so it's never blocked.
A native ChatGPT integration is in review with OpenAI and coming soon.
## Troubleshooting
### OAuth / sign-in fails
* Confirm your [API key](https://app.famulor.de/api-keys) is valid and copied without extra spaces.
* Try signing in again — tokens expire after 30 days.
* For ChatGPT, ensure **Developer mode** is on and OAuth is selected (not API key in headers).
### Server not connecting
* Use `https://app.famulor.de/mcp`.
* Check health: [https://app.famulor.de/health](https://app.famulor.de/health)
* Restart your client and refresh MCP servers (Cursor: **Settings → MCP → Refresh**).
### Tools not appearing
* Complete OAuth sign-in after adding the server.
* In ChatGPT, ensure the **Famulor** app is selected for the current chat.
Related pages: [MCP Server](/en/mcp/server), [Claude & ChatGPT Connector](/en/automation/mcp-connector), [Famulor Skill](/en/mcp/famulor-skill).
After you click **Add**, your browser opens Famulor's OAuth consent screen. Review the
permissions, paste your [API key](https://app.famulor.de/api-keys) when asked, then click **Connect**.
Once the connector is listed in the Claude and ChatGPT directories, you'll also be able to add it in
one click by searching for **Famulor** under Settings → Connectors — no manual URL needed.
## CLI clients — Claude Code, Codex, Gemini CLI
Add the hosted server to a CLI agent, then sign in with your [API key](https://app.famulor.de/api-keys) when prompted:
```bash theme={null}
# Claude Code
claude mcp add --transport http famulor https://app.famulor.de/mcp
# OpenAI Codex
codex mcp add famulor --url https://app.famulor.de/mcp && codex mcp login famulor
# Gemini CLI
gemini mcp add --transport http famulor https://app.famulor.de/mcp
```
Prefer a full onboarding agent over raw tools? Install the **Famulor Skill** (works with Claude Code, Cursor, Codex, OpenClaw, Hermes and more): `npx skills add bekservice/Famulor-Skill` — see [Famulor Skill](/en/mcp/famulor-skill).
## Other clients
**One-click install:** [Add to Cursor](cursor://anysphere.cursor-deeplink/mcp/install?name=famulor\&config=eyJ0eXBlIjoiaHR0cCIsInVybCI6Imh0dHBzOi8vYXBwLmZhbXVsb3IuZGUvbWNwIn0%3D) · [Add to VS Code](https://vscode.dev/redirect/mcp/install?name=famulor\&config=%7B%22type%22%3A%22http%22%2C%22url%22%3A%22https%3A%2F%2Fapp.famulor.de%2Fmcp%22%7D)
**Global:** Cursor **Settings → Tools & MCP → New MCP Server** (opens `~/.cursor/mcp.json`)
**Project:** create `.cursor/mcp.json` in your project root.
```json theme={null}
{
"mcpServers": {
"famulor": {
"type": "http",
"url": "https://app.famulor.de/mcp"
}
}
}
```
Refresh MCP in settings after saving. Sign in with your [API key](https://app.famulor.de/api-keys) when prompted.
### Windsurf
`~/.codeium/windsurf/mcp_config.json`
```json theme={null}
{
"mcpServers": {
"famulor": {
"serverUrl": "https://app.famulor.de/mcp"
}
}
}
```
### VS Code
`.vscode/mcp.json`
```json theme={null}
{
"servers": {
"famulor": {
"type": "http",
"url": "https://app.famulor.de/mcp"
}
}
}
```
### Cline
**Cline extension → MCP Servers → Configure**
```json theme={null}
{
"mcpServers": {
"famulor": {
"url": "https://app.famulor.de/mcp"
}
}
}
```
### Continue
`~/.continue/config.yaml`
```yaml theme={null}
mcpServers:
- name: famulor
type: streamable-http
url: "https://app.famulor.de/mcp"
```
### Zed
`~/.config/zed/settings.json`
```json theme={null}
{
"context_servers": {
"famulor": {
"command": "npx",
"args": ["-y", "mcp-remote@latest", "https://app.famulor.de/mcp"]
}
}
}
```
## Try it
Start a new chat in Claude or ChatGPT and ask, for example:
"Create an inbound receptionist for my dental clinic that books appointments and answers FAQs."
"Read my last 5 calls and tell me what my assistant got wrong."
"Create a mid-call tool that looks up an order by number from our API."
"Set up an outbound campaign for this week's leads and start it."
More prompt ideas:
* *"Create a German sales assistant using GPT-4.1-mini and the Susi voice"*
* *"Start campaign #42 and add these 50 leads"*
* *"Show me all calls today where the goal wasn't reached"*
* *"What were my last calls?"*
## Security & privacy
* **OAuth 2.0** with a branded consent screen — no API key is ever stored in config files.
* **Scoped to your account** — the connector can only see and change your own data.
* **Secrets masked** — auth tokens stored on your tools are never returned in plain text.
* **No chat-history harvesting** — the connector acts only on your Famulor resources.
* Privacy policy: [famulor.io/privacy](https://www.famulor.io/privacy).
## Self-hosting
To run your own instance instead of the hosted server, see [MCP Server — Self-hosting](/en/mcp/server#self-hosting).
## FAQ
This page covers **ChatGPT**, **Claude**, CLI agents, and other MCP clients such as Cursor or
VS Code. For a full connector walkthrough with screenshots, see
[Claude & ChatGPT Connector](/en/automation/mcp-connector).
Yes — you paste your [Famulor API key](https://app.famulor.de/api-keys) during the OAuth consent
flow. It is **not** stored in config files — only inside an encrypted access token on your device.
Yes. Every tool is scoped to your own authenticated account, write and destructive actions ask for
confirmation, and any integration secrets you've stored are masked in responses.
Only when you explicitly ask it to place a call or send an SMS/WhatsApp — and it confirms first.
Building and editing assistants, reading calls, and managing your account don't place calls.
This block comes from **OpenAI's own safety layer inside ChatGPT**, not from Famulor. When ChatGPT is
about to trigger a tool that places a real outbound phone call, OpenAI's policy on AI agents
initiating phone calls stops it before the request ever reaches us. We can't override OpenAI's
decision from our side, and it mainly affects the **ChatGPT browser**.
Things that work:
* **ChatGPT desktop app** or an **OpenAI agent** — the same call goes through there.
* **Claude** — the call works there too, including placing a reminder call through the assistant.
* **Schedule an outbound campaign** — for reminder calls ("call John at 16:00"), set up a
[scheduled outbound campaign](/en/outbound-calls/campaigns) (assistant + contact + time) from the dashboard or via the [API](/en/api-reference/introduction) /
[Automate](/en/automation-platform/introduction). It never goes through ChatGPT's safety layer, so it's never blocked.
A native ChatGPT integration is in review with OpenAI and coming soon.
## Troubleshooting
### OAuth / sign-in fails
* Confirm your [API key](https://app.famulor.de/api-keys) is valid and copied without extra spaces.
* Try signing in again — tokens expire after 30 days.
* For ChatGPT, ensure **Developer mode** is on and OAuth is selected (not API key in headers).
### Server not connecting
* Use `https://app.famulor.de/mcp`.
* Check health: [https://app.famulor.de/health](https://app.famulor.de/health)
* Restart your client and refresh MCP servers (Cursor: **Settings → MCP → Refresh**).
### Tools not appearing
* Complete OAuth sign-in after adding the server.
* In ChatGPT, ensure the **Famulor** app is selected for the current chat.
Related pages: [MCP Server](/en/mcp/server), [Claude & ChatGPT Connector](/en/automation/mcp-connector), [Famulor Skill](/en/mcp/famulor-skill).