> ## Documentation Index
> Fetch the complete documentation index at: https://docs.famulor.io/llms.txt
> Use this file to discover all available pages before exploring further.
# Telnyx Integration
> Step-by-step setup guide to connect Telnyx numbers to Famulor via SIP trunking
**Done for you — any region, any country (our EU partner carrier)**
If you prefer not to configure a SIP trunk or import numbers yourself, our **EU partner carrier** can supply **local numbers in any region and any country**, set up the **SIP trunk**, and **import the connection into Famulor** for you. Provisioning runs **end-to-end through the partner** (carrier-side), so you skip DIY trunk and number import in Famulor.
* **Custom number region / full-service onboarding:** [Famulor Custom Number Region form](https://tally.so/r/w4bN2Y)
* **More detail or bespoke options:** [support@famulor.de](mailto:support@famulor.de)
# Telnyx Integration
> A step-by-step guide to connect your Telnyx phone numbers via SIP trunking
This guide walks you through connecting your Telnyx phone numbers using SIP trunking. You will create an FQDN connection in Telnyx, configure outbound authentication, assign your numbers, and import them into Famulor.
**One-time setup:** You only need to create the SIP connection once (Steps 1-5). For each additional phone number after that, simply assign it to your existing connection (Step 5) and import it (Step 7).
**Why FQDN?** The connection type must be **FQDN** - not Credentials or IP Address. Credential connections require SIP REGISTER for inbound calls, which our platform does not send. FQDN connections route inbound calls directly to our SIP server and authenticate outbound calls via credentials.
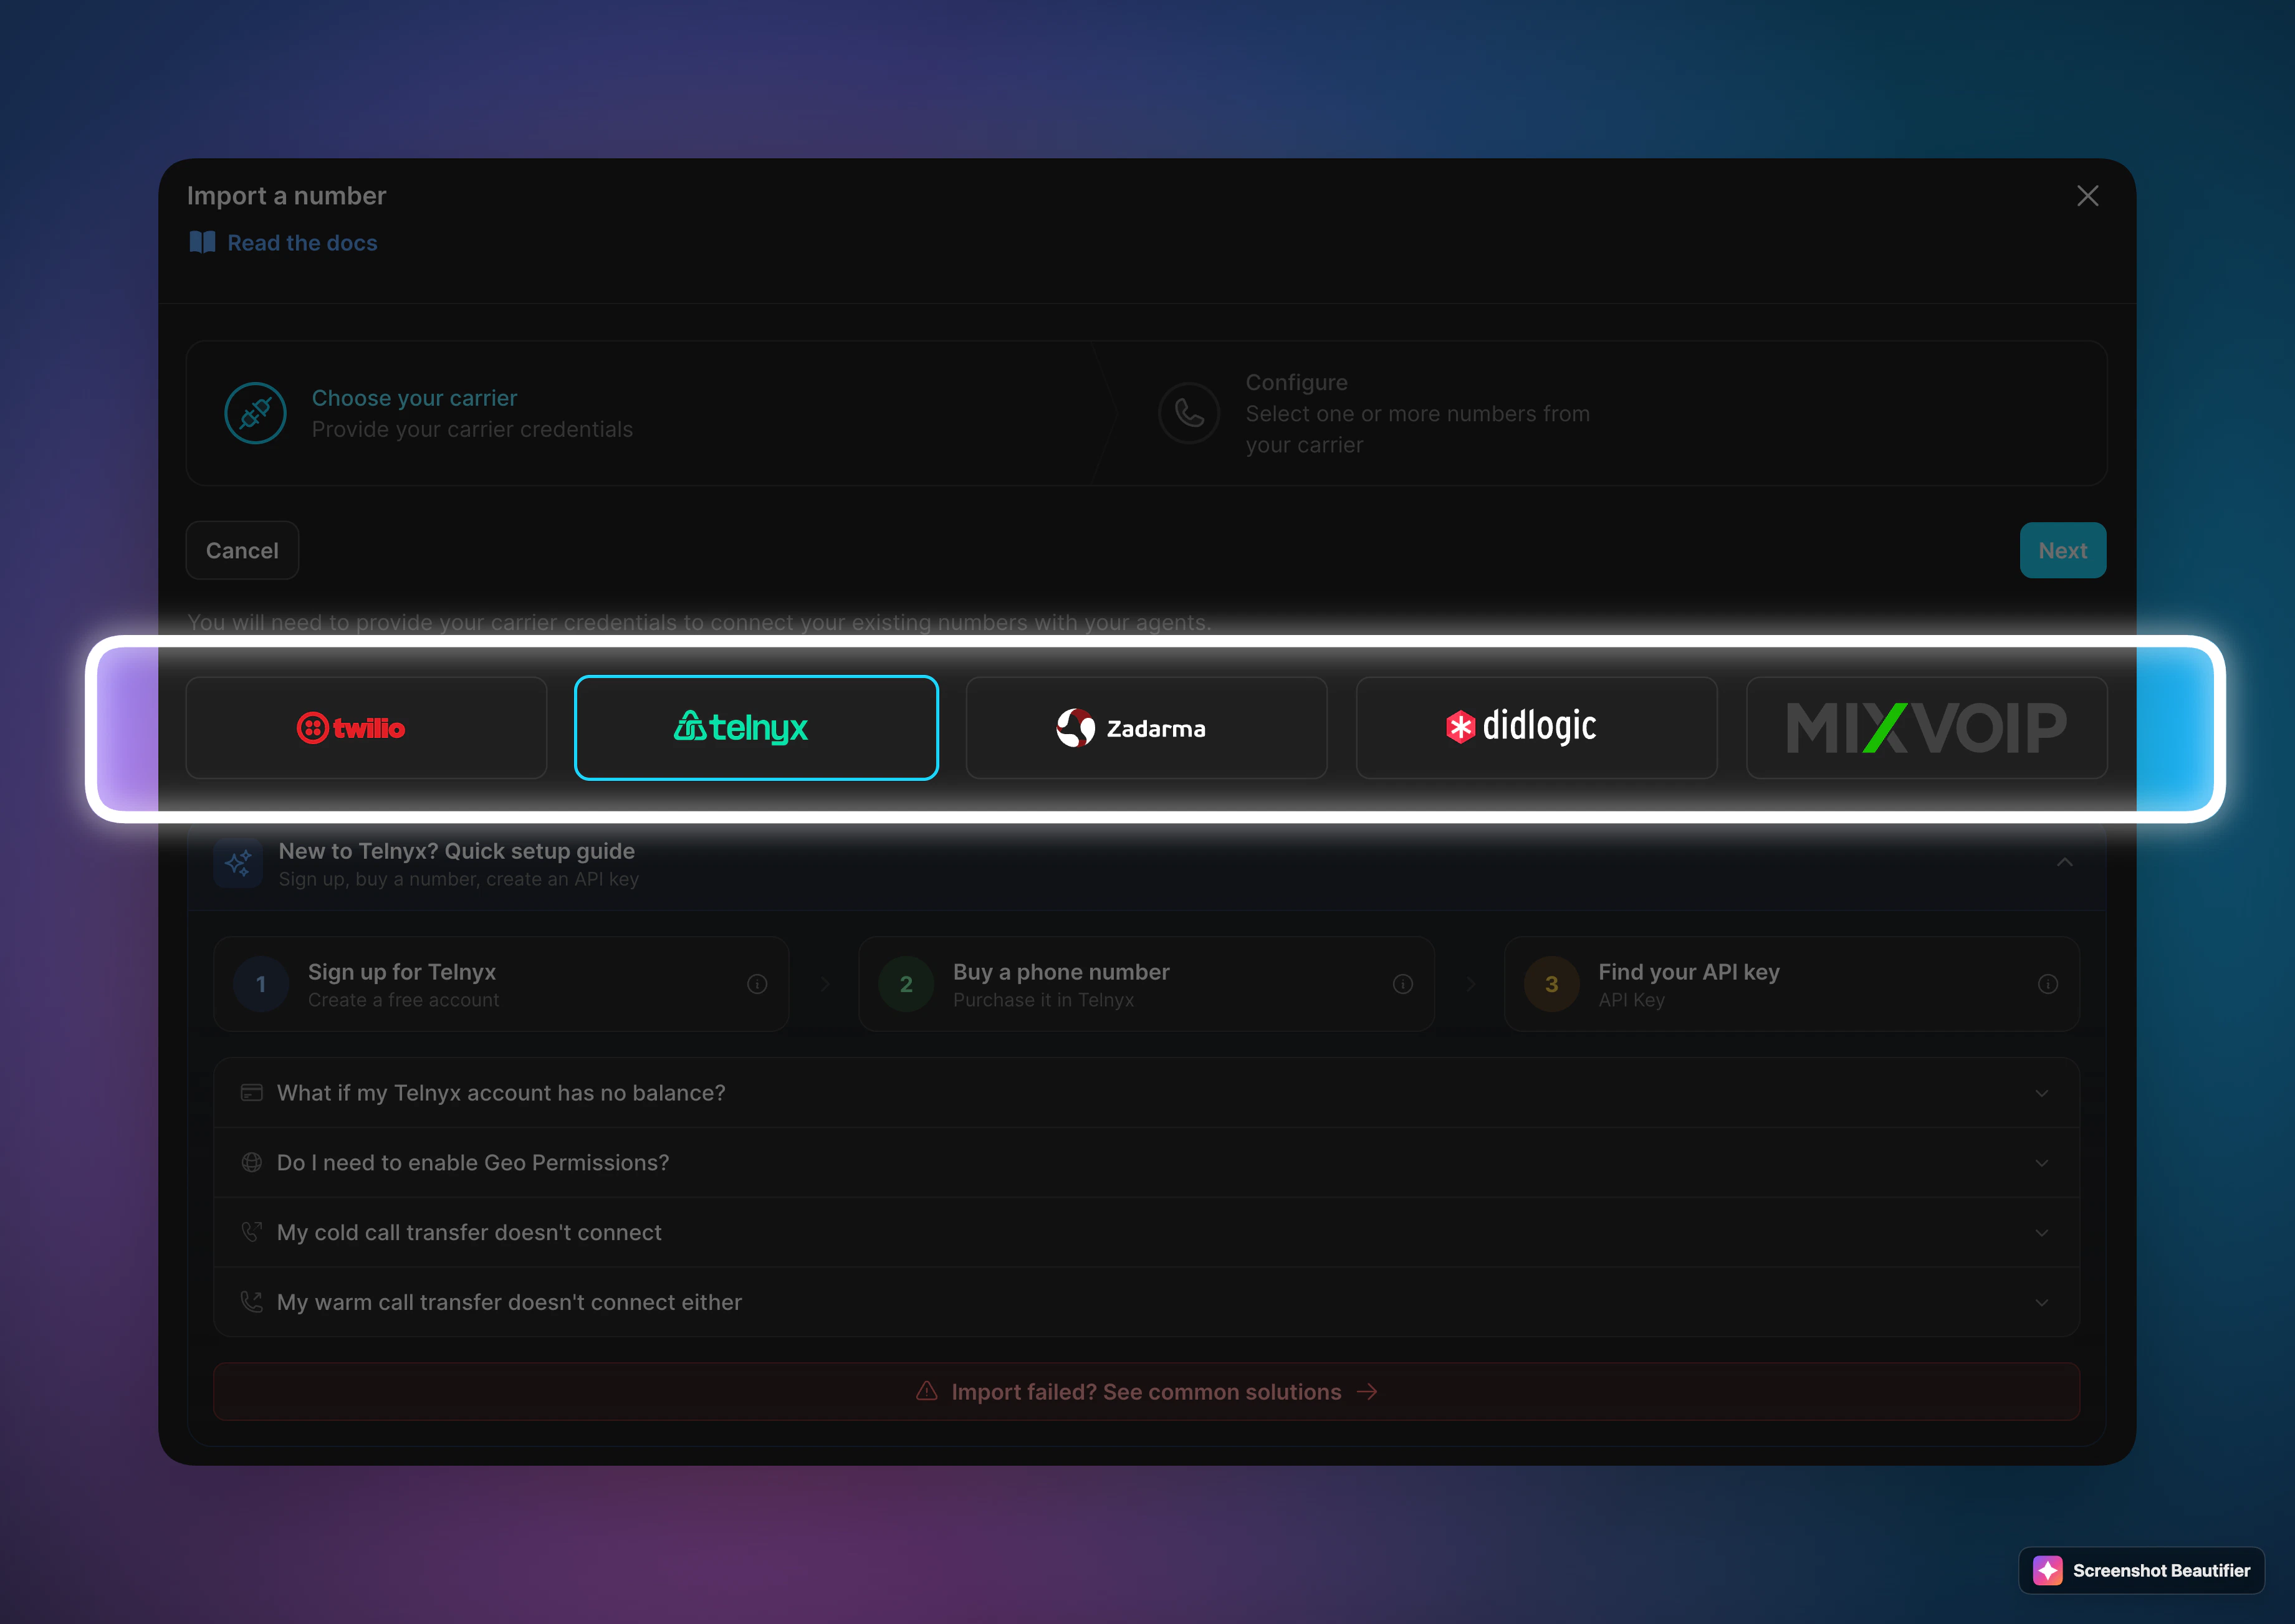
**Phone number import (BYOC):** Open **Your Phone Numbers → Integrate SIP trunk** in the Famulor dashboard. The wizard lists **Twilio**, **Telnyx**, **Zadarma**, and **DIDLogic**. **Import number** creates what you need on Famulor’s side and imports your numbers from the carrier once your account is linked—you do not need to fill every SIP field by hand. Use **Import number**, or **follow this guide below** for full manual setup. Overview: [SIP Integration](/en/provisioning/sip-ai/sip-integration). The steps below document **manual Telnyx** SIP trunking (FQDN).
 **Pricing snapshot:** Telnyx publishes public starting prices for numbers and SIP trunking, while country-specific details are provided through the live pricing sheet.
* **Inbound / number rental:** local numbers from `$1/month`; inbound local calls from `$0.0035/min`
* **Outbound / calling:** international outbound calls from `$0.005/min`
* **Germany / Switzerland / United Kingdom / United States:** exact live country-specific rates are available in Telnyx pricing sheets rather than directly on the summary page
* **Official pricing:** [Numbers pricing](https://www.telnyx.com/pricing/numbers) and [SIP trunking pricing](https://telnyx.com/pricing/elastic-sip)
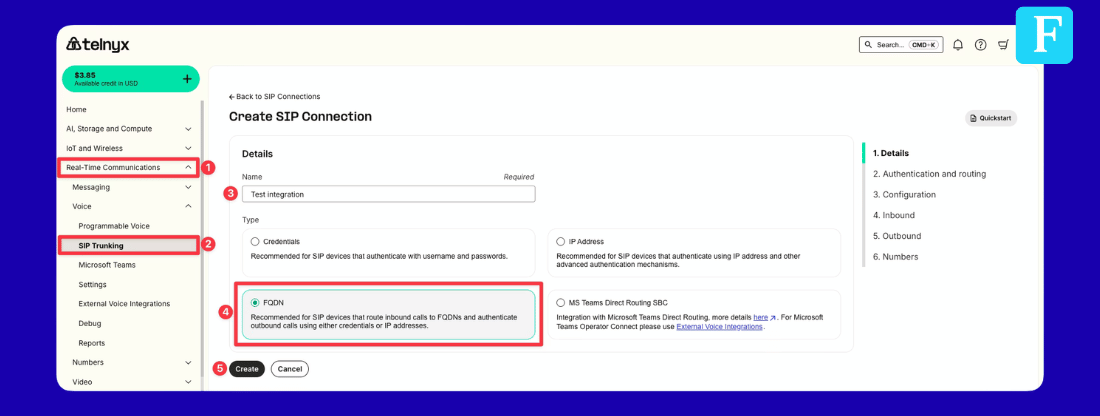
## Step 1: Create SIP Connection
1. Log in to the [Telnyx Mission Control Portal](https://portal.telnyx.com)
2. Navigate to **Real-Time Communications** -> **Voice** -> **SIP Trunking**
3. Click **Create SIP Connection**
4. **Name**: Choose a name (for example, `my-company SIP trunk`)
5. **Type**: Select **FQDN**
6. Click **Create** - this opens the setup wizard
**Pricing snapshot:** Telnyx publishes public starting prices for numbers and SIP trunking, while country-specific details are provided through the live pricing sheet.
* **Inbound / number rental:** local numbers from `$1/month`; inbound local calls from `$0.0035/min`
* **Outbound / calling:** international outbound calls from `$0.005/min`
* **Germany / Switzerland / United Kingdom / United States:** exact live country-specific rates are available in Telnyx pricing sheets rather than directly on the summary page
* **Official pricing:** [Numbers pricing](https://www.telnyx.com/pricing/numbers) and [SIP trunking pricing](https://telnyx.com/pricing/elastic-sip)
## Step 1: Create SIP Connection
1. Log in to the [Telnyx Mission Control Portal](https://portal.telnyx.com)
2. Navigate to **Real-Time Communications** -> **Voice** -> **SIP Trunking**
3. Click **Create SIP Connection**
4. **Name**: Choose a name (for example, `my-company SIP trunk`)
5. **Type**: Select **FQDN**
6. Click **Create** - this opens the setup wizard
 ## Step 2: Authentication and Routing
The wizard takes you to the **Authentication and routing** step. Here you add the FQDN for inbound call routing and set up outbound credentials.
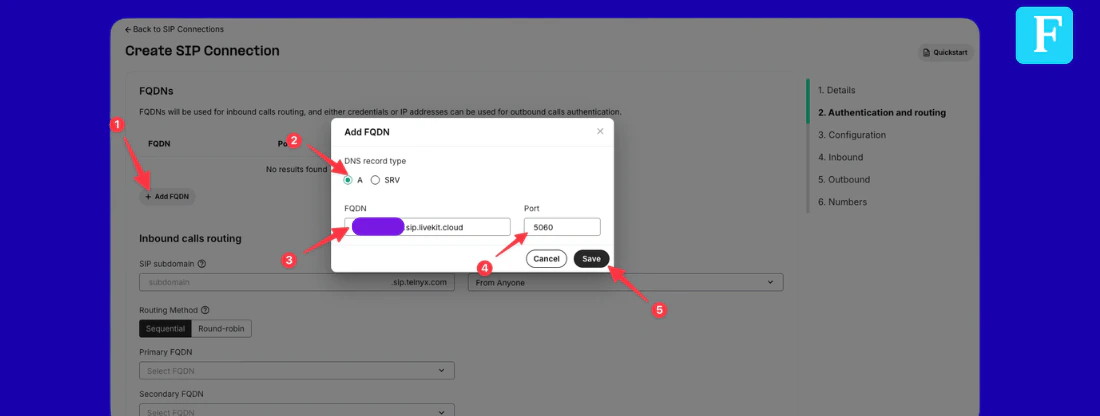
### Add FQDN
1. Click **"+ Add FQDN"** and enter:
* **DNS Record Type**: `A`
* **FQDN**: `{famulorsipadress}.sip.livekit.cloud`
* **Port**: `5060`
2. Click **Save**
## Step 2: Authentication and Routing
The wizard takes you to the **Authentication and routing** step. Here you add the FQDN for inbound call routing and set up outbound credentials.
### Add FQDN
1. Click **"+ Add FQDN"** and enter:
* **DNS Record Type**: `A`
* **FQDN**: `{famulorsipadress}.sip.livekit.cloud`
* **Port**: `5060`
2. Click **Save**
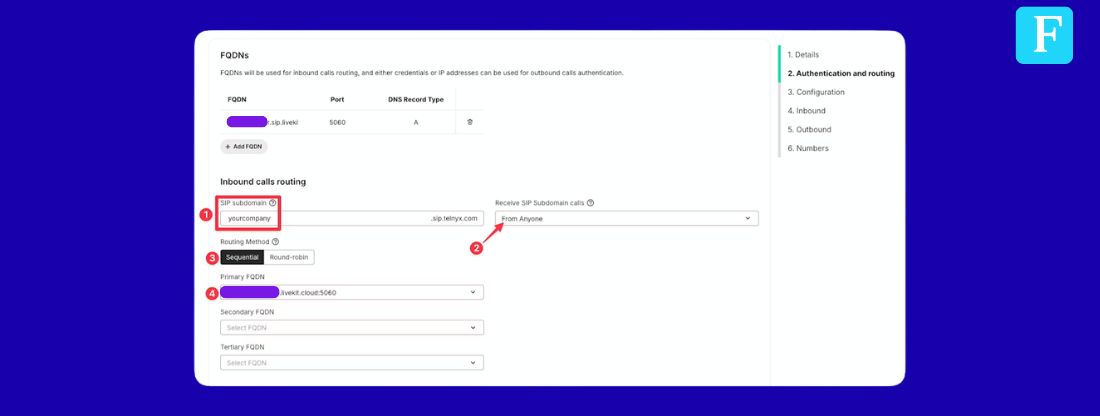
 ### Inbound Calls Routing
Scroll down to the **Inbound calls routing** section on the same page:
1. **SIP subdomain**: Enter a name (for example, `yourcompany`) - this creates `yourcompany.sip.telnyx.com`
2. **Receive SIP Subdomain calls**: Set to **From Anyone**
3. **Primary FQDN**: Select `{famulorsipadress}.sip.livekit.cloud` from the dropdown
### Inbound Calls Routing
Scroll down to the **Inbound calls routing** section on the same page:
1. **SIP subdomain**: Enter a name (for example, `yourcompany`) - this creates `yourcompany.sip.telnyx.com`
2. **Receive SIP Subdomain calls**: Set to **From Anyone**
3. **Primary FQDN**: Select `{famulorsipadress}.sip.livekit.cloud` from the dropdown
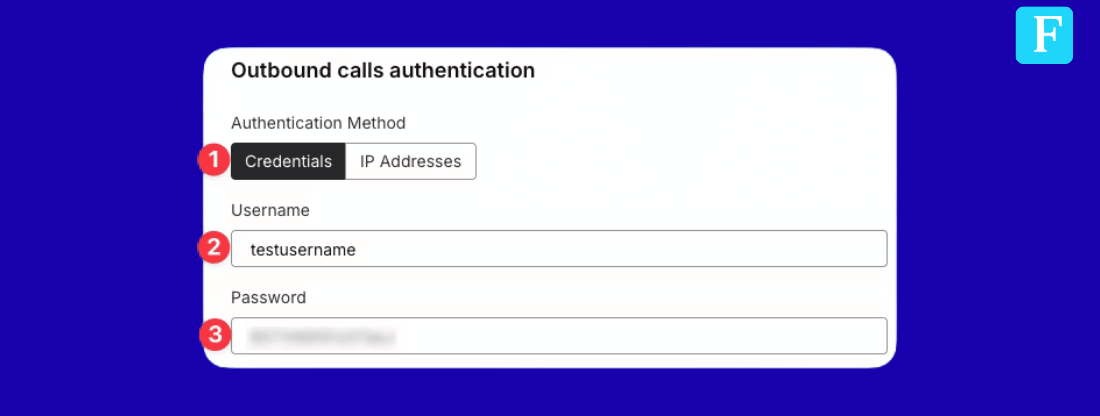
 ### Outbound Authentication
Scroll down further to the **Outbound calls authentication** section:
1. **Method**: Select **Credentials**
2. Set a **username** and **password** - save these, you need them when importing the number into Famulor
### Outbound Authentication
Scroll down further to the **Outbound calls authentication** section:
1. **Method**: Select **Credentials**
2. Set a **username** and **password** - save these, you need them when importing the number into Famulor
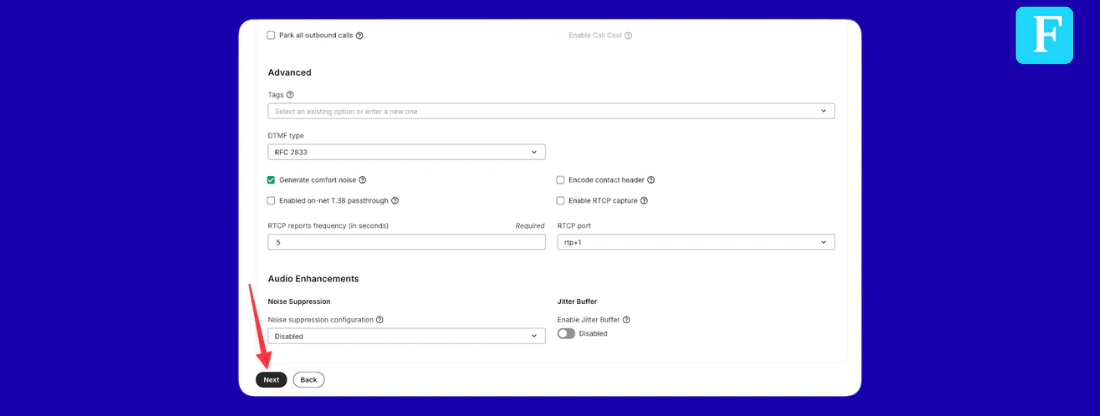
 Click **Next** at the bottom of the page.
## Step 3: Configuration
The wizard shows the **Configuration** page with connection details, webhooks, and advanced settings.
You do not need to change anything here - just verify that the **Type** shows **FQDN Connection** and click **Next**.
Click **Next** at the bottom of the page.
## Step 3: Configuration
The wizard shows the **Configuration** page with connection details, webhooks, and advanced settings.
You do not need to change anything here - just verify that the **Type** shows **FQDN Connection** and click **Next**.
 ## Step 4: Inbound and Outbound
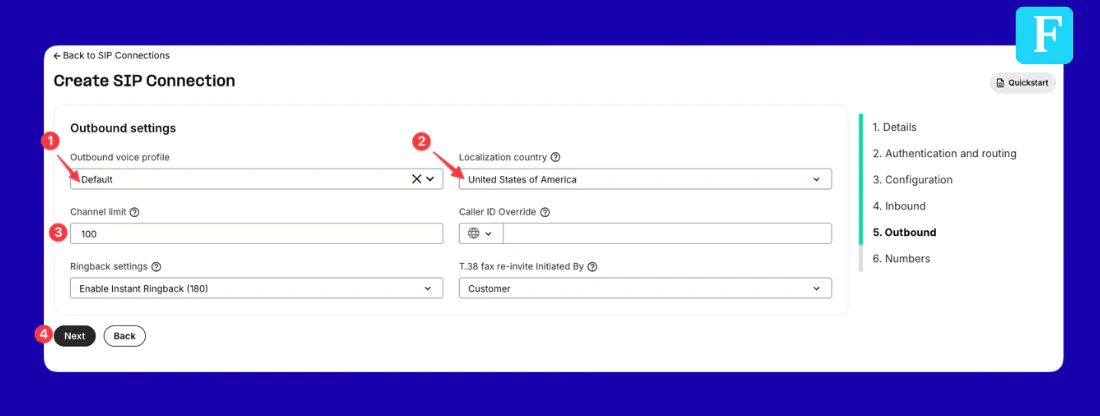
The wizard goes through the **Inbound** and **Outbound** steps. Since you already configured these in Step 2, verify the settings and click **Next** on each page.
On the **Outbound** page, make sure:
1. **Outbound voice profile**: Select your profile (or "Default")
2. **Localization country**: Select your country
3. **Channel limit**: Set to `10` or higher
## Step 4: Inbound and Outbound
The wizard goes through the **Inbound** and **Outbound** steps. Since you already configured these in Step 2, verify the settings and click **Next** on each page.
On the **Outbound** page, make sure:
1. **Outbound voice profile**: Select your profile (or "Default")
2. **Localization country**: Select your country
3. **Channel limit**: Set to `10` or higher
 If you do not have an Outbound Voice Profile, go to **Voice** -> **Settings** -> **Outbound Voice Profiles** -> **Create Profile**. Make sure to enable the countries you want to call under **Allowed Destinations**.
## Step 5: Assign Numbers
The last step of the wizard is the **Numbers** page:
1. Click **Assign numbers**
2. Select the phone number(s) you want to use
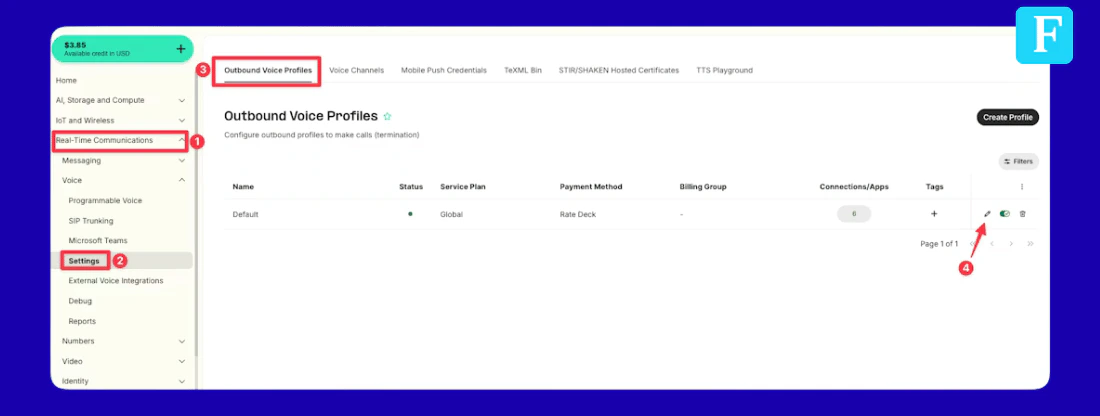
## Step 6: Enable Geographic Permissions
1. Go to **Voice** -> **Settings** -> **Outbound Voice Profiles**
2. Click **Edit**
If you do not have an Outbound Voice Profile, go to **Voice** -> **Settings** -> **Outbound Voice Profiles** -> **Create Profile**. Make sure to enable the countries you want to call under **Allowed Destinations**.
## Step 5: Assign Numbers
The last step of the wizard is the **Numbers** page:
1. Click **Assign numbers**
2. Select the phone number(s) you want to use
## Step 6: Enable Geographic Permissions
1. Go to **Voice** -> **Settings** -> **Outbound Voice Profiles**
2. Click **Edit**
 3. Click your profile -> **Allowed Destinations**
4. Enable the countries/regions you need to call
3. Click your profile -> **Allowed Destinations**
4. Enable the countries/regions you need to call
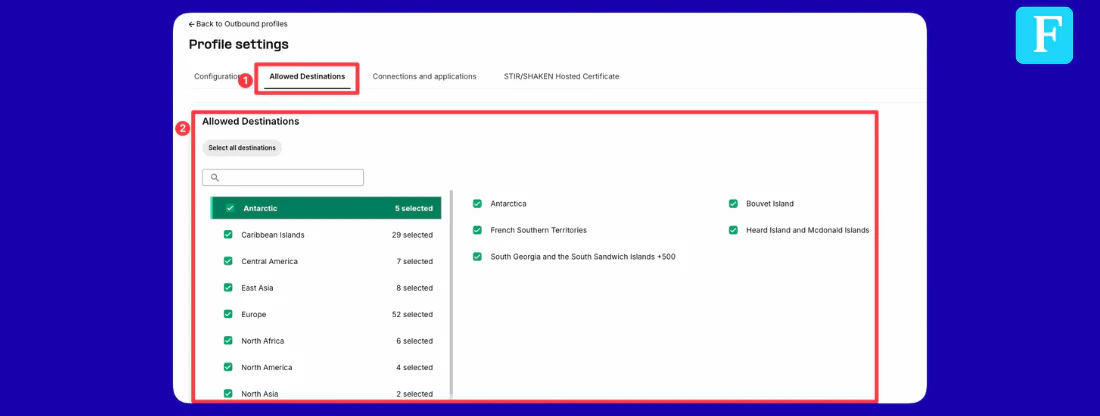 If you skip this step, outbound calls fail with a `403` error: **"Dialed number is not included in whitelisted countries."**
## Step 7: Import Number to Famulor
1. Open **Phone Numbers** directly in your Famulor dashboard.
If it takes you to the login page, log in first - it automatically redirects you to Phone Numbers.
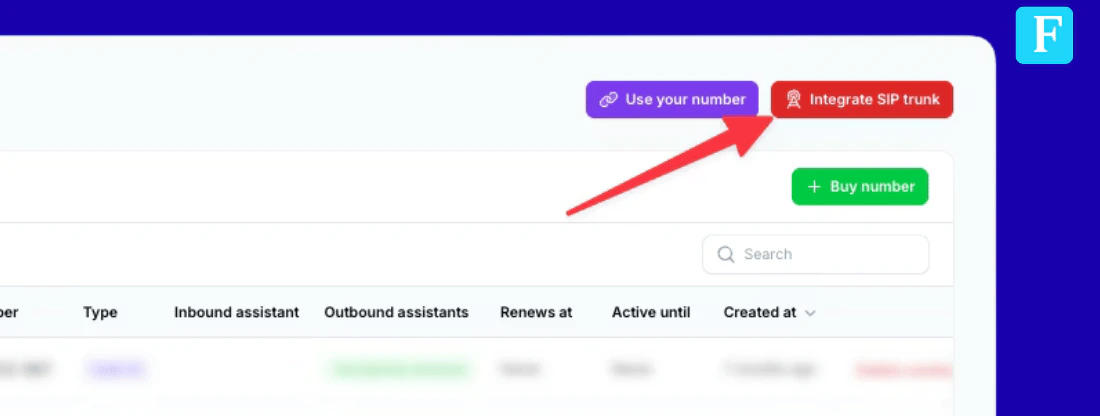
2. Click **"Integrate SIP trunk"** (top-right corner of the page)
If you skip this step, outbound calls fail with a `403` error: **"Dialed number is not included in whitelisted countries."**
## Step 7: Import Number to Famulor
1. Open **Phone Numbers** directly in your Famulor dashboard.
If it takes you to the login page, log in first - it automatically redirects you to Phone Numbers.
2. Click **"Integrate SIP trunk"** (top-right corner of the page)
 3. Fill in your phone number and SIP credentials:
```
Phone number: Your Telnyx number (for example, +1 555 0123)
Username: The outbound username from Step 2
Password: The outbound password from Step 2
```
4. Enter outbound settings:
```
SIP address: sip.telnyx.com
Outbound format: International (with + in front)
```
3. Fill in your phone number and SIP credentials:
```
Phone number: Your Telnyx number (for example, +1 555 0123)
Username: The outbound username from Step 2
Password: The outbound password from Step 2
```
4. Enter outbound settings:
```
SIP address: sip.telnyx.com
Outbound format: International (with + in front)
```
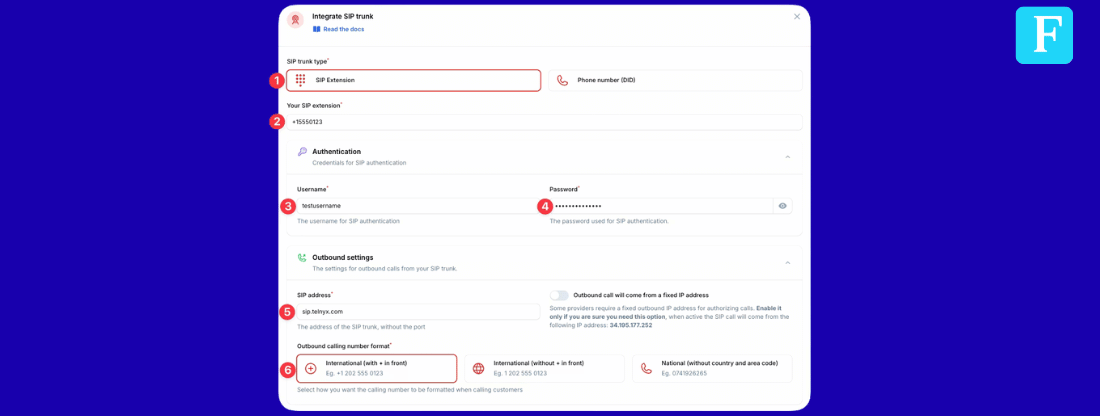 **SIP address must be `sip.telnyx.com`** - do NOT use your SIP subdomain (for example, `yourcompany.sip.telnyx.com`). The subdomain is only for inbound routing on the Telnyx side. Using it as the outbound SIP address results in `404 Not Found` errors.
5. Select **Authorization type**: **IP Address** and add the Telnyx IP addresses for your region:
* **US**: `192.76.120.10`
* **Europe**: `185.246.41.140` and `185.246.41.141`
* **Australia**: `103.115.244.145` and `103.115.244.146`
**SIP address must be `sip.telnyx.com`** - do NOT use your SIP subdomain (for example, `yourcompany.sip.telnyx.com`). The subdomain is only for inbound routing on the Telnyx side. Using it as the outbound SIP address results in `404 Not Found` errors.
5. Select **Authorization type**: **IP Address** and add the Telnyx IP addresses for your region:
* **US**: `192.76.120.10`
* **Europe**: `185.246.41.140` and `185.246.41.141`
* **Australia**: `103.115.244.145` and `103.115.244.146`
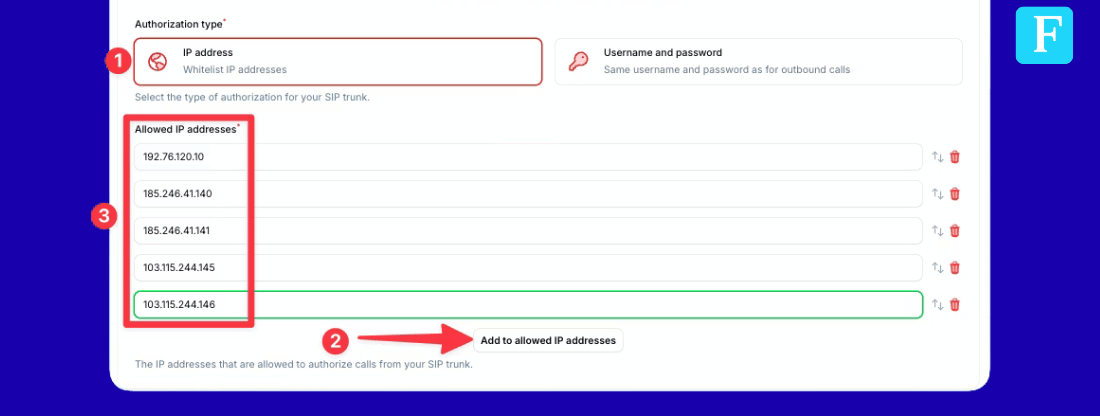 You can add all IP addresses regardless of region - only the relevant ones are used.
6. Select the **country** where your SIP trunk is located.
You can add all IP addresses regardless of region - only the relevant ones are used.
6. Select the **country** where your SIP trunk is located.
 ## Step 8: Verify Setup
To test your Telnyx number, assign it to AI assistants. Inbound and outbound require **separate assistants**:
### Test Inbound
1. Go to **AI Assistants** -> create a new assistant (or use an existing one)
2. Set assistant type to **Receive phone calls**
3. Assign your Telnyx phone number to the assistant
4. Call your Telnyx number from any phone - the AI assistant should answer
### Test Outbound
1. Create a **second assistant** with type **Make phone calls**
2. Assign the same Telnyx phone number to this assistant
3. Click **Speak to assistant** -> **Phone call** - Famulor calls your personal phone using the Telnyx number
A single assistant cannot handle both directions. You need one **Receive phone calls** assistant and one **Make phone calls** assistant, both with the same phone number assigned.
## Security Requirements
Your SIP credentials need to be secure:
* **Username**: Your provider-supplied username
* **Password must have**:
* 12 or more characters
* Numbers
* Upper and lowercase letters
* Special characters recommended
## Common Issues
Go to **Voice** -> **Settings** -> **Outbound Voice Profiles** -> your profile -> **Allowed Destinations** and enable the destination country you are trying to call.
* Make sure the connection type is **FQDN** (not Credentials or IP Address)
* Verify the FQDN is set to `{famulorsipadress}.sip.livekit.cloud` on port `5060`
* Check that the phone number is assigned to the FQDN connection (not another connection)
* Verify the SIP address is `sip.telnyx.com` (not your SIP subdomain)
* Check that credentials match between Telnyx and Famulor
* Make sure an **Outbound Voice Profile** is attached to the connection
* Verify the **Localization country** is set correctly
Credential connections require SIP REGISTER for inbound calls. Famulor uses direct SIP routing (no registration), so FQDN connection type is required. FQDN still supports credential-based authentication for outbound calls.
***
Need help setting up? Our support team specializes in SIP onboarding and will guide you through the full setup for your specific phone system.
Related pages: [SIP Integration](/en/provisioning/sip-ai/sip-integration) and [Twilio Integration](/en/provisioning/sip-ai/twilio-integration).
## Step 8: Verify Setup
To test your Telnyx number, assign it to AI assistants. Inbound and outbound require **separate assistants**:
### Test Inbound
1. Go to **AI Assistants** -> create a new assistant (or use an existing one)
2. Set assistant type to **Receive phone calls**
3. Assign your Telnyx phone number to the assistant
4. Call your Telnyx number from any phone - the AI assistant should answer
### Test Outbound
1. Create a **second assistant** with type **Make phone calls**
2. Assign the same Telnyx phone number to this assistant
3. Click **Speak to assistant** -> **Phone call** - Famulor calls your personal phone using the Telnyx number
A single assistant cannot handle both directions. You need one **Receive phone calls** assistant and one **Make phone calls** assistant, both with the same phone number assigned.
## Security Requirements
Your SIP credentials need to be secure:
* **Username**: Your provider-supplied username
* **Password must have**:
* 12 or more characters
* Numbers
* Upper and lowercase letters
* Special characters recommended
## Common Issues
Go to **Voice** -> **Settings** -> **Outbound Voice Profiles** -> your profile -> **Allowed Destinations** and enable the destination country you are trying to call.
* Make sure the connection type is **FQDN** (not Credentials or IP Address)
* Verify the FQDN is set to `{famulorsipadress}.sip.livekit.cloud` on port `5060`
* Check that the phone number is assigned to the FQDN connection (not another connection)
* Verify the SIP address is `sip.telnyx.com` (not your SIP subdomain)
* Check that credentials match between Telnyx and Famulor
* Make sure an **Outbound Voice Profile** is attached to the connection
* Verify the **Localization country** is set correctly
Credential connections require SIP REGISTER for inbound calls. Famulor uses direct SIP routing (no registration), so FQDN connection type is required. FQDN still supports credential-based authentication for outbound calls.
***
Need help setting up? Our support team specializes in SIP onboarding and will guide you through the full setup for your specific phone system.
Related pages: [SIP Integration](/en/provisioning/sip-ai/sip-integration) and [Twilio Integration](/en/provisioning/sip-ai/twilio-integration).