> ## Documentation Index
> Fetch the complete documentation index at: https://docs.famulor.io/llms.txt
> Use this file to discover all available pages before exploring further.
# Twilio Integration
> Step-by-step guide to connecting your Twilio account via SIP trunking
**Done for you — any region, any country (our EU partner carrier)**
If you prefer not to configure a SIP trunk or import numbers yourself, our **EU partner carrier** can supply **local numbers in any region and any country**, set up the **SIP trunk**, and **import the connection into Famulor** for you. Provisioning runs **end-to-end through the partner** (carrier-side), so you skip DIY trunk and number import in Famulor.
* **Custom number region / full-service onboarding:** [Famulor Custom Number Region form](https://tally.so/r/w4bN2Y)
* **More detail or bespoke options:** [support@famulor.de](mailto:support@famulor.de)
This guide walks you through connecting your Twilio phone numbers using Elastic SIP Trunking. You'll create a SIP trunk in Twilio, assign your numbers to it, and import them into the platform.
**One-time setup:** You only need to create the Elastic SIP Trunk once (Step 1). For each additional phone number after that, you simply add it to your existing trunk (Step 2) and import it (Step 3).
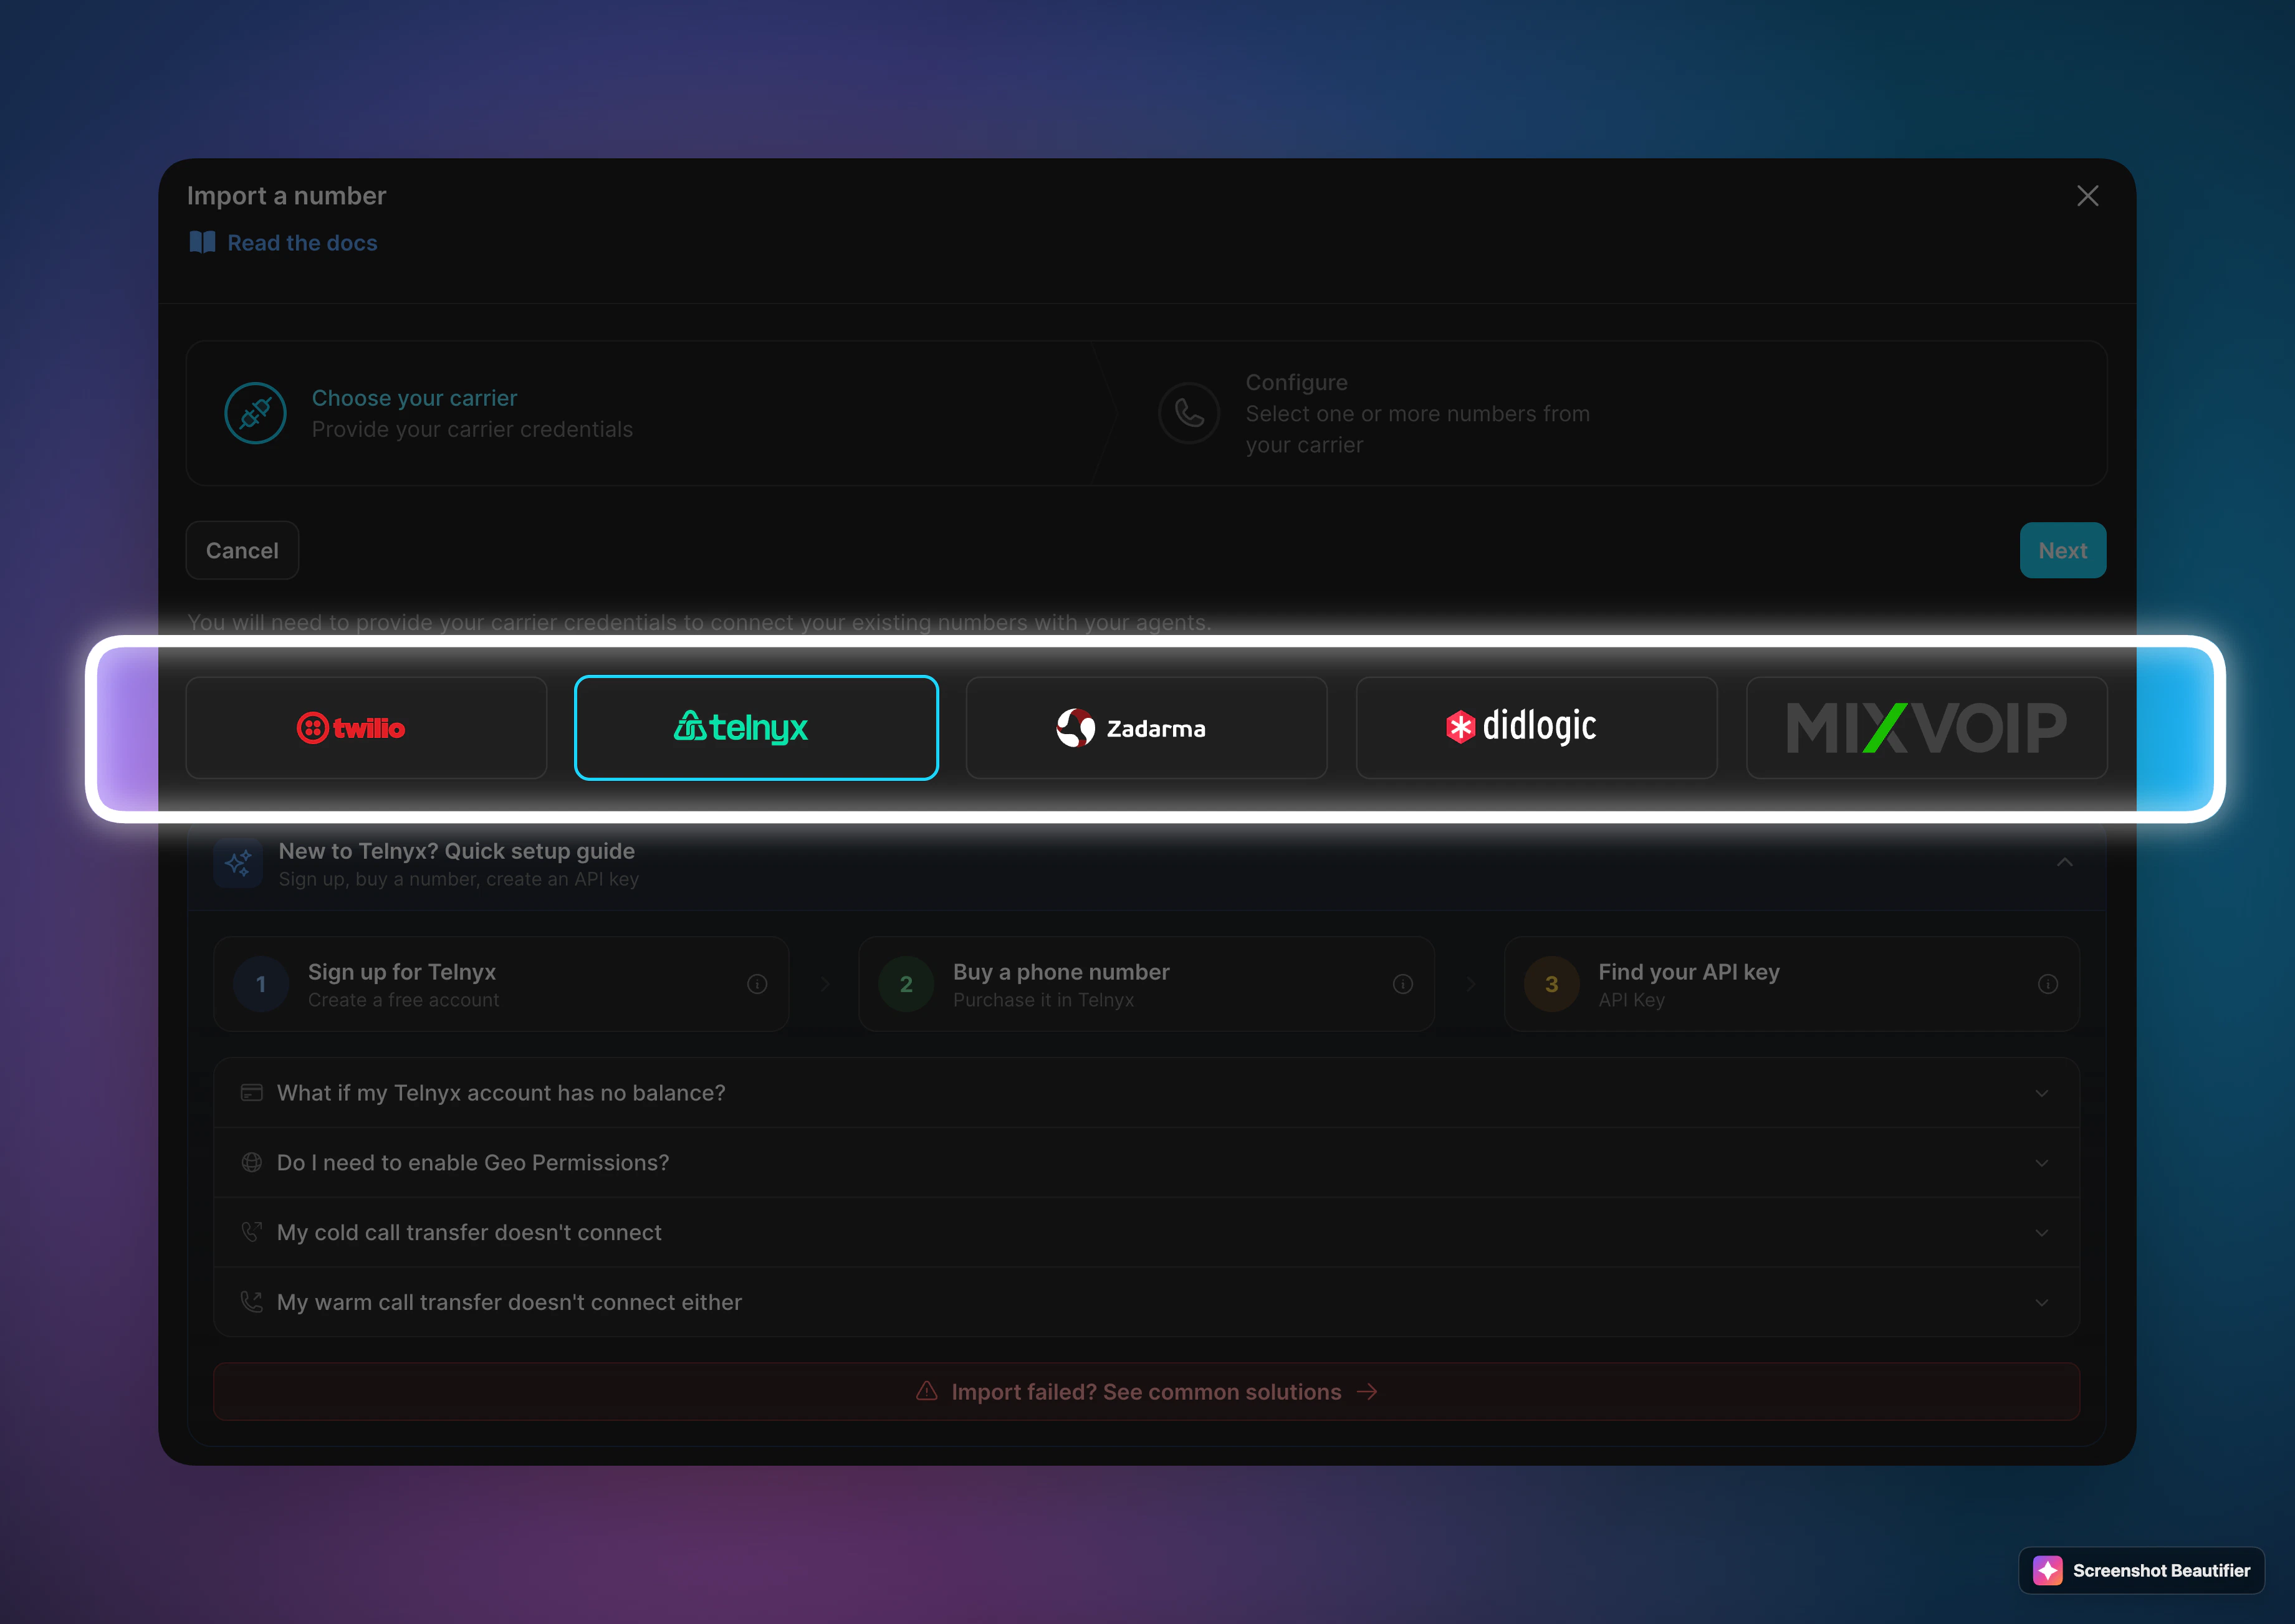
**Phone number import (BYOC):** Open **Your Phone Numbers → Integrate SIP trunk** in the Famulor dashboard. The wizard lists **Twilio**, **Telnyx**, **Zadarma**, and **DIDLogic**. **Import number** creates what you need on Famulor’s side and imports your numbers from the carrier once your account is linked—you do not need to fill every SIP field by hand. Use **Import number**, or **follow this guide below** for full manual setup. Overview: [SIP Integration](/en/provisioning/sip-ai/sip-integration). The steps below document **manual Twilio Elastic SIP Trunking**.
 **Pricing snapshot:** Public Elastic SIP Trunking pricing checked against Twilio's official country pages.
* **Germany:** local number `from $1.35/month`, inbound origination `from $0.0060/min`, outbound termination `from $0.0170/min`
* **Switzerland:** local number `from $1.15/month`, inbound origination `from $0.0060/min`, outbound termination `from $0.0334/min`
* **United Kingdom:** local number `from $1.15/month`, inbound origination `from $0.0060/min`, outbound termination `from $0.0118/min`
* **United States:** local number `from $1.15/month`, inbound origination `from $0.0034/min`, outbound termination `from $0.0011/min`
* **Official pricing:** [Germany](https://www.twilio.com/en-us/sip-trunking/pricing/de), [Switzerland](https://twilio.com/en-us/sip-trunking/pricing/ch), [United Kingdom](https://twilio.com/en-us/sip-trunking/pricing/gb), [United States](https://www.twilio.com/sip-trunking/pricing/us)
## Step 1: Create Elastic SIP Trunking
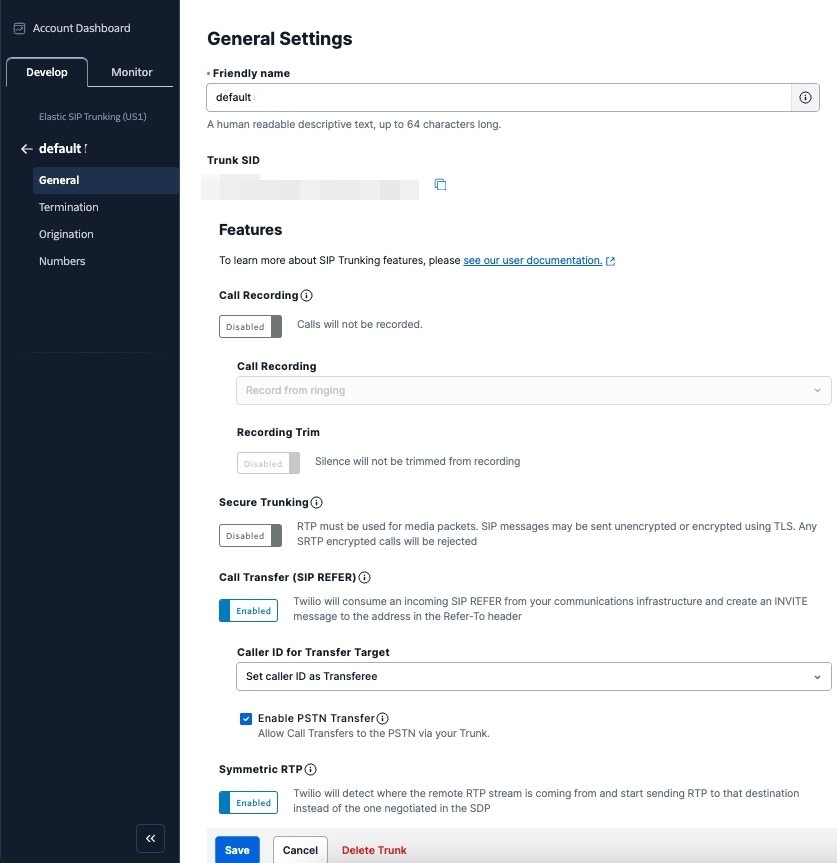
1. Create the trunk, give it a name, and configure the general settings
**Pricing snapshot:** Public Elastic SIP Trunking pricing checked against Twilio's official country pages.
* **Germany:** local number `from $1.35/month`, inbound origination `from $0.0060/min`, outbound termination `from $0.0170/min`
* **Switzerland:** local number `from $1.15/month`, inbound origination `from $0.0060/min`, outbound termination `from $0.0334/min`
* **United Kingdom:** local number `from $1.15/month`, inbound origination `from $0.0060/min`, outbound termination `from $0.0118/min`
* **United States:** local number `from $1.15/month`, inbound origination `from $0.0034/min`, outbound termination `from $0.0011/min`
* **Official pricing:** [Germany](https://www.twilio.com/en-us/sip-trunking/pricing/de), [Switzerland](https://twilio.com/en-us/sip-trunking/pricing/ch), [United Kingdom](https://twilio.com/en-us/sip-trunking/pricing/gb), [United States](https://www.twilio.com/sip-trunking/pricing/us)
## Step 1: Create Elastic SIP Trunking
1. Create the trunk, give it a name, and configure the general settings
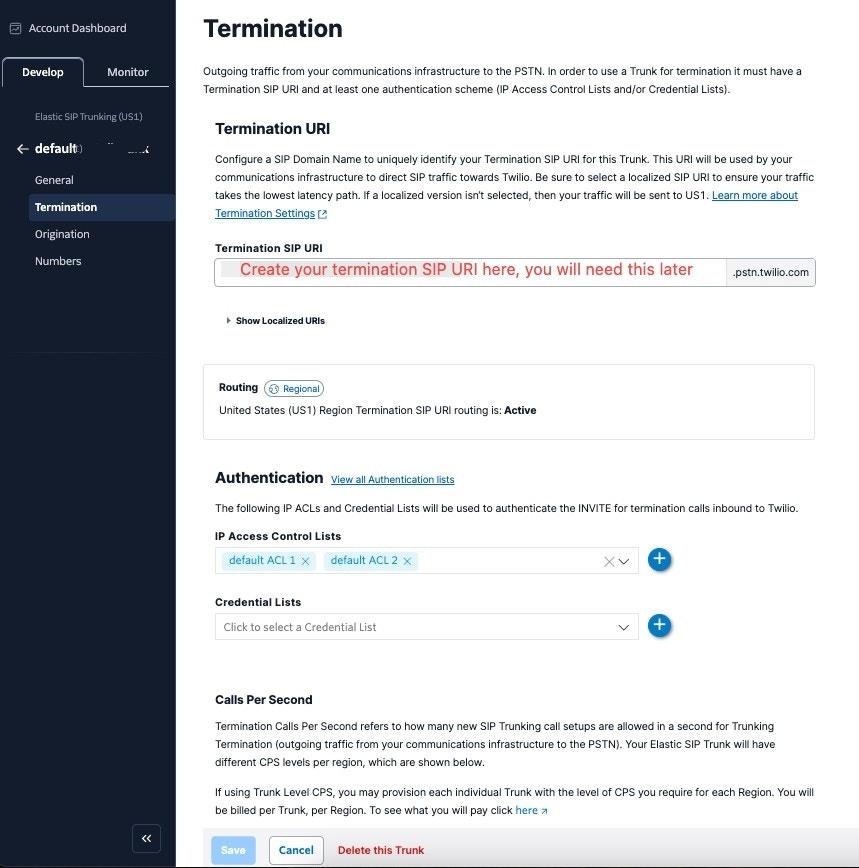
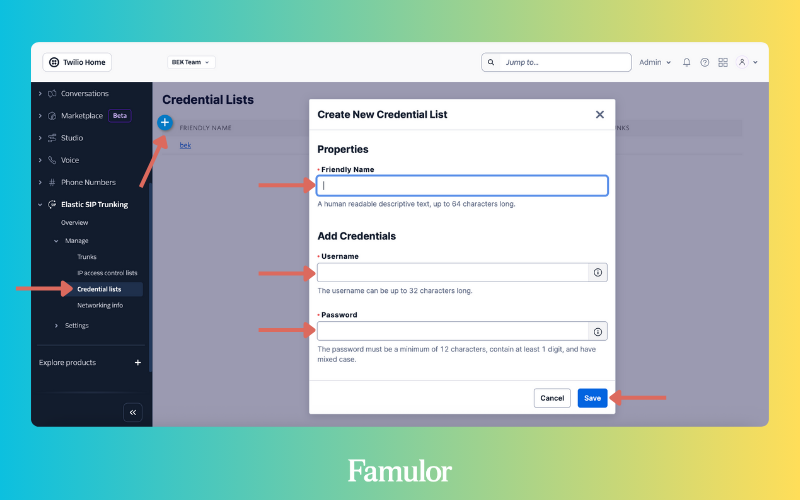
 2. Set up Termination (for outgoing calls)
* The termination SIP URI is important here, as we will use it in later steps. You should use a localized termination URI that is close to you. You can view your localized URIs in the Twilio Console.
2. Set up Termination (for outgoing calls)
* The termination SIP URI is important here, as we will use it in later steps. You should use a localized termination URI that is close to you. You can view your localized URIs in the Twilio Console.
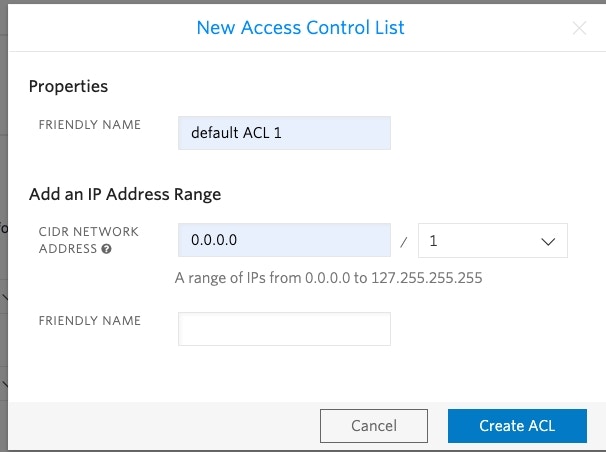
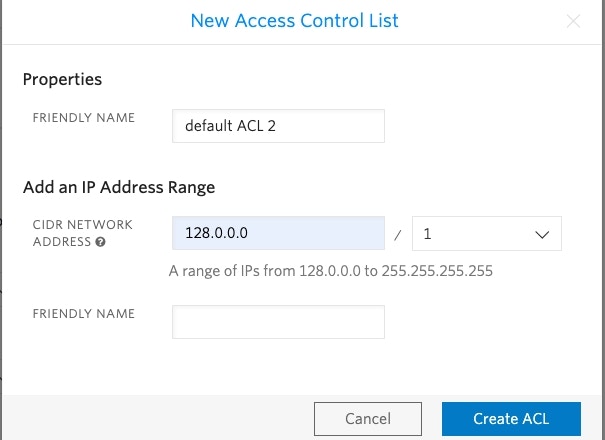
 * To have your Elastic SIP Trunk accept our outgoing requests, you need to either whitelist IP addresses or create authentication with username and password.
- Since the Famulor SIP server currently does not have a static IP, if you are using the IP route you must whitelist all IP addresses as follows:
* To have your Elastic SIP Trunk accept our outgoing requests, you need to either whitelist IP addresses or create authentication with username and password.
- Since the Famulor SIP server currently does not have a static IP, if you are using the IP route you must whitelist all IP addresses as follows:
 3. Set up Origination (for incoming calls)
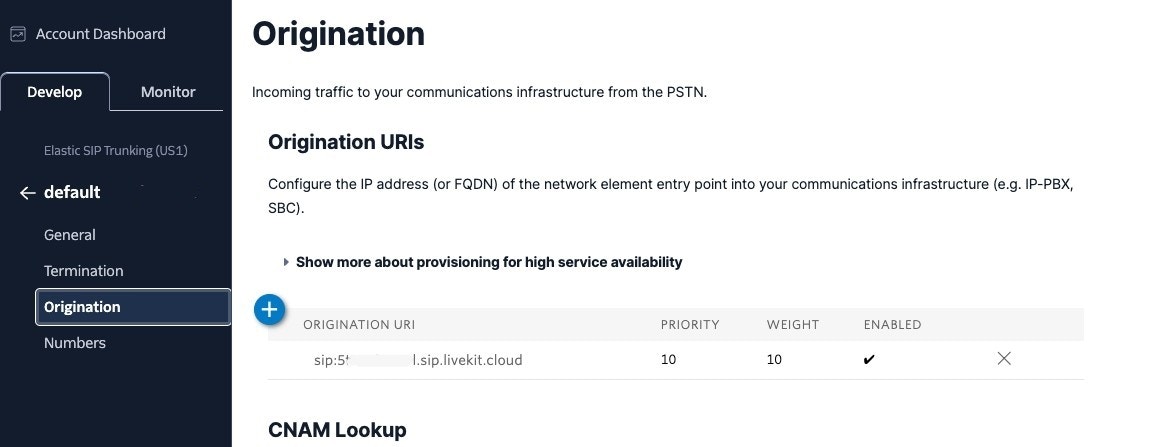
* Here you enter the Famulor SIP server address as the Origination SIP URI: `sip:XXX.sip.livekit.cloud`
3. Set up Origination (for incoming calls)
* Here you enter the Famulor SIP server address as the Origination SIP URI: `sip:XXX.sip.livekit.cloud`
 ## Step 2: Add numbers to the Elastic SIP Trunk
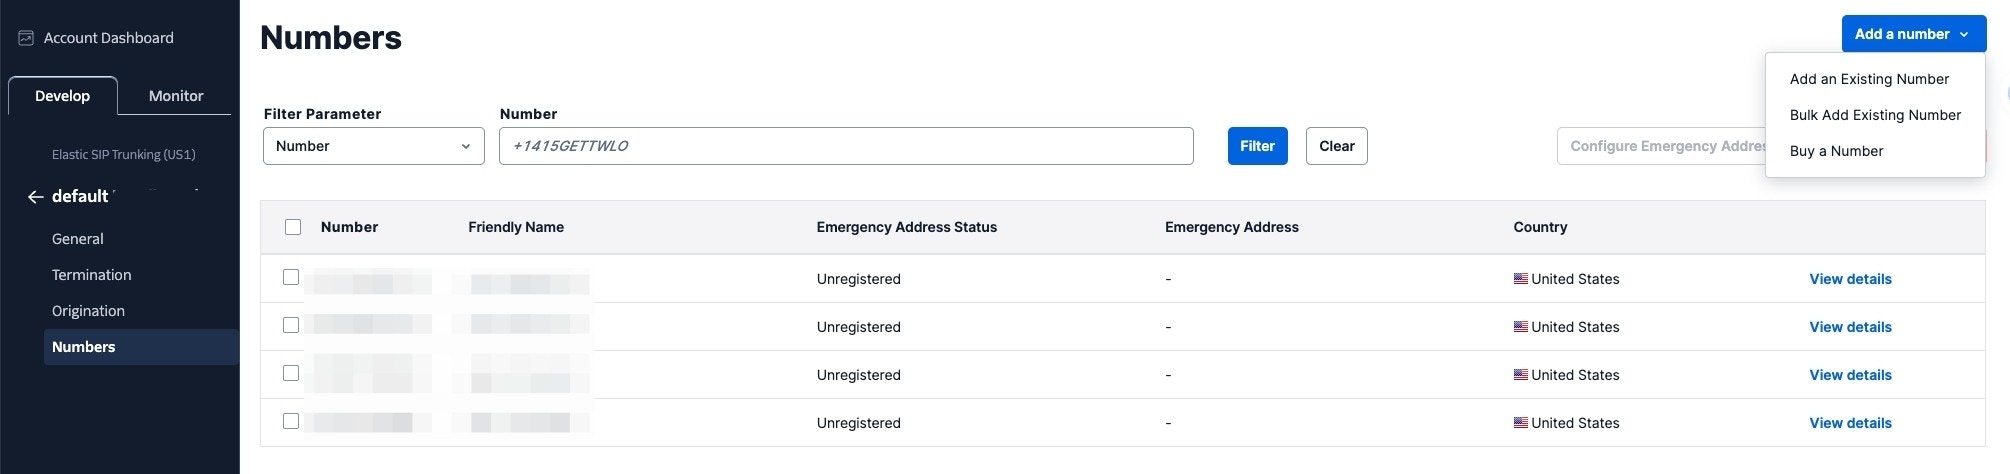
You have created the Elastic SIP Trunk. Now you need to buy numbers or add existing numbers to this trunk.
## Step 2: Add numbers to the Elastic SIP Trunk
You have created the Elastic SIP Trunk. Now you need to buy numbers or add existing numbers to this trunk.
 ## Step 3: Import numbers into Famulor
Once the number is set up with your Elastic SIP Trunking, you need to import the number into Famulor so we know how to route the call.
1. Open your Famulor.ai dashboard
2. Navigate to **Your Phone Numbers**
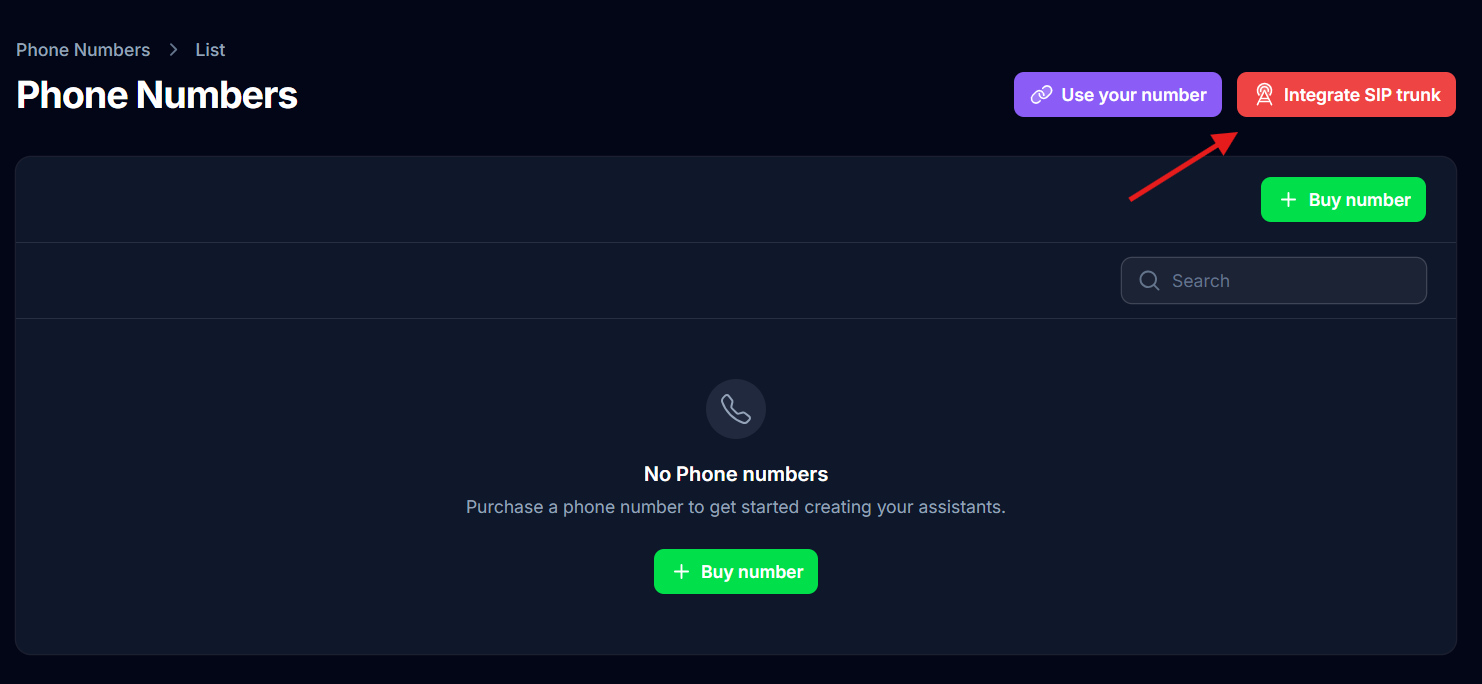
3. Click on "Integrate SIP Trunk"
## Step 3: Import numbers into Famulor
Once the number is set up with your Elastic SIP Trunking, you need to import the number into Famulor so we know how to route the call.
1. Open your Famulor.ai dashboard
2. Navigate to **Your Phone Numbers**
3. Click on "Integrate SIP Trunk"
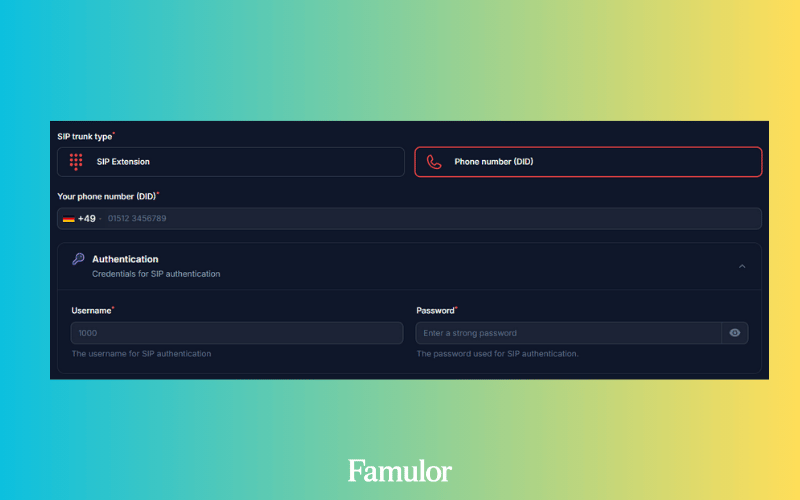
 4. Enter your data according to your integration type
```
Phone number: e.g. +49 831 555 0123
Username: Your extension username
Password: Your extension password
```
4. Enter your data according to your integration type
```
Phone number: e.g. +49 831 555 0123
Username: Your extension username
Password: Your extension password
```
 5. Here you enter the termination SIP URI you set up in step 1.
```
Server address: e.g. xxx.pstn.twilio.com
```
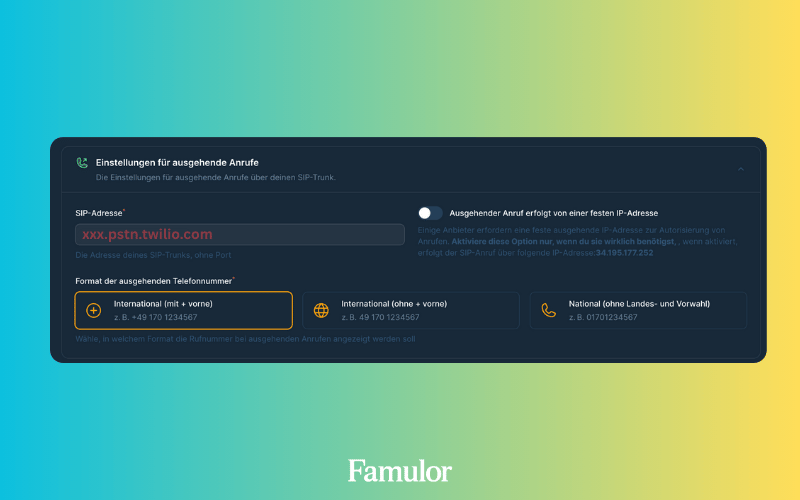
5. Here you enter the termination SIP URI you set up in step 1.
```
Server address: e.g. xxx.pstn.twilio.com
```
 6. Choose the authorization type you selected in step 2.
* If you chose the IP option, add the IPs:
```
54.244.51.0
54.244.51.1
54.244.51.2
54.244.51.3
54.172.60.0
54.172.60.1
54.172.60.2
54.172.60.3
```
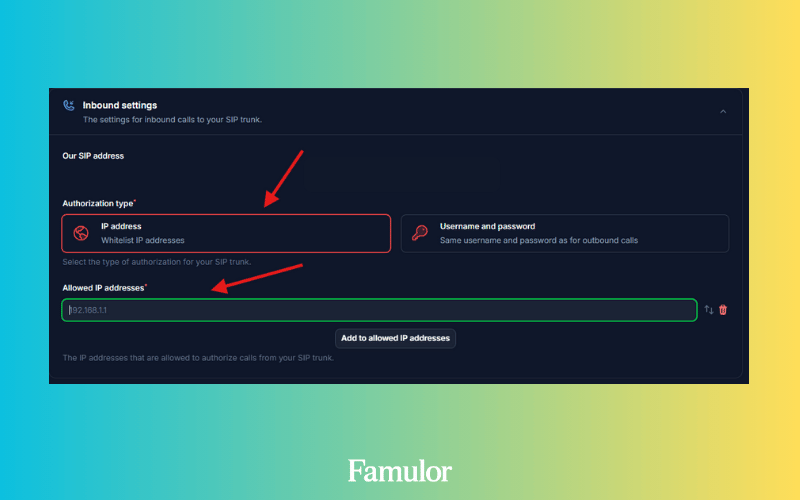
6. Choose the authorization type you selected in step 2.
* If you chose the IP option, add the IPs:
```
54.244.51.0
54.244.51.1
54.244.51.2
54.244.51.3
54.172.60.0
54.172.60.1
54.172.60.2
54.172.60.3
```
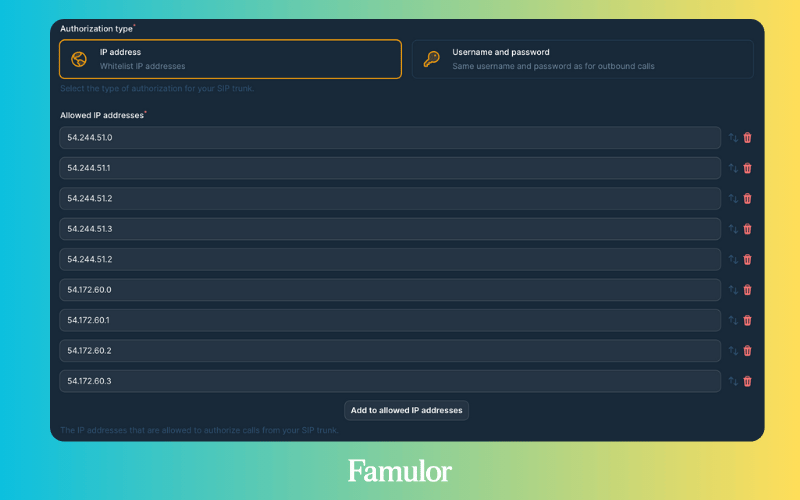 7. Select the country where your SIP Trunk is located.
 ## Step 4: Verify setup
After configuration:
1. Place a test call to your number/extension
2. Verify that the AI assistant answers
3. Use the test call feature to verify outgoing calls
## Security requirements
Your SIP credentials must be secure:
* **Username**: Your extension number or username provided by your provider
* **The password must include**:
* 12 or more characters
* Numbers
* Uppercase and lowercase letters
* Special characters recommended
## Common issues
* Check your Termination SIP URI: If it contains a space, please remove it. Also, use a localized termination URI close to your region. For more info, see this [documentation](https://www.twilio.com/docs/global-infrastructure/localized-uris/termination).
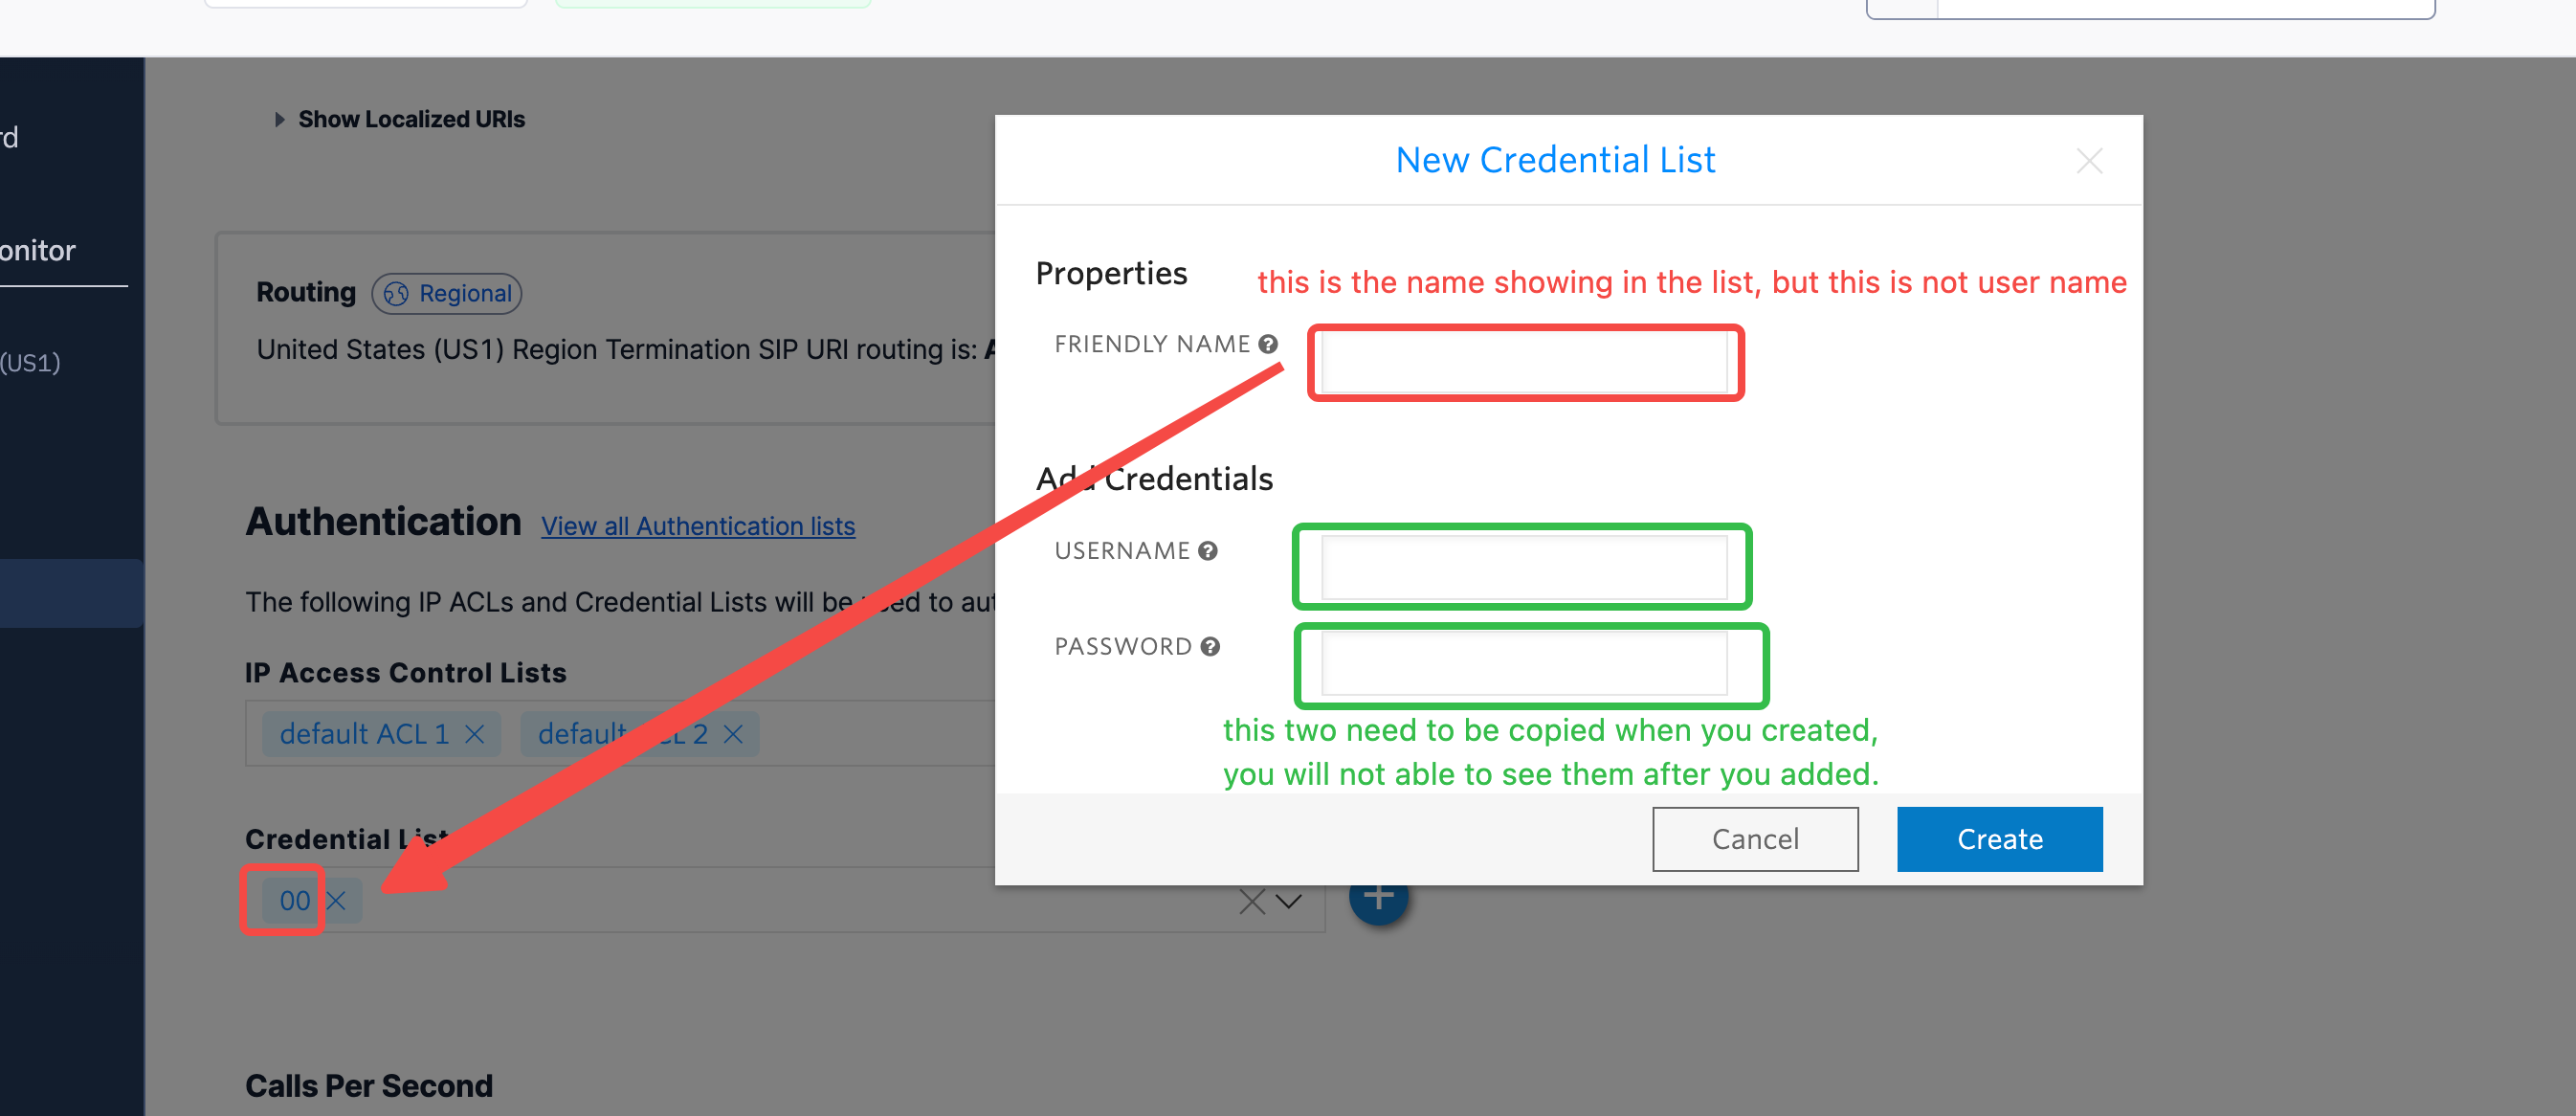
* Verify your username and credentials: Make sure you entered the correct username and credentials shown in this dialog. Note that the username is not the display name in the credentials list. The display name is different from the username — verify if you have assigned different names.
## Step 4: Verify setup
After configuration:
1. Place a test call to your number/extension
2. Verify that the AI assistant answers
3. Use the test call feature to verify outgoing calls
## Security requirements
Your SIP credentials must be secure:
* **Username**: Your extension number or username provided by your provider
* **The password must include**:
* 12 or more characters
* Numbers
* Uppercase and lowercase letters
* Special characters recommended
## Common issues
* Check your Termination SIP URI: If it contains a space, please remove it. Also, use a localized termination URI close to your region. For more info, see this [documentation](https://www.twilio.com/docs/global-infrastructure/localized-uris/termination).
* Verify your username and credentials: Make sure you entered the correct username and credentials shown in this dialog. Note that the username is not the display name in the credentials list. The display name is different from the username — verify if you have assigned different names.
 {" "}
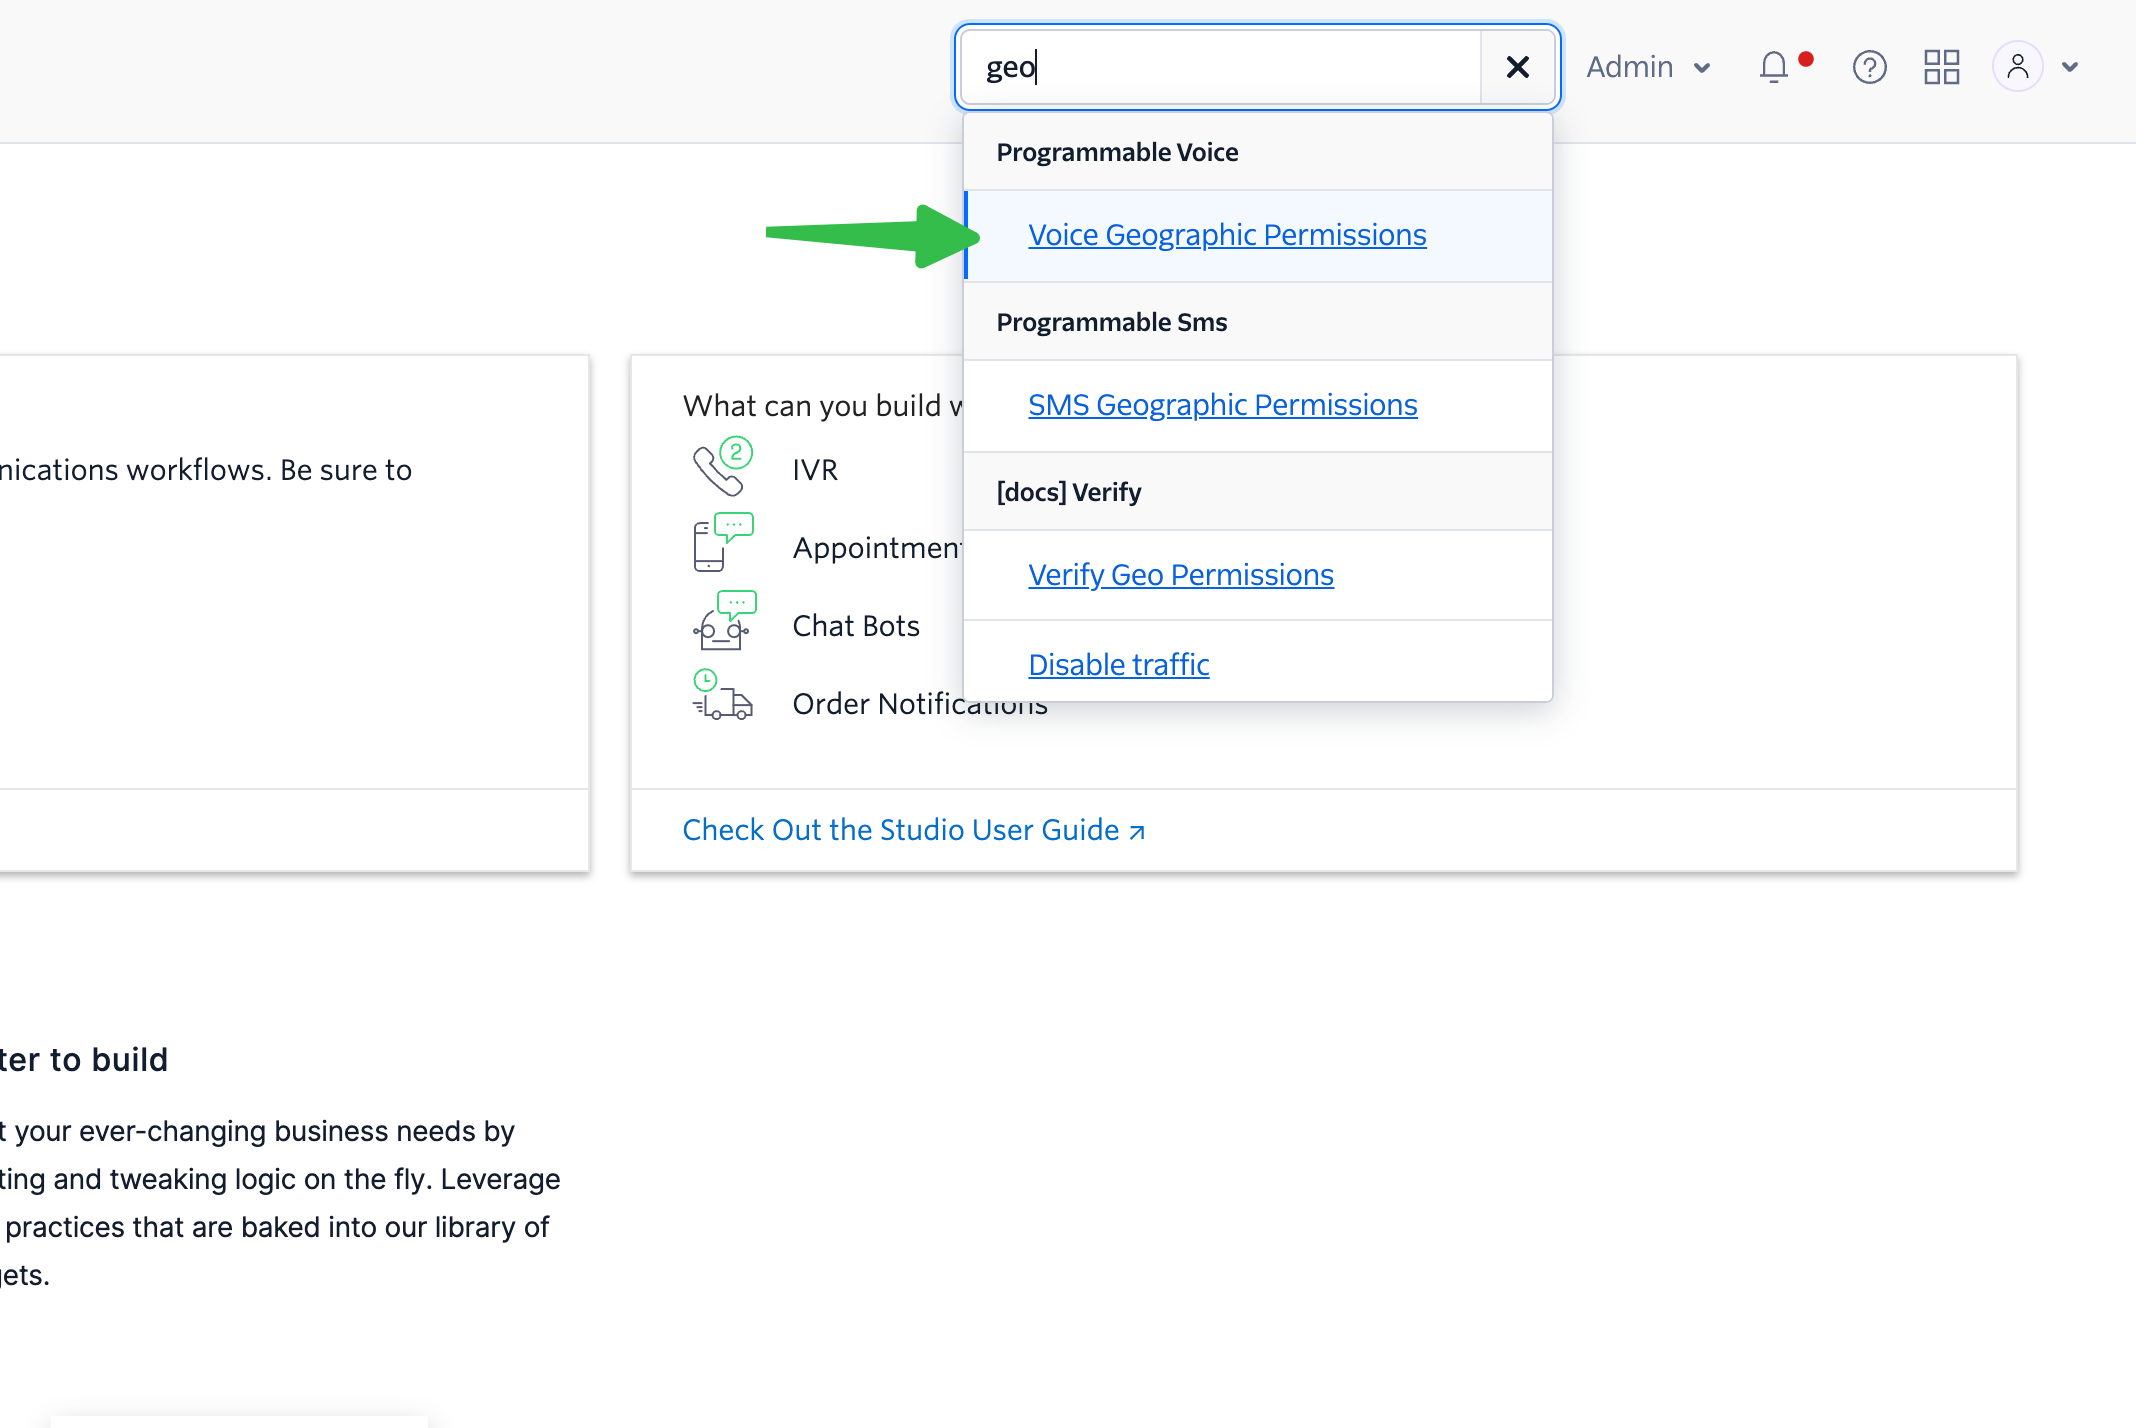
* Search for "geo" to find the "Voice Geographic Permissions" setting.
{" "}
* Search for "geo" to find the "Voice Geographic Permissions" setting.
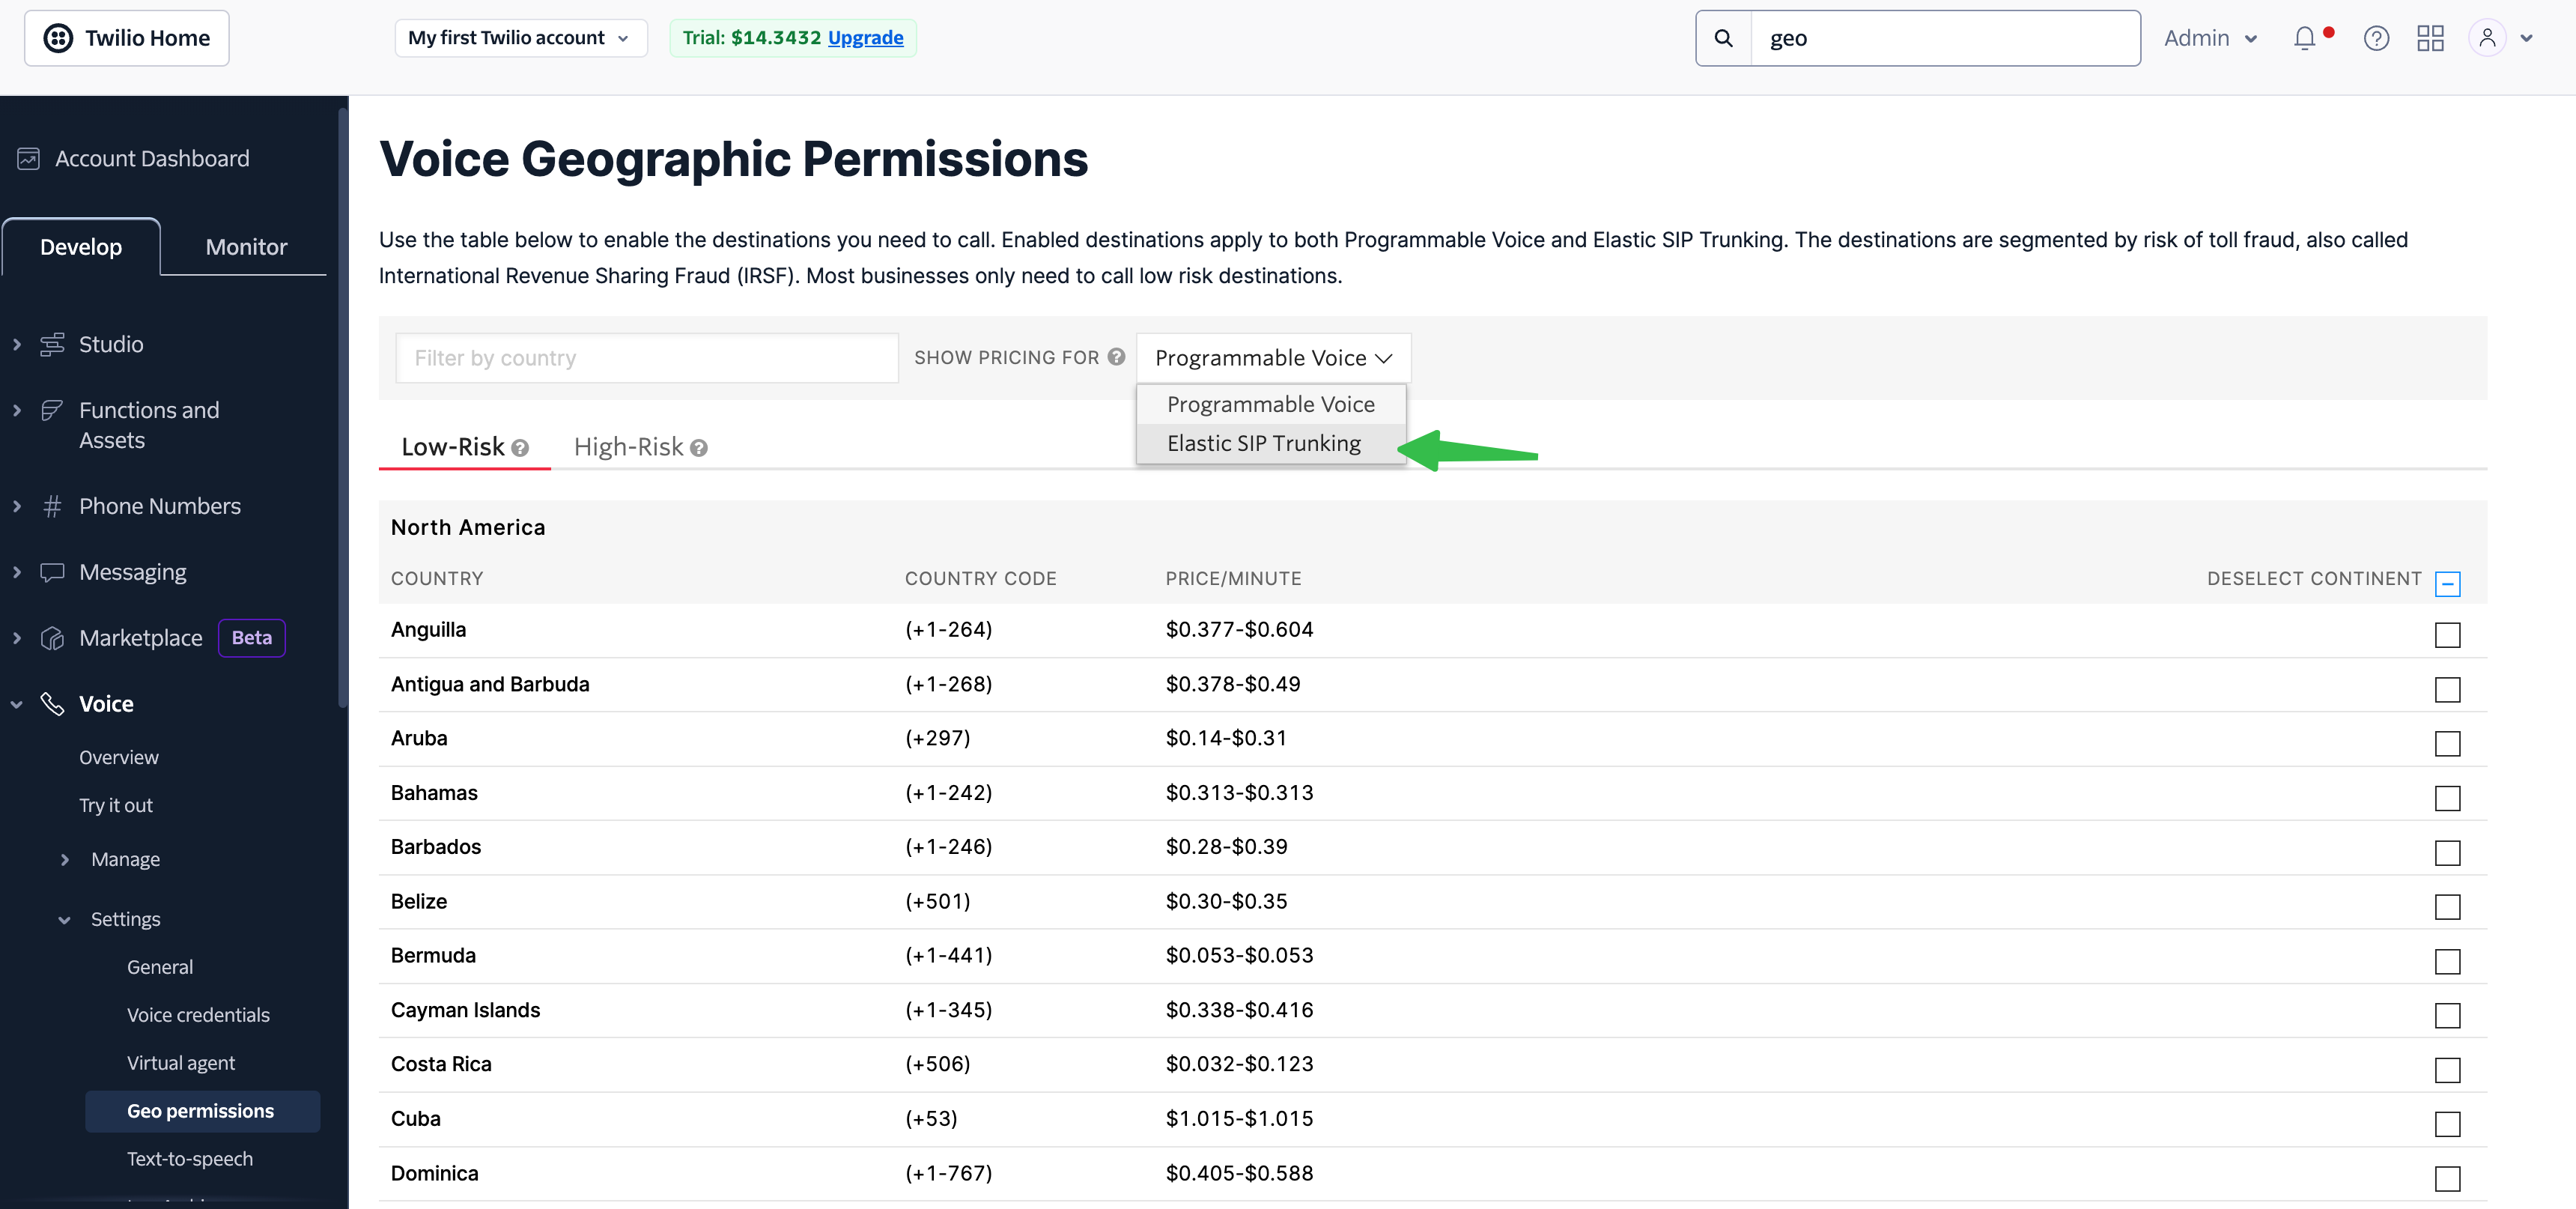
 * Select "Elastic SIP Trunking" in the dropdown menu and choose the countries you want to call.
 {" "}
***
Need help with setup? Our support team specializes in assisting customers with integrating their phone systems. We guide you through the entire process to ensure a smooth configuration with your specific telephony setup.
Related pages: [Index](/en/index) and [Support](/en/support), and [FAQ](/en/faq).
{" "}
***
Need help with setup? Our support team specializes in assisting customers with integrating their phone systems. We guide you through the entire process to ensure a smooth configuration with your specific telephony setup.
Related pages: [Index](/en/index) and [Support](/en/support), and [FAQ](/en/faq).