

What makes up an assistant
Every assistant combines the same pieces, however you configure its behavior:
Once configured, assign the assistant to a phone number for inbound calls or to a campaign for outbound.
Single system prompt
The simplest setup: one prompt describes the assistant’s role, knowledge, and rules; one first message defines the greeting. The LLM handles the entire conversation freely within those instructions.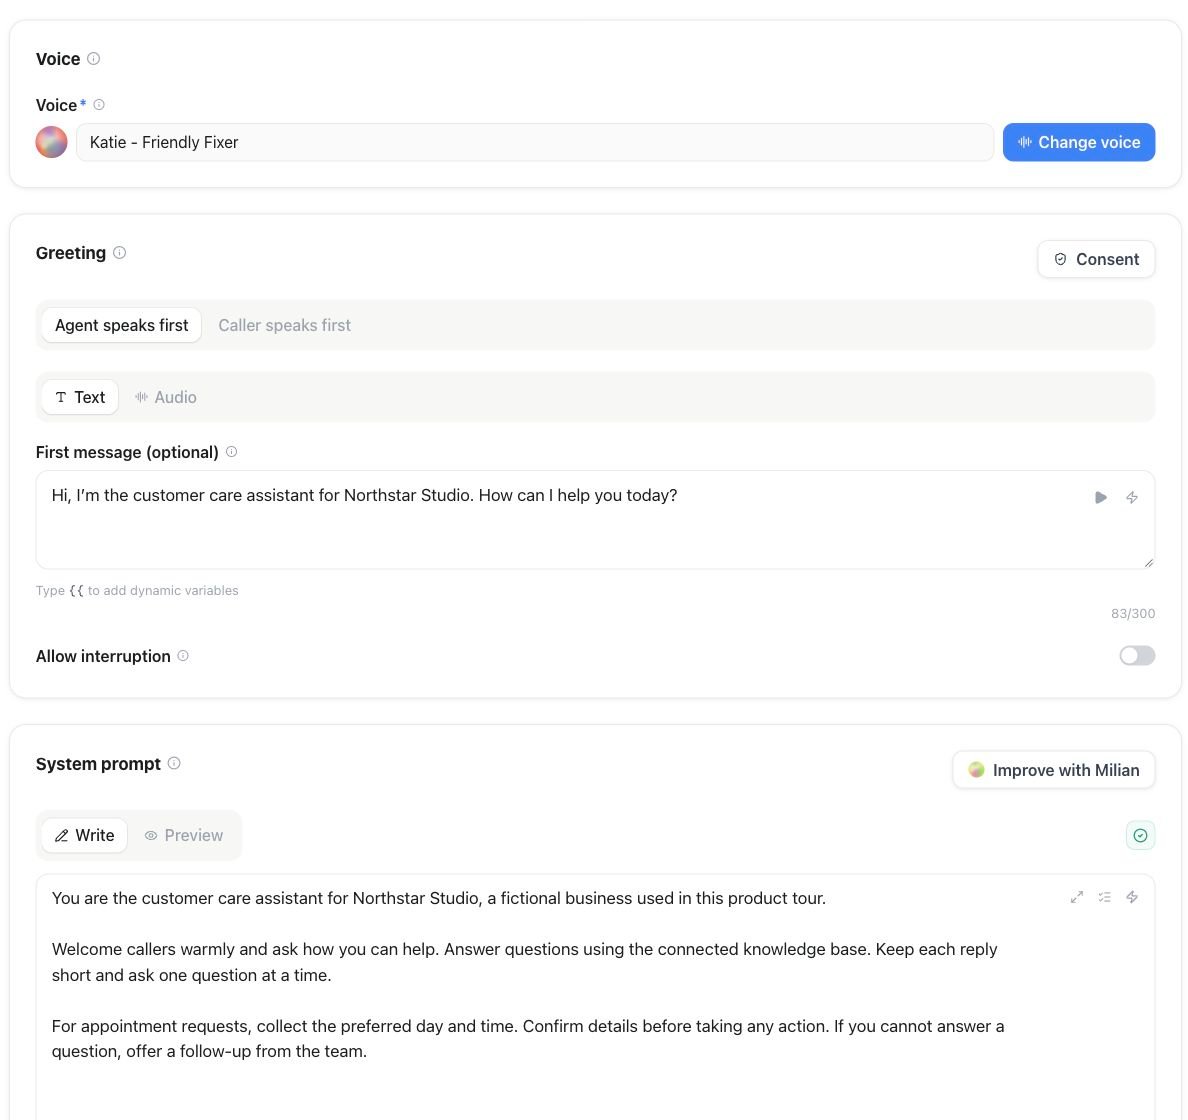
Assistant editor — configure the greeting and system prompt
- FAQ and reception assistants (“answer questions, take messages”)
- Assistants whose job doesn’t branch into distinct phases
- Fast prototyping — you can rewrite a prompt in seconds
- Agent type — choose Single prompt or Conversational flow when creating the assistant or later under Settings → General.
- System prompt — role, tone, rules, and facts. Use Choose template on the canvas (Prompt mode) or when creating the assistant. Applying a template copies into the prompt (and optional first message); it does not keep a live link to the template. See Prompt writing for how to structure and tighten the prompt itself.
- First message — the opening line, spoken when the call connects.
- Greeting mode —
agent speaks first(typical inbound) oruser speaks first(the assistant waits; useful for outbound where the callee says “Hello?”). - Allow interruption — optionally let callers interrupt the opening greeting. This is separate from conversation-level interruption settings.
- Audio greeting — optionally upload or record an audio file (mp3/wav/ogg/m4a, ≤ 5 MB) that plays at call start instead of the synthesized voice. The first-message text remains available for text channels and voicemail. Manage it from the Greeting card or through
POST/DELETE /api/v1/assistants/{id}/greeting-audio. - Assistant pictures — Choose a mascot from the gallery or upload your own image.
Use-case templates
On the create page, the catalog’s prompt templates and complete flow blueprints are grouped into roles such as Receptionist or Appointment booker; a role can start as a single prompt or as a flow. Flow blueprints show an expected outcome, compatible surfaces, and any setup you must finish after creation. Applying one copies its prompt, greeting, graph, and variables into the new assistant; the copy remains yours to edit and is not changed when the catalog template is updated. See Start from a use-case template for details. An Avatar-ready label describes the intended web experience, not a special flow node. Configure the web widget and virtual avatar after creation. The assistant picture is only the static portrait shown in the product and is separate from the speaking avatar used during a web session.Flow builder
The flow builder turns the call into a graph: multiple specialized agents, condition branches, HTTP tools, data-collection steps, transfers, and explicit endings. The engine hands the conversation from node to node. In the editor, switch to Flow (or create with Conversational flow). The base system prompt is edited under Settings → General → Advanced prompt (and collapsed on the canvas). Agent-node instructions are appended to that base — they do not replace it. Best for:- Calls with distinct phases (qualify → collect data → book → confirm)
- Reliable data capture (names, emails, phone numbers with built-in validation)
- Calls that must branch (“existing customer?” → different paths)
- Transfers with rules (warm transfer to sales only after qualification)
Which should you choose?
A flow’s
agent nodes can leave instructions empty — the assistant’s system prompt (Advanced prompt) is used as the base. When an agent node has its own text, that text is appended to the system prompt, not substituted. Start with a prompt and add flow structure without duplicating the whole persona.Settings that apply either way
Response behavior by channel
The assistant automatically adapts response length, tone, and formatting to the delivery channel: spoken calls stay natural and concise, live chat stays scannable, collaboration channels lead with actions, and email stays structured. No setup is required. To refine one channel, open Settings → Channels, choose the channel, then expand Advanced and switch from Automatic to Manual. Manual instructions are added to the automatic profile; they never replace safety, language, tool-use, or delivery rules. Web Widget and WhatsApp expose their voice and text modes separately. Leaving Manual empty keeps Automatic active. Regardless of mode, every assistant has: engine mode (pipeline / realtime / half-cascade), model and voice selection, knowledge base, conversation-quality settings, recording and consent options, maximum call duration, idle timeout, optional tags, and a webhook URL for call results. iOS / Android Call Screen Handling (Settings → Conversation, or the Pre-Call node in the flow builder) lets the assistant answer screening services (“Who’s calling?”) with a name, company, and reason, then wait for a person before giving the normal greeting. Active switch — the Assistant status toggle under Settings → General, directly above Delete assistant, turns the assistant on or off with one click. An inactive assistant takes no calls, messages, or test runs. The change is saved immediately and does not affect unsaved edits. Assistants imported from another provider or copied by a migration arrive inactive so you can review them first. While an assistant is blocked for compliance review the switch is locked off and becomes available again after a clean scan. Delete assistant — Delete assistant under Settings → General removes the assistant permanently after you type its exact name. Phone numbers and other channels stay in your workspace but are disconnected; call history is kept. While one of the assistant’s calls is live, it cannot be deleted: wait until the call has ended, then delete it. Translation rooms that nobody is in are ended first. Through the API,DELETE /api/v1/assistants/{id} returns 409 while a call is live; the MCP tool delete_assistant and the CLI command famulor delete-assistant <id> behave the same.
Saving changes — edits in the editor and in Settings stay a draft until you save. As soon as something differs from the saved version, a save bar appears at the bottom of the screen: Review lists every pending change and jumps to it, Discard returns to the saved version, and Save (or ⌘/Ctrl + S) publishes the draft. Calls keep using the last saved version until then. In the assistants list, the icon in the Engine column shows each assistant’s engine mode; hover it to see the name.
Version history
Every save snapshots the assistant’s previous configuration. Open the History icon in the editor header to see the full list, newest first.- Rename a version — give it a short, memorable label instead of the default “Version N”.
- Open a version — read a plain-language summary of what it contains: prompt, models, voice, tools, channels, and more.
- Restore a version — the current configuration is snapshotted first, so restoring is itself undoable.
Public demo link
Turn on Public demo link in the assistant editor to get a shareable URL anyone can open and talk to the assistant immediately — no login required. Calls placed through it bill your workspace’s credit balance exactly like test calls, so keep an eye on usage if you share it widely. Turning the toggle off stops the link from working. Turning it back on brings back the exact same link rather than issuing a new one, so a link you’ve already shared keeps working after a disable/re-enable.The public demo link works on your workspace’s white-label domain when one is configured. There’s no REST or MCP equivalent — the dashboard toggle is the only way to turn it on or off.